Author: Maria

  • Creamy Pasta with Meat

    Creamy Pasta with Meat

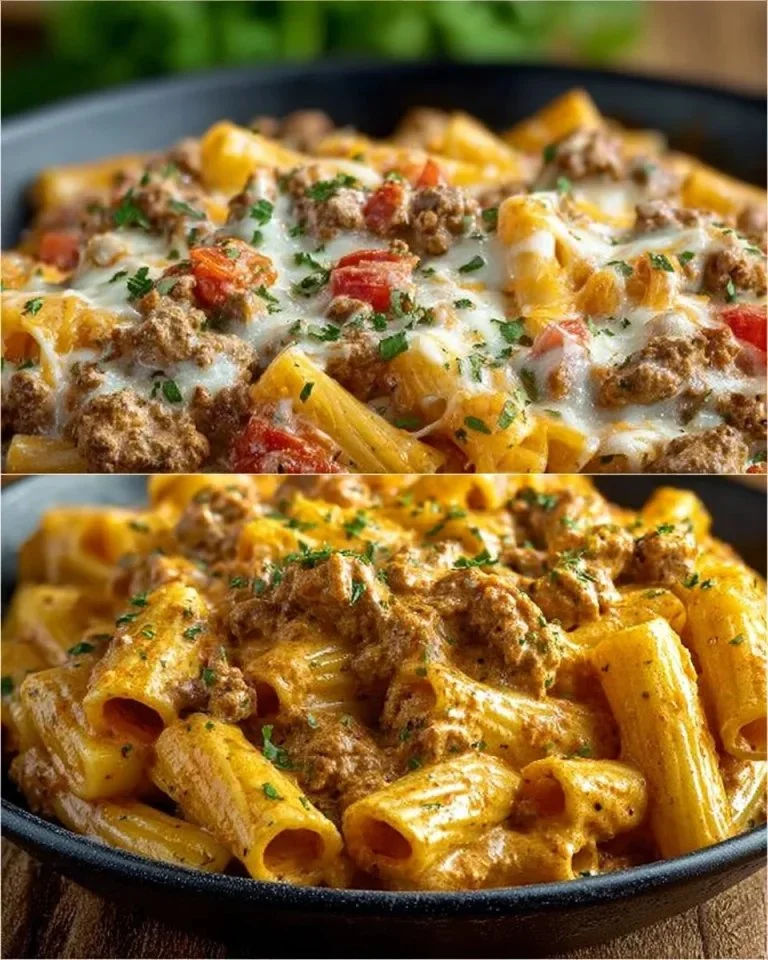
    Indulge in a comforting bowl of creamy pasta with meat that combines the heartiness of ground beef or turkey with the richness of cheese and cream. This easy recipe features rigatoni or penne pasta, coated in a velvety sauce made with diced tomatoes and spices. Perfect for weeknight dinners, it’s sure to satisfy your family and friends.

    Ingredients:

    • 12 oz rigatoni or penne pasta (340 g)
    • 1 lb ground beef or turkey (450 g)
    • 1 tablespoon olive oil (15 ml)
    • 10 oz Rotel diced tomatoes with green chilies (280 g)
    • 1 cup heavy cream or half and half (240 ml)
    • 1 cup shredded cheddar or Mexican blend cheese (100 g)
    • 1/2 teaspoon garlic powder
    • 1/2 teaspoon onion powder
    • 1 teaspoon salt
    • 1/8 teaspoon black pepper
    • Chopped parsley (optional for garnish)

    Directions:

    1. Bring a large pot of salted water to a boil. Add the rigatoni or penne pasta and cook according to package directions until al dente. Drain the pasta and set aside.
    2. Heat the olive oil in a large skillet over medium heat. Add the ground meat and cook until browned, breaking it up as it cooks. Drain excessive grease from the skillet.
    3. Stir in the can of Rotel, garlic powder, onion powder, salt, and black pepper. Simmer for 2-3 minutes, allowing the flavors to blend.
    4. Pour in the heavy cream or half and half and stir to combine. Bring the mixture to a gentle simmer, stirring occasionally to prevent sticking.
    5. Gradually add the shredded cheese a handful at a time until melted and the sauce is smooth and creamy.
    6. Add the cooked pasta to the skillet with the creamy sauce and toss until the pasta is well coated and heated through.
    7. Garnish with chopped parsley if desired and serve hot.

    How to Serve Creamy Pasta with Meat

    Serve this creamy pasta as a standalone dish or with a simple side salad for a complete meal. Garlic bread pairs wonderfully with it, offering a crunchy contrast to the creamy texture. For a refreshing touch, consider a light white wine to complement the flavors. Enjoy this comforting dish any night of the week!

  • Apple Bread

    Apple Bread

    Delicious Apple Bread Recipe

    Discover the warmth of homemade Apple Bread, a delightful treat that combines the sweetness of applesauce with aromatic spices. This moist, flavorful bread is perfect for breakfast, snacks, or as a comforting dessert. Let’s dive into this easy-to-follow recipe that will impress your family and friends!

    Ingredients:

    • 1 1/2 cups all-purpose flour (190 g)
    • 1 cup unsweetened applesauce (240 g)
    • 3/4 cup granulated sugar (150 g)
    • 1/2 cup vegetable oil (120 ml)
    • 2 large eggs
    • 1 teaspoon baking soda
    • 1/2 teaspoon baking powder
    • 1 teaspoon ground cinnamon
    • 1/4 teaspoon ground nutmeg
    • 1/4 teaspoon ground cloves
    • 1 teaspoon vanilla extract
    • 1/2 cup chopped walnuts (60 g)
    • 1/2 cup raisins (optional) (60 g)

    Directions:

    1. Preheat your oven to 350°F (180°C).
    2. Grease a 9×5 inch (23×13 cm) loaf pan.
    3. In a large bowl, whisk together the applesauce, sugar, oil, eggs, and vanilla extract until smooth.
    4. In a separate bowl, sift together the flour, baking soda, baking powder, cinnamon, nutmeg, and cloves.
    5. Gradually add the dry ingredients to the wet ingredients, mixing until just combined.
    6. Fold in the chopped walnuts and raisins if you’re using them.
    7. Pour the batter into the prepared loaf pan.
    8. Bake for 50-60 minutes, or until a toothpick inserted in the center comes out clean.
    9. Let cool in the pan for 10 minutes, then transfer to a wire rack to cool completely.
    10. To store, keep leftovers in an airtight container at room temperature for up to 3 days or in the refrigerator for up to 1 week. To freeze, wrap cooled bread in plastic wrap and aluminum foil, then freeze for up to 3 months.

    For an extra flavor boost, consider adding a pinch of ground ginger or allspice.

    How to Serve Apple Bread

    Enjoy your Apple Bread as a delightful standalone snack or warm it slightly for a cozy treat. A light spread of butter complements its sweetness beautifully, making it an excellent choice for breakfast or afternoon tea. Pair with your favorite cup of coffee or tea for a truly comforting experience. Enjoy this delicious bread with family and friends!

  • Little shoes

    Little shoes

    Satisfying Little Shoes: Eggplant Boats with Savory Meat Filling

    If you’re on the lookout for a delicious and unique dish to impress your family or friends, these Little Shoes—eggplant boats filled with a savory meat mixture—are the perfect choice. With tender eggplants, flavorful ground meat, and a creamy topping, this recipe brings together delightful Mediterranean ingredients that are sure to make your taste buds sing!

    Ingredients

    • 4 large eggplants (about 2.2 pounds or 1 kg)
    • Olive oil
    • 1 pound (450 grams) ground meat (half pork and half lean beef)
    • 1 onion, sliced (about 100 grams)
    • 2 cloves garlic, finely minced
    • 1 ⅓ cups (200 grams) canned diced tomatoes
    • 2 teaspoons tomato paste
    • A splash of red wine
    • 2 tablespoons fresh parsley, chopped
    • 1/4 teaspoon ground allspice
    • 1/3 teaspoon ground cinnamon
    • 1/2 teaspoon smoked paprika
    • 1 bay leaf
    • 2 cups (500 ml) warm milk
    • 3 tablespoons (40 grams) butter
    • 1/3 cup (40 grams) all-purpose flour
    • A pinch of nutmeg
    • 2 tablespoons Greek yogurt
    • 1/2 cup (60 grams) Gruyère or Greek Kefalotyri cheese, grated
    • 1 egg

    Directions

    1. Preheat Oven: Set your oven to 400°F (200°C).
    2. Prepare the Eggplants: Cut the tops and bottoms off the eggplants and slice them in half lengthwise to create boats. Carefully scoop out the pulp and make crisscross cuts inside the eggplant halves.
    3. Bake the Eggplant Boats: Place the eggplant boats on a baking sheet. Brush the insides with olive oil and bake for about 30 minutes, or until they are soft.
    4. Cook the Filling: In a large skillet, heat some olive oil and sauté the sliced onions until they are caramelized. Add the ground meat and minced garlic, breaking it apart as it cooks. Stir in allspice, cinnamon, smoked paprika, and tomato paste. Deglaze the pan with a splash of red wine.
    5. Add Tomatoes: Mix in the canned diced tomatoes, bay leaf, and a pinch of salt and pepper. Pour in 1 cup (250 ml) of water and let it simmer until thickened.
    6. Make the Cream Sauce: In a saucepan, melt the butter over medium heat. Add the flour and stir to combine. Gradually whisk in the warm milk and a pinch of nutmeg, cooking until the mixture thickens. Remove from heat and let it cool slightly before stirring in the egg and grated cheese.
    7. Assemble the Little Shoes: Press down the eggplant pulp in the boats and fill them with the meat sauce. Top each filled boat with the creamy sauce and sprinkle with any remaining cheese.
    8. Final Bake: Lower the oven temperature to 350°F (180°C) and bake the eggplant boats for 35-40 minutes, until they are golden and bubbling.
    9. Let Rest and Serve: Once out of the oven, let the Little Shoes rest for a few minutes. Garnish with chopped parsley before serving.

    How to Serve Little Shoes

    These hearty Little Shoes make a splendid main dish on their own, but you can enhance your meal by serving them with a fresh garden salad or some roasted vegetables on the side. For a complete Mediterranean feast, pair them with crusty bread and a glass of red wine. Enjoy your culinary creation, and watch as your guests rave about this delightful dish!

  • Vegetable and Brie Tart

    Vegetable and Brie Tart

    Looking for a delicious and impressive dish to wow your guests? This Vegetable and Brie Tart combines the earthy flavors of fresh shiitake mushrooms, Brussels sprouts, and the sweetness of caramelized onions with a creamy, gooey Brie cheese. Perfect for a cozy dinner or holiday gathering, this tart is sure to become a favorite in your recipe rotation.

    Ingredients:

    • 6 tablespoons extra virgin olive oil (about 90 ml)
    • 280 grams fresh shiitake mushrooms, stems removed and sliced (about 10 ounces)
    • Salt and pepper, to taste
    • 2 teaspoons soy sauce (about 10 ml)
    • 1 small butternut squash, peeled and cut into 15 cm cubes (about 4 cups, 450 grams)
    • 1 tablespoon honey (about 15 ml)
    • 450 grams Brussels sprouts, cleaned, halved, and thinly sliced (about 4 cups)
    • 2 large shallots, chopped (about 1 cup, 150 grams)
    • 2 cloves garlic, minced
    • 2 teaspoons fresh rosemary, chopped
    • 1 medium red onion (about 280 grams), halved and thinly sliced
    • 1 teaspoon fresh thyme leaves
    • 15 tablespoons light brown sugar (about 200 grams)
    • 1 tablespoon balsamic vinegar (about 15 ml)
    • Flour for dusting, as needed
    • 2 sheets of puff pastry (from 1 package, 480-510 grams), thawed in the refrigerator for 24 hours
    • 1 egg, beaten
    • 1 whole Brie or Camembert cheese (about 200-225 grams)

    Directions:

    1. Preheat your oven to 220 degrees Celsius (425 degrees Fahrenheit).
    2. In a large cast iron or non-stick skillet, heat 2 tablespoons of olive oil over medium-high heat. Add the shiitake mushrooms, season with salt and pepper, and cook until they are golden brown and tender (about 8-10 minutes). Transfer the cooked mushrooms to a bowl and mix in the soy sauce.
    3. Prepare the butternut squash by tossing it with 1 tablespoon of olive oil and honey. Season to taste and roast until tender, which should take about 15 minutes.
    4. In another skillet, heat another 2 tablespoons of oil and add the Brussels sprouts, shallots, garlic, and rosemary. Cook until the vegetables are tender (about 8 minutes).
    5. Combine the cooked Brussels sprouts with the roasted squash and mushrooms in the bowl.
    6. In the same skillet, caramelize the red onions with thyme using the remaining oil. Add the brown sugar, balsamic vinegar, and a splash of water, cooking until the mixture has a jam-like consistency (10-15 minutes). Let the filling cool completely before assembling the tart.
    7. Roll out the puff pastry into circles on a lightly floured surface. Place half of the vegetable mixture on one sheet of puff pastry. Add a layer of Brie cheese and some of the onion jam, then top with the rest of the vegetable mixture.
    8. Brush the edges of the pastry with the beaten egg, fold over the top pastry, and seal the edges. Brush generously with the beaten egg.
    9. Bake the tart in the preheated oven until it is golden brown, which should take about 40-45 minutes. Allow the tart to cool for 30 minutes to 1 hour before serving.

    How to Serve Vegetable and Brie Tart

    Serve your Vegetable and Brie Tart warm, perhaps alongside a light salad dressed with a lemon vinaigrette. This dish pairs beautifully with a crisp white wine or a refreshing sparkling water. Enjoy a slice as a hearty appetizer or as a delightful main course at your next meal.

  • Vegetable Garden Tart

    Vegetable Garden Tart

    Delicious Torta di Verdure dell’Orto Recipe

    If you’re searching for a savory and colorful dish to brighten your meal, look no further than Torta di Verdure dell’Orto. This delightful vegetable garden tart features fresh zucchini, yellow squash, and a burst of flavors topped with crispy bacon and cheese. It’s perfect for sharing at gatherings or enjoying on a cozy night in.

    Ingredients:

    • One 23 cm pie crust (store-bought or homemade)
    • 250 g zucchini, thinly sliced (about 2 cups)
    • 250 g yellow squash, thinly sliced (about 2 cups)
    • One red tomato, sliced
    • 80 g red onion, chopped (about 1/2 cup)
    • Four slices bacon, cooked and crispy
    • 300 g cheese, shredded (about 3 cups)
    • 45 ml mayonnaise (about 3 tablespoons)
    • One teaspoon dried basil
    • One teaspoon dried oregano

    Directions:

    1. Preheat your oven to 200°C (390°F).
    2. Cook the bacon in a pan until crispy, then set aside to drain on paper towels.
    3. In the same pan with the bacon grease, add the zucchini and yellow squash along with the chopped red onion. Sauté for 3-4 minutes until softened.
    4. In a separate bowl, combine 1 cup of shredded cheese and the mayonnaise.
    5. Remove the sautéed zucchini and squash from the pan. Create a layer in the pie crust with half of the cheese and mayonnaise mixture.
    6. Layer half of the tomato slices, sprinkle with additional cheese, and top with half of the crumbled bacon. Season with dried basil and oregano.
    7. Add the remaining zucchini, yellow squash, tomato slices, and bacon, then finish with the remaining 60 g (about 1/2 cup) of cheese on top.
    8. Place the tart in the preheated oven and bake for 30-35 minutes, or until the cheese is melted and bubbly.
    9. Let it cool slightly before serving.

    How to Serve Vegetable Garden Tart

    Torta di Verdure dell’Orto is best served warm or at room temperature. Pair this tart with a fresh salad for a delightful and well-rounded meal. You can also enjoy it as a side dish at your next family gathering or picnic. This versatile dish is not only delicious but also makes for great leftovers, maintaining its flavor for the next day! Enjoy your culinary creation and the wonderful flavors of garden-fresh vegetables.

  • Baked Zucchini and Eggplant

    Baked Zucchini and Eggplant

    Delicious Baked Zucchini and Eggplant: A Flavorful Vegetable Dish

    Looking for a healthy and tasty way to enjoy your veggies? This Baked Zucchini and Eggplant recipe is the perfect solution! With a delightful combination of fresh zucchini, eggplant, and cherry tomatoes, all baked to perfection with aromatic garlic and herbs, this dish makes a vibrant addition to any meal.

    Ingredients:

    • 3 medium zucchini (about 450 grams)
    • 1 small-medium eggplant (about 340 grams)
    • 1 container of cherry tomatoes (about 300 grams)
    • 1 tablespoon extra virgin olive oil
    • 4 cloves garlic, minced
    • 1/4 teaspoon kosher salt
    • 1/4 teaspoon black pepper
    • 70 grams grated Parmesan cheese, divided
    • 15 grams fresh basil, chopped, divided
    • 15 grams fresh parsley, chopped, divided

    Directions:

    1. Preheat your oven to 350°F (175°C). Lightly grease a 9×9 inch (23×23 cm) deep baking pan or a similar 3.5-liter casserole dish with cooking spray.

    2. Prepare the zucchini by slicing it in half lengthwise, then cutting it into about 1/2 inch (1.5 cm) thick slices. Place the sliced zucchini into a large bowl.

    3. Next, slice the eggplant into about 1/4 inch (0.5 cm) thick slices. Overlap the slices slightly and then cut them into about 1 inch (2 cm) pieces. Add the eggplant pieces to the bowl with zucchini.

    4. Halve the cherry tomatoes and toss them into the bowl as well.

    5. Drizzle the olive oil over the vegetables, then add the minced garlic, kosher salt, black pepper, 50 grams of the grated Parmesan cheese, and half of the chopped basil and parsley. Gently mix everything together until well combined.

    6. Transfer the vegetable mixture to the prepared baking pan and spread it evenly. Bake in the preheated oven for 25 minutes, then cover with aluminum foil and continue baking for an additional 10-20 minutes, or until the vegetables are tender.

    7. Once baked, sprinkle the remaining Parmesan cheese, basil, and parsley over the top. Serve warm and enjoy!

    How to Serve Baked Zucchini and Eggplant

    This Baked Zucchini and Eggplant dish can be served as a delicious main course or a hearty side. It pairs beautifully with grilled chicken, steak, or fish, making it a versatile addition to any dinner table. For a complete meal, consider serving it alongside a fresh garden salad and crusty bread. This dish not only pleases the palate but also adds a splash of color to your plate!

  • Easy Vegetable Tart

    Easy Vegetable Tart

    Delicious Easy Vegetable Tart Recipe

    Looking for a savory dish that’s both nutritious and satisfying? This Easy Vegetable Tart is packed with healthy ingredients like zucchini, carrots, and fresh herbs, making it the perfect choice for lunch or dinner. Baked to golden perfection, it’s not only a feast for the eyes but also deliciously flavorful!

    Ingredients:

    • 3 eggs, beaten (3 eggs)
    • 3 oz (80 g) ricotta or Greek yogurt
    • 3 tablespoons (45 ml) olive oil
    • 1 ½ cups (180 g) flour
    • 1/3 cup (40 g) grated Parmesan cheese
    • 2 teaspoons baking powder
    • 1 teaspoon salt
    • 1 ½ cups (300 g) grated zucchini
    • 1 ½ cups (150 g) grated carrots
    • 3 spring onions, chopped
    • 2 tablespoons fresh dill, chopped
    • 1 cup (100 g) grated mozzarella cheese

    Directions:

    1. Preheat your oven to 350°F (180°C). Line a 9×13-inch (23×33 cm) metal baking pan with parchment paper.
    2. In a large bowl, whisk together the beaten eggs, ricotta, and olive oil until smooth.
    3. Add the flour, grated Parmesan, baking powder, and salt to the mixture. Stir well to combine all ingredients thoroughly.
    4. With clean hands, fold in the grated zucchini, carrots, chopped spring onions, and fresh dill until evenly distributed in the batter.
    5. Gently incorporate the grated mozzarella cheese into the mixture.
    6. Pour the batter into the prepared baking pan and spread it evenly using a rubber spatula.
    7. Drizzle a little olive oil over the top and use a brush or your hands to spread it out evenly. Sprinkle with sesame seeds if desired.
    8. Bake in the preheated oven for 35-45 minutes, or until the surface is golden brown and a toothpick comes out clean.
    9. Once baked, let it rest in the pan for 10 minutes. Then, transfer to a wire rack to cool slightly before slicing.

    How to Serve Easy Vegetable Tart

    Serve this Easy Vegetable Tart warm or at room temperature, making it an excellent option for meals at home or picnics. Pair it with a fresh salad or a yogurt-based sauce for a refreshing contrast. This dish is not only easy to prepare but also an excellent way to incorporate vegetables into your diet. Enjoy the flavors of summer year-round!

  • Preserved Peppers in Oil

    Preserved Peppers in Oil

    Preserved Peppers in Oil: A Burst of Flavor for Your Pantry

    Looking for a way to elevate your meals with vibrant flavors? These Preserved Peppers in Oil are not only easy to make but also add color and taste to any dish. With a mix of red, green, and yellow bell peppers, combined with the rich flavor of roasted garlic and fresh thyme, this recipe is perfect for beginners and seasoned cooks alike.

    Ingredients:

    • 3 red bell peppers (450 g)
    • 3 green bell peppers (450 g)
    • 2 yellow bell peppers (300 g)
    • 6 tablespoons (75 ml) olive oil
    • 1 head of garlic
    • 1 sprig fresh thyme
    • 1 teaspoon red pepper flakes (flakes de pimiento rojo)
    • ½ teaspoon black pepper (pimienta negra)
    • ½ teaspoon sea salt flakes (sal marina)

    Directions:

    1. Preheat your oven to 375°F (190°C). Cut the bell peppers in half and arrange them cut-side down on a baking sheet.
    2. Bake the peppers in the moderate oven for 20 minutes until they are slightly charred and blackened.
    3. Once done, remove the peppers from the oven and cover them with plastic wrap, allowing them to cool until you can handle them comfortably.
    4. Peel off the skin from the peppers, cut them into long thin strips, and discard any seeds and unusable parts.
    5. Wrap the whole head of garlic in aluminum foil and roast it in the oven for 20-30 minutes until soft.
    6. After roasting, squeeze out the soft garlic and discard the skin.
    7. In a bowl, mix the olive oil with salt, black pepper, and red pepper flakes.
    8. In a sterile jar, layer the colorful pepper strips with roasted garlic and a few thyme leaves. Drizzle some of the flavored oil between each layer.
    9. Continue layering the jar until filled, ensuring the peppers and garlic are well covered by the oil. Use a plastic stick to release any air bubbles trapped in the jar.
    10. Seal the jar and store it in the refrigerator.

    How to Serve Preserved Peppers in Oil

    These Preserved Peppers in Oil make an excellent addition to salads, sandwiches, or pastas. They can also be enjoyed simply on toasted bread as a delicious appetizer. For an elevated dish, try pairing them with grilled meats or using them as a vibrant topping for pizza. With their robust flavors, your meals will never be dull again!

    Enjoy this delightful recipe and savor the taste of summer year-round!

  • Oreo Cheesecake

    Oreo Cheesecake

    Indulgent Oreo Cheesecake Recipe

    Are you ready to satisfy your sweet tooth? This decadent Oreo Cheesecake combines the rich creaminess of cream cheese with the delightful crunch of Oreo cookies. Perfect for any occasion, this simple yet elegant dessert is sure to impress your friends and family!

    Ingredients:

    • 150 g (about 1 ½ cups) Oreo crumbs
    • 30 g (2 tablespoons) melted butter
    • 680 g (24 ounces) cream cheese, softened
    • 200 g (1 cup) sugar
    • 5 large eggs
    • 2 teaspoons vanilla extract
    • 1/4 teaspoon salt
    • 30 g (1/4 cup) all-purpose flour
    • 230 g (1 cup) sour cream
    • 15 Oreos, coarsely crushed, for topping

    Directions:

    1. Preheat your oven to 320°F (160°C) and lightly butter a 9-inch (23 cm) springform pan.
    2. In a mixing bowl, combine Oreo crumbs with melted butter. Press this mixture firmly into the bottom and about 1 ½ inches (4 cm) up the sides of the prepared pan.
    3. Beat the cream cheese on low speed until light and fluffy. Gradually add the sugar, mixing until well combined.
    4. Add the eggs one at a time, beating just until incorporated for each. Be careful not to overmix.
    5. Stir in the vanilla extract, salt, and flour, mixing until smooth. Finally, add the sour cream and mix until just combined—again, avoid overmixing. Gently fold in less than half of the crushed Oreos.
    6. Pour the cheesecake batter into the springform pan and sprinkle the remaining crushed Oreos on top.
    7. Bake on the upper rack of the preheated oven for 1 hour, or until the center jiggles slightly. If it jiggles excessively, bake for an additional 15 minutes.
    8. Turn off the oven and leave the door slightly ajar. Allow the cheesecake to sit in the oven for another hour before transferring it to a wire rack to cool completely.
    9. Once cooled, cover the cheesecake and refrigerate for at least 24 hours before serving.
    10. When ready to serve, cut into slices and consider garnishing with whipped cream or melted chocolate for an extra touch.

    How to Serve Oreo Cheesecake

    This Oreo Cheesecake is best served chilled, and it pairs wonderfully with a dollop of whipped cream or a drizzle of melted chocolate for added flavor. For a deliciously indulgent experience, enjoy it alongside a cup of coffee or a glass of cold milk. Whether it’s for a birthday, holiday, or just a special treat, this cheesecake is bound to be a hit!

  • Zucchini and Feta Cake

    Zucchini and Feta Cake

    Zucchini and Feta Cake: A Savory Delight

    Looking for a delicious and healthy dish that combines the goodness of zucchini with the creamy flavor of feta? This Zucchini and Feta Cake is baked to perfection, making it a wonderful option for lunch or as a side dish at dinner. With fresh ingredients and a simple preparation, this savory cake is sure to impress everyone at your table.

    Ingredients

    • 2 medium zucchini, coarsely grated (about 300 g)
    • 3 scallions, chopped (about 50 g)
    • 80 g fresh mint, chopped (about 3 cups packed)
    • 80 ml olive oil (about 1/3 cup)
    • 115 g Greek yogurt (about 1/2 cup)
    • 2 eggs, lightly beaten
    • 200 g feta cheese, crumbled (about 7 oz)
    • Zest of 1/2 lemon
    • 1 teaspoon baking powder
    • Salt and pepper to taste
    • 90 g almond flour or regular flour, oat flour, or gluten-free flour (about 3/4 cup)

    Directions

    1. Preheat your oven to 350°F (180°C). Lightly oil a 9×13 inch (23×33 cm) baking pan or line it with parchment paper.
    2. Squeeze all the water out of your grated zucchini using a clean cotton cloth to prevent the cake from becoming soggy.
    3. In a large bowl, mix the grated zucchini, scallions, fresh mint, olive oil, Greek yogurt, beaten eggs, crumbled feta cheese, lemon zest, baking powder, and salt and pepper to taste.
    4. Gradually add the flour to the mixture, mixing well until everything is combined and smooth.
    5. Transfer the mixture to the prepared baking pan and level it out evenly.
    6. Bake for 50-55 minutes, or until the cake is set and lightly golden. If the surface isn’t golden brown, turn on the grill (broiler) for a few minutes for a perfect finish.
    7. Remove from the oven and let the cake cool in the pan for 10 minutes before slicing.

    How to Serve Zucchini and Feta Cake

    Serve your Zucchini and Feta Cake warm or at room temperature. This savory treat pairs wonderfully with a fresh salad, a dollop of Greek yogurt, or a drizzle of olive oil. Enjoy it as a light lunch or as a flavorful side dish at your next gathering. This cake not only looks impressive but also packs a nutritious punch, making it a must-try for any home cook!