Author: Maria

  • Brownie Bombs

    Brownie Bombs

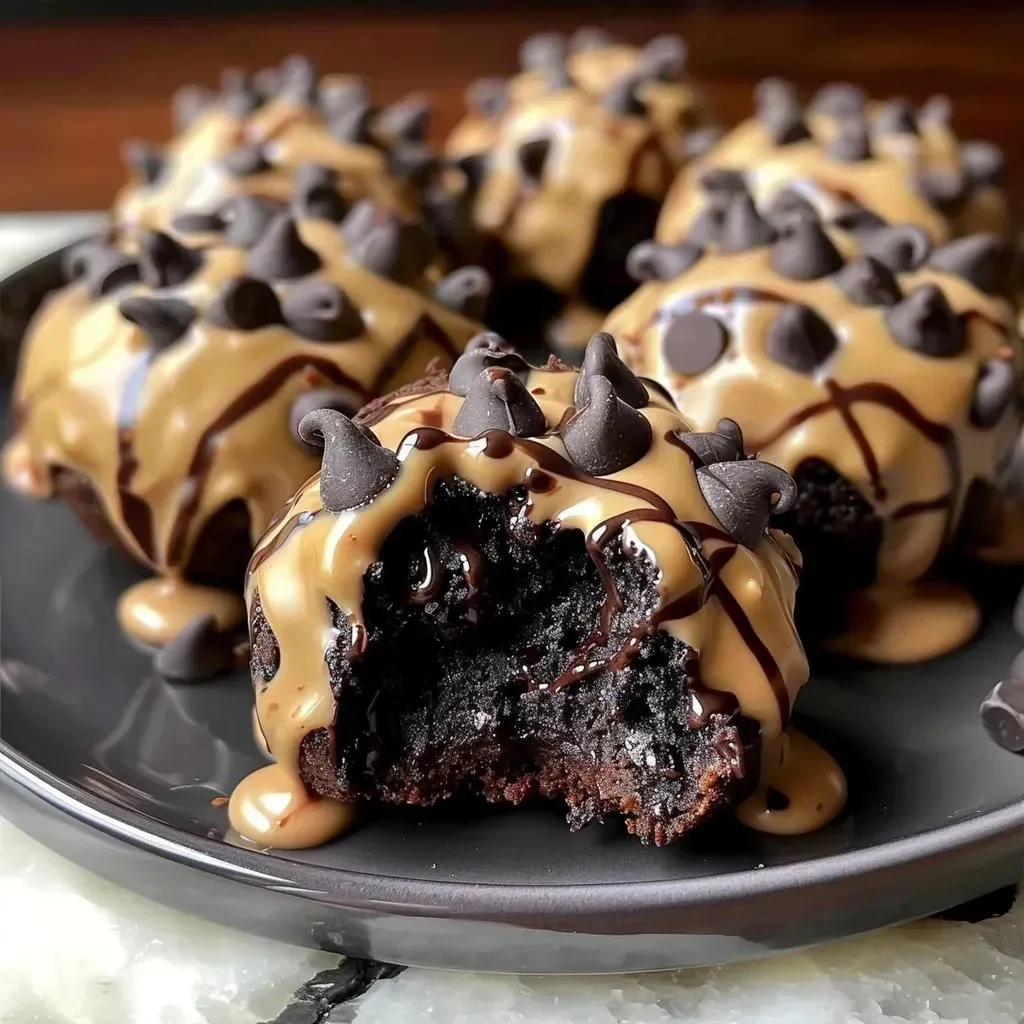
    Brownie Bombs are a delicious and indulgent treat that combines the rich, fudgy goodness of brownies with the sweet and chewy delight of cookie dough. These bite-sized treats are perfect for gatherings, parties, or just a sweet snack at home. If you love brownies and cookies, you will definitely adore Brownie Bombs.

    Why make this recipe

    There are many reasons to make Brownie Bombs. First, they are incredibly easy to prepare, especially when using a pre-made brownie mix. This recipe offers flexibility for creativity. You can customize them with your favorite flavors and toppings. They are also an impressive dessert to serve to friends and family. Everyone will be amazed by how delicious they are! Plus, they are bite-sized, making them perfect for any occasion. Whether it’s a birthday party, holiday gathering, or a cozy movie night, Brownie Bombs add a fun and tasty touch.

    Another great reason to make Brownie Bombs is that they can be made ahead of time. You can prepare them a day or two in advance and then store them in the fridge until you’re ready to serve. They are just as tasty chilled or at room temperature.

    How to make Brownie Bombs

    Making Brownie Bombs involves simple steps. You will prepare the brownies first and let them cool. Next, you will create the soft cookie dough and shape it into balls. Then, you will assemble the Brownie Bombs by wrapping the brownie around the cookie dough. Finally, you will coat them in chocolate and let them set. Follow these easy directions to create these spectacular treats!

    Ingredients:

    1 box brownie mix (15.5 oz/440 g),
    Unsalted butter (room temperature, ½ cup or 113 g),
    Brown sugar (½ cup or 100 g),
    Granulated sugar (¼ cup or 50 g),
    Whole milk (2 tablespoons or 30 ml),
    Pure vanilla extract (1 teaspoon or 5 ml),
    All-purpose flour (½ cup or 63 g),
    Mini chocolate chips (½ cup or 90 g),
    Chocolate candy melts (1 cup or 170 g),
    Sprinkles (optional)

    Directions:

    1. Prepare the brownies by baking the brownie mix according to package instructions until just set. Cool thoroughly on a rack.
    2. Make the cookie dough by creaming softened butter with brown and granulated sugars until fluffy. Mix in milk and vanilla; then gradually add flour until you have a soft dough. Gently fold in mini chocolate chips.
    3. Shape the cookie dough by scooping about one tablespoon of dough per ball, rolling them into even balls, and chilling briefly.
    4. Assemble the brownie bombs by slicing cooled brownies into squares, placing a dough ball in the center, gently pressing and folding the brownie around it, and pinching to seal.
    5. Coat in chocolate by melting candy melts until smooth, then using two forks to lower each brownie bomb into the chocolate, coating it entirely. Let excess drip off and place on a parchment-lined tray.
    6. Decorate and set by scattering sprinkles over the chocolate before it sets, then refrigerate until the chocolate is fully firm.
    7. Store brownie bombs in an airtight container in the fridge for up to five days or freeze them between parchment sheets.
    8. Serving suggestions: Stack on a tiered cake stand or place in paper candy cups; serve chilled or at room temperature.

    How to serve Brownie Bombs

    Serving Brownie Bombs is easy and fun! You can place them on a decorative plate or a tiered cake stand to create an impressive display. If you want to take it a step further, consider serving them in colorful paper candy cups. This adds a pop of color and makes for easy serving.

    Brownie Bombs can be enjoyed chilled straight from the refrigerator. They are also delightful at room temperature, allowing the chocolate coating to soften just a bit. Offer them as a dessert option alongside coffee or tea for a sweet end to any meal. Guests can easily pick one up and enjoy it without any need for cutlery!

    How to store Brownie Bombs

    To keep your Brownie Bombs fresh, store them in an airtight container. Place a piece of parchment paper between layers of Brownie Bombs to prevent them from sticking together. They can be stored in the refrigerator for up to five days. If you want to store them for a longer period, you can freeze the Brownie Bombs. Just layer them between sheets of parchment paper in an airtight container and store them in the freezer. They will stay delicious for up to two months. When you’re ready to enjoy them, let them thaw in the refrigerator overnight.

    Tips to make Brownie Bombs

    • Use high-quality chocolate chips for the cookie dough. This can elevate the flavor of your Brownie Bombs.
    • Be sure to let your brownies cool completely before wrapping them around the cookie dough. This helps maintain the texture and allows for easier assembly.
    • Don’t worry if your brownie starts to crack when wrapping the dough. Just gently press and pinch the brownie around the cookie dough ball until sealed.
    • Experiment with toppings! You can drizzle melted chocolate over the top or use different colored sprinkles for a fun touch.
    • Always save some cookie dough to eat as is! It’s delicious!

    Variation (if any)

    Feel free to experiment with this recipe! Instead of using mini chocolate chips, you can add other mix-ins like nuts, caramel bits, or even crushed candy bars. If you want a different flavor entirely, consider using a cake mix instead of brownie mix. This can create a variety of flavors while maintaining the same fun concept. You might enjoy making red velvet Brownie Bombs or even a peanut butter fudge version.

    FAQs

    Q: Can I make these Brownie Bombs ahead of time?
    A: Yes! Brownie Bombs can be made a day or two ahead of time. Store them in the fridge until you are ready to serve.

    Q: What is the best way to melt chocolate candy melts?
    A: The best way to melt chocolate is to use a microwave. Heat the chocolate candy melts in a microwave-safe bowl in 20-second increments, stirring in between until completely melted.

    Q: Can I freeze Brownie Bombs?
    A: Yes, you can freeze Brownie Bombs. Layer them between parchment paper in an airtight container to avoid sticking.

    Q: How can I make these Brownie Bombs more festive?
    A: You can use colored sprinkles, holiday-shaped cookie cutters for the brownie pieces, or even a drizzle of colored candy melts for decoration.

    Q: Can I make these Brownie Bombs gluten-free?
    A: Yes, simply use a gluten-free brownie mix and substitute the all-purpose flour with a gluten-free flour blend.

    Nutritional Information

    Per Brownie Bomb (1 piece, approx.):
    Calories: 180
    Total Fat: 8g
    Saturated Fat: 4g
    Trans Fat: 0g
    Cholesterol: 20mg
    Sodium: 30mg
    Total Carbohydrates: 26g
    Dietary Fiber: 1g
    Sugars: 15g
    Protein: 2g

    Now you are ready to indulge in the delightful world of Brownie Bombs! Enjoy making and sharing these sweet bites with your family and friends.

  • Cheesy Beef Braid

    Cheesy Beef Braid

    Cheesy Beef Braid is a delightful recipe that brings together rich, savory flavors in a fun and visually appealing way. This dish features seasoned ground beef, melted cheese, and pizza sauce, all wrapped in a golden, flaky bread braid. Perfect for family dinners, game days, or casual gatherings, this recipe is sure to impress everyone at the table. Whether you are an experienced cook or a beginner looking to try something new, Cheesy Beef Braid is easy to make and utterly delicious.

    Why make this recipe

    Making Cheesy Beef Braid is a fantastic choice for several reasons. First, it’s a complete meal in one dish. The combination of protein from the ground beef, the richness of the cheese, and the carbs from the pizza dough makes it satisfying. Second, it is incredibly versatile. You can customize the fillings to suit your preferences, from adding vegetables to using different cheeses. Third, it is perfect for meal prep! You can make it ahead of time and reheat it, saving time on busy nights. Lastly, this dish is fun to serve. Its braided presentation makes it look special, and it’s something everyone will enjoy sharing.

    How to make Cheesy Beef Braid

    Preparing Cheesy Beef Braid is straightforward. It requires simple ingredients and minimal preparation, making it suitable for any cook. Follow these steps to create a masterpiece that everyone will love!

    Ingredients:

    • 1 pound (450 grams) lean ground beef
    • 1 teaspoon (1 gram) dried oregano
    • 1 teaspoon (3 grams) garlic powder
    • 1 teaspoon (6 grams) kosher salt
    • 1 cup (240 milliliters) pizza sauce, divided
    • 1 pound (450 grams) refrigerated pizza dough
    • 4 ounces (115 grams) provolone cheese, sliced
    • 3 ounces (85 grams) thin sliced pepperoni
    • 1 cup (120 grams) mozzarella cheese, shredded
    • 2 tablespoons (30 milliliters) butter, melted
    • 2 tablespoons (20 grams) Parmesan cheese, grated

    Directions:

    1. Heat a large nonstick skillet over medium heat. Add the ground beef, dried oregano, garlic powder, and kosher salt. Break up the beef with a spatula and cook until there is no pink visible and the meat is caramelized. Drain any excess fat from the pan.

    2. Allow the beef mixture to cool for a few minutes, then stir in one-third cup of pizza sauce for flavor and moisture.

    3. Preheat your oven to 375°F (190°C). While the oven is heating, lay out the refrigerated pizza dough on a rimmed baking sheet lined with parchment paper.

    4. Spoon half a cup of pizza sauce down the center of the dough. Layer on the slices of provolone cheese, followed by the pepperoni, the seasoned ground beef, and the shredded mozzarella cheese.

    5. Using a sharp knife or a pizza cutter, cut diagonal strips along the sides of the dough, about 1 inch (2.5 cm) wide, toward the center.

    6. Gently lift the strips of dough and alternate folding them over the filling, creating a braid-like effect. Start from one side, fold over, and then do the same on the other side, repeating until the filling is covered.

    7. In a small bowl, mix the melted butter with the grated Parmesan cheese and the remaining dried oregano. Brush this mixture over the braided dough to add flavor and shine.

    8. Bake in the preheated oven for about 25-30 minutes or until the dough is golden brown and the cheese is bubbling. Allow the Cheesy Beef Braid to rest for about 5 minutes before slicing.

    9. While it cools, heat some extra pizza sauce in a small saucepan to serve alongside the braid.

    How to serve Cheesy Beef Braid

    Serving Cheesy Beef Braid is a delightful experience. Cut the braid into generous slices and present it on a large platter. Serve it warm with the extra pizza sauce on the side for dipping. This dish pairs wonderfully with a fresh salad or some sautéed vegetables, adding color and crunch to the meal. You can also enhance your presentation with fresh herbs, like parsley or basil, sprinkled on top.

    How to store Cheesy Beef Braid

    If you have leftovers, storing Cheesy Beef Braid is simple. Allow it to cool completely before wrapping it tightly in plastic wrap or placing it in an airtight container. It can be stored in the refrigerator for up to 3 days. For longer storage, you can freeze individual slices or the whole braid. Wrap it well in aluminum foil and place it in a freezer-safe bag. It can be frozen for up to three months. To reheat, simply thaw in the refrigerator overnight and re-bake at 350°F (175°C) until heated through.

    Tips to make Cheesy Beef Braid

    Here are some handy tips for making the best Cheesy Beef Braid:

    1. Use fresh ingredients: Freshly grated cheese and homemade or high-quality pizza sauce can elevate the flavor significantly.

    2. Add vegetables: Incorporate ingredients like bell peppers, onions, or mushrooms into the beef mixture for additional flavor and nutrition.

    3. Different meats: You can substitute ground beef with ground turkey or chicken for a leaner option.

    4. Herb variations: Experiment with different herbs and spices in your beef mixture to customize flavors to your liking.

    5. Dough alternatives: If you want to make it healthier, try using whole wheat pizza dough or a gluten-free dough.

    Variation (if any)

    Cheesy Beef Braid is very adaptable. You can easily change the ingredients based on what you have at home or your taste preferences. For a vegetarian version, consider replacing the beef with sautéed mushrooms, spinach, and cheese for a delicious alternative. You can also switch cheeses, using cheddar or pepper jack for a different flavor profile. Adding spices such as crushed red pepper flakes can add a little heat.

    FAQs

    Can I make Cheesy Beef Braid ahead of time?
    Yes, you can prepare the filling and braid it ahead of time. Store it in the fridge until you are ready to bake.

    Can I freeze Cheesy Beef Braid?
    Absolutely! This dish freezes well. Ensure it is wrapped tightly, and reheat from frozen.

    What should I serve with Cheesy Beef Braid?
    It pairs well with a simple salad, garlic bread, or a side of fresh vegetables and dip.

    Can I use homemade pizza dough?
    Yes, homemade pizza dough works great and can add extra flavor to your braid.

    How long does it take to bake Cheesy Beef Braid?
    Bake for about 25-30 minutes at 375°F (190°C) or until the dough is golden brown.

    Nutritional Information

    • Serving Size: 1 slice (1/8 of a braid)
    • Calories: 320
    • Protein: 18g
    • Fat: 18g
    • Carbohydrates: 25g
    • Fiber: 1g
    • Sugar: 2g
    • Sodium: 600mg

    Making Cheesy Beef Braid is a fun and rewarding cooking project that results in a delicious centerpiece for any table. With its cheesy, savory filling wrapped in flaky dough, it promises to be a hit at your next meal. Enjoy your cooking and the wonderful flavors of this tasty braid!

  • Strawberry Cheesecake Rolls

    Strawberry Cheesecake Rolls

    Strawberry Cheesecake Rolls are a delightful dessert that brings together the rich, creamy taste of cheesecake with the fresh, vibrant flavor of strawberries. These rolls are not only visually stunning but also incredibly easy to make. Perfect for parties, holiday celebrations, or just a sweet treat at home, they will certainly impress your family and friends. The combination of cream cheese, whipped cream, and fresh strawberries wrapped in a soft crepe creates a heavenly bite that satisfies your sweet tooth.

    Why make this recipe

    Making Strawberry Cheesecake Rolls is a rewarding experience that offers both flavor and presentation. They are versatile, allowing you to customize the rolls with various fruits or crust options. These rolls provide a lighter alternative to traditional cheesecake while maintaining that luscious cheesecake flavor you love. The process is straightforward and does not require baking, making it an ideal choice for busy home cooks. These rolls can be prepared ahead of time and served chilled, allowing you to enjoy more time with your guests.

    How to make Strawberry Cheesecake Rolls

    Making Strawberry Cheesecake Rolls is a fun and straightforward process. By following a few simple steps, you can create a delightful dessert that looks as good as it tastes. Here’s how to do it.

    Ingredients:

    • 8 ounces cream cheese, softened (226 grams)
    • 1/4 cup granulated sugar (50 grams)
    • 1 teaspoon vanilla extract (5 milliliters)
    • 1 cup heavy whipping cream (240 milliliters)
    • 1 cup fresh strawberries, diced (150 grams)
    • 2 tablespoons granulated sugar (25 grams)
    • 1 1/2 cups crushed shortbread cookies or graham crackers (150 grams)
    • 1/4 cup unsalted butter, melted (60 milliliters)
    • 6 large crepes or thin cake layers
    • Powdered sugar for dusting

    Directions:

    1. Make The Cheesecake Filling: Start by beating the softened cream cheese in a mixing bowl. Add the granulated sugar and vanilla extract. Mix everything until very smooth and fluffy.

    2. Whip The Cream: In a clean bowl, pour the heavy cream and whip it until you achieve stiff peaks. This means when you lift the beaters, the cream holds its shape. Carefully fold this whipped cream into the cream cheese mixture until well combined.

    3. Prep The Strawberries: Wash and dice the fresh strawberries evenly. Sprinkle them with two tablespoons of sugar and let them sit for ten minutes. This will enhance their natural sweetness and create a little syrup.

    4. Make The Crumb Mixture: Take the crushed cookies or graham crackers and mix them with the melted unsalted butter. Combine until the crumbs are evenly coated.

    5. Layer And Roll: Lay out one crepe flat on a clean surface or plate. Spread a thick strip of the cheesecake filling along one edge of the crepe. Add a thin layer of the buttery crumb mixture over the filling, then scatter some of the macerated strawberries on top. Carefully roll up the crepe, starting from the edge with the filling, and keep it very tight to ensure the roll holds together.

    6. Chill And Slice: Once all the rolls are made, wrap each one snugly in plastic wrap. Place them in the refrigerator and let them chill for at least one hour. This helps the rolls set and makes slicing easier.

    7. Finish And Serve: After chilling, unwrap the rolls and use a sharp serrated knife to slice them into one-inch pieces. Dust heavily with powdered sugar before serving to add a touch of sweetness and a beautiful presentation.

    How to serve Strawberry Cheesecake Rolls

    Strawberry Cheesecake Rolls are best served cold and can be displayed on a lovely platter for an elegant touch. You can serve them as a delightful dessert after dinner or as a refreshing treat at a picnic. For added flair, consider garnishing with additional fresh strawberries or a drizzle of chocolate sauce. These rolls also pair beautifully with a cup of coffee or tea, making them an excellent choice for brunch gatherings or tea time.

    How to store Strawberry Cheesecake Rolls

    If you have any leftover Strawberry Cheesecake Rolls, you can store them in the refrigerator. Wrap them tightly in plastic wrap or place them in an airtight container to keep them fresh. They can be stored for up to three days without losing their delicious taste. If you plan to keep them longer, it is best not to slice them until just before serving, as this will help maintain their texture.

    Tips to make Strawberry Cheesecake Rolls

    1. Use Fresh Strawberries: For the best flavor, always use fresh strawberries. They add a nice bright flavor and texture to the rolls.

    2. Don’t Skip the Chilling Step: Chilling the rolls helps them hold their shape when you slice them, making it easier to serve.

    3. Customize Your Fillings: Feel free to experiment with different fruits such as blueberries, raspberries, or even bananas.

    4. Make Your Own Crepes: If you have time, making homemade crepes can elevate the recipe. However, store-bought crepes are a convenient option.

    5. Make Ahead: You can prepare the cheesecake filling and crumb mixture ahead of time, making the assembly even quicker when you are ready to roll.

    Variation (if any)

    While Strawberry Cheesecake Rolls are delicious as they are, you can easily mix things up. Consider adding a layer of chocolate ganache for a rich twist. Use flavored cream cheese, like strawberry or vanilla bean, for a different taste. You can also add nuts for a crunchy texture or substitute the strawberries with other fruits to create unique combinations based on your favorites.

    FAQs

    Can I freeze Strawberry Cheesecake Rolls?
    Yes, you can freeze the rolls before slicing them. Wrap them well in plastic wrap and then place them in a freezer bag. They can be frozen for up to a month. Just thaw in the fridge overnight before slicing and serving.

    Can I use store-bought cheesecake filling?
    While homemade filling is recommended for flavor and texture, you can use store-bought cheesecake filling in a pinch.

    How can I make these rolls gluten-free?
    Use gluten-free cookies or graham crackers for the crumb layer and ensure that the crepes you choose are gluten-free as well.

    Can I replace heavy cream with a lighter option?
    For a lighter version, you can use whipped topping or use lighter cream alternatives. Keep in mind that the texture and flavor may differ slightly.

    Nutritional Information

    • Servings: 6 rolls
    • Calories: 270 per roll
    • Total Fat: 18g
    • Saturated Fat: 10g
    • Cholesterol: 66mg
    • Sodium: 150mg
    • Total Carbohydrates: 24g
    • Dietary Fiber: 1g
    • Sugars: 10g
    • Protein: 4g

    Enjoy your Strawberry Cheesecake Rolls as a beautiful and delicious dessert that is sure to delight everyone!

  • No-Bake Snickers Cheesecake

    No-Bake Snickers Cheesecake

    Do you love cheesecake? How about Snickers? If you enjoy rich desserts that are easy to make, you will adore No-Bake Snickers Cheesecake. This dessert combines the creaminess of cheesecake, the crunch of a cookie crust, and the caramel and nougat goodness of Snickers bars. Best of all, it requires no baking, making it perfect for any occasion. This delightful treat is sure to impress your family and friends!

    Why make this recipe

    No-Bake Snickers Cheesecake is an appealing dessert because it combines various textures and flavors, making it a crowd favorite. It is creamy, crunchy, and sweet with the occasional bite of chocolate and caramel. The simplicity of preparation allows anyone, whether an experienced baker or a novice in the kitchen, to whip up this tasty treat. Since it does not require baking, it is also perfect for hot summer days when you want to avoid heating up your kitchen. The convenience of chilling rather than baking means less cleanup for you. It is the perfect way to satisfy your sweet tooth while indulging in beloved candy flavors.

    How to make No-Bake Snickers Cheesecake

    Making No-Bake Snickers Cheesecake is straightforward and fun. Follow these steps to create a delicious dessert that will leave everyone begging for the recipe.

    Ingredients:

    • 1 ½ cups (150g) graham cracker crumbs or crushed Oreos
    • ½ cup (115g) melted unsalted butter
    • 1 cup (175g) semi-sweet chocolate chips
    • 8 oz (225g) cream cheese, softened
    • 1 cup (120g) powdered sugar
    • 1 cup (240ml) heavy cream
    • 1 tsp (5ml) vanilla extract
    • 4 Snickers bars, chopped
    • A few drops of pink food coloring
    • M&Ms for topping
    • Whipped cream for topping
    • Extra Snickers or more M&Ms for garnish

    Directions:

    1. Make The Crust: Smash your choice of cookies in a bag or pulse them in a food processor until you have fine crumbs.

    2. Mix And Press The Crust: Stir the crumbs with the melted butter until everything is well combined. Then press the mixture evenly into the bottom of a 9-inch (23 cm) springform pan.

    3. Chill The Crust: Place the crust in the refrigerator for at least 30 minutes to set.

    4. Melt Chocolate: In a saucepan over medium heat, melt the chocolate chips, stirring until they become glossy.

    5. Cool Chocolate: Let the melted chocolate cool for a few minutes to avoid curdling the cream cheese.

    6. Whip Cream Cheese Base: In a mixing bowl, beat the softened cream cheese, powdered sugar, and vanilla extract together until the mixture is silky and smooth.

    7. Blend In Chocolate: Gradually add the cooled melted chocolate into the cream cheese mixture, mixing until everything is fully incorporated.

    8. Fold In Snickers: Gently fold the chopped Snickers bars into the cheesecake filling until evenly distributed.

    9. Color The Filling: Add a few drops of pink food coloring and fold it back into the filling until you achieve the desired color.

    10. Whip The Cream: In a separate bowl, whip the heavy cream until stiff peaks form.

    11. Lighten The Filling: Carefully fold in the whipped cream into the pink cheesecake filling, taking care not to deflate the mixture.

    12. Fill The Pan: Pour the creamy filling into the chilled crust, smoothing it out with a spatula.

    13. Chill To Set: Cover the cheesecake and refrigerate it for at least four hours or overnight to allow it to firm up.

    14. Unmold And Decorate: Carefully transfer the chilled cheesecake to a plate. Top it with whipped cream, sprinkle M&Ms, and add extra Snickers for garnish.

    How to serve No-Bake Snickers Cheesecake

    Serve No-Bake Snickers Cheesecake cold from the refrigerator. Slice it into wedges and arrange pieces on dessert plates. A drizzle of chocolate sauce or caramel over the top can add an extra touch. You can also serve it with fresh fruit to balance the sweetness. It makes for a fantastic dessert for parties, birthdays, or any celebration.

    How to store No-Bake Snickers Cheesecake

    Store any leftovers in an airtight container in the refrigerator. It will stay fresh for up to five days. If you make it ahead of time, it is best not to add toppings like whipped cream or M&Ms until you are ready to serve to keep them fresh and crunchy.

    Tips to make No-Bake Snickers Cheesecake

    • Allow cream cheese to come to room temperature before beating. This will help prevent lumps.
    • Use high-quality chocolate chips for the best flavor.
    • Customize toppings based on your preferences. You can try crushed nuts or different candies.
    • Be gentle when folding whipped cream into the mixture to keep it light and fluffy.

    Variation (if any)

    You can experiment with different candy bars in this cheesecake. Try using Reese’s Peanut Butter Cups for a chocolate-peanut butter variation or change to Kit Kats for a different crunch. You can also make a chocolate crust by using chocolate sandwich cookies instead of graham crackers or Oreos.

    FAQs

    Can I freeze No-Bake Snickers Cheesecake?
    Yes, you can freeze it! Just make sure it’s well covered. Thaw it in the refrigerator before serving.

    Can I use a different type of cream cheese?
    You can use whipped cream cheese spread, but softening it to room temperature will still result in a smooth filling.

    What if I can’t find Snickers bars?
    You can substitute with other candy bars like Milky Way bars or Twix for a similar flavor profile.

    Is it necessary to use pink food coloring?
    No, pink food coloring is optional. It adds a fun pop of color but does not affect the taste.

    How can I make this cheesecake gluten-free?
    Use gluten-free graham crackers or cookies for the crust and ensure that your Snickers or any other candy is gluten-free.

    Nutritional Information (per serving, makes 12 servings)

    • Calories: 300
    • Total Fat: 20g
    • Saturated Fat: 10g
    • Cholesterol: 50mg
    • Sodium: 150mg
    • Total Carbohydrate: 30g
    • Dietary Fiber: 1g
    • Sugars: 24g
    • Protein: 3g

    No-Bake Snickers Cheesecake is the ultimate indulgent dessert for any occasion. By following these simple steps, you can create a delightful treat that everyone will enjoy! Share it with loved ones or keep it all for yourself; either way, you are in for a tasty delight.

  • Lasagna

    Lasagna

    Lasagna is a classic Italian dish that many people love. It is a hearty meal that combines layers of pasta, rich meat sauce, creamy béchamel, and gooey cheese. Making lasagna at home can be a fun activity, and the results are delicious. Whether you are cooking for family or friends, this dish is sure to please everyone at the table. In this article, you will find an easy lasagna recipe, tips for making it, and answers to common questions.

    Why make this recipe

    There are many reasons to make lasagna. First, it is incredibly satisfying to create a dish from scratch that tastes amazing. Lasagna is also versatile. You can customize it with your favorite ingredients or make it vegetarian. The layers of flavors and textures in lasagna make it a comforting meal. Additionally, it is perfect for making in advance and freezing for later. With this recipe, you can impress your loved ones and enjoy a meal that feels special.

    How to make Lasagna

    Making lasagna involves a few simple steps. You will start by preparing a flavorful meat sauce, then move on to making a creamy béchamel sauce. After that, you will layer the ingredients and bake the lasagna until it is bubbly and golden.

    Ingredients:

    • 1 pound (450 grams) ground beef
    • 1 medium onion, diced
    • 2 garlic cloves, minced
    • 4 ounces (115 grams) crispy cooked bacon, crumbled
    • 24 ounces (680 grams) marinara sauce
    • 2 teaspoons Italian seasoning
    • 1 teaspoon smoked paprika
    • Salt, to taste
    • Black pepper, to taste
    • 4 tablespoons (55 grams) unsalted butter
    • 1/4 cup (30 grams) all-purpose flour
    • 2 cups (480 milliliters) whole milk
    • 1/2 cup (50 grams) Parmesan cheese, grated
    • 1 teaspoon garlic powder
    • 12 lasagna noodles
    • 2 cups (225 grams) mozzarella cheese, shredded
    • 1 cup (115 grams) shredded cheddar cheese
    • 1/2 cup (50 grams) grated Parmesan cheese, for topping
    • Fresh parsley, for garnish

    Directions:

    1. Prepare the Meat Sauce: Start by browning the ground beef in a large skillet over medium heat. Cook the beef until it is no longer pink. Add the diced onion and continue cooking until the onion is softened, about 5 minutes. Stir in the minced garlic and cook for an additional minute. Next, pour in the marinara sauce and add the crumbled bacon, Italian seasoning, and smoked paprika. Stir well and let it simmer for about ten minutes. Season with salt and pepper to taste.

    2. Make The Parmesan Garlic Béchamel: In a separate saucepan, melt 4 tablespoons of butter over medium heat. Once the butter is melted, sprinkle in the flour while whisking constantly to create a roux. Gradually pour in the whole milk, whisking continuously until the mixture thickens. Remove from heat and stir in the grated Parmesan cheese and garlic powder. Season with salt and pepper to taste.

    3. Assemble The Lasagna: Preheat your oven to 375 degrees Fahrenheit (190 degrees Celsius). Spread a layer of meat sauce on the bottom of a large baking dish. Lay three lasagna noodles on top of the sauce. Next, spoon some béchamel over the noodles, followed by a layer of mozzarella cheese and a layer of shredded cheddar. Repeat these layers until all your ingredients are used, finishing with a layer of meat sauce on top. Sprinkle the remaining grated Parmesan cheese on the very top.

    4. Bake And Rest: Cover the lasagna with aluminum foil and bake in the preheated oven for 30 minutes. After 30 minutes, remove the foil and bake for an additional 15 minutes, or until the top is golden brown and bubbly. Once it is done, let the lasagna rest for about 10 minutes before slicing. This resting time helps the layers set, making it easier to serve.

    How to serve Lasagna

    To serve your delicious lasagna, slice it into squares using a sharp knife. Place each piece on a plate. You can garnish it with fresh parsley for a touch of color. Lasagna is great on its own, but you can also serve it with a side salad and some garlic bread for a complete meal.

    How to store Lasagna

    Lasagna is perfect for meal prep and leftovers. Allow any leftover lasagna to cool completely, then cover it tightly with plastic wrap or aluminum foil or transfer it to an airtight container. You can store it in the refrigerator for up to 3-4 days. If you want to store it for longer, you can freeze the lasagna. Wrap it tightly in plastic wrap and then in aluminum foil. Frozen lasagna can last for up to 3 months. When you’re ready to eat it, thaw it in the refrigerator overnight and then reheat it in the oven until heated through.

    Tips to make Lasagna

    1. Use Fresh Ingredients: Fresh ingredients can elevate your lasagna significantly. Fresh herbs and quality marinara can make a big difference in flavor.

    2. Pre-cook the Noodles: Some lasagna noodles require pre-cooking before layering them. Check the package instructions. If they are "no-boil" noodles, you can layer them straight into the dish.

    3. Experiment with Cheese: Feel free to mix and match your cheeses. In addition to mozzarella and Parmesan, you can try ricotta cheese, goat cheese, or fontina for different flavors.

    4. Layer Generously: Don’t be shy about layering! Make each layer thick for maximum flavor and texture.

    Variation (if any)

    You can easily customize this lasagna recipe. For a vegetarian version, you can replace the ground beef with sautéed vegetables like zucchini, mushrooms, or spinach. Alternatively, you could use a mix of different cheeses and omit the meat entirely. You can also add layers of pesto for a unique flavor.

    FAQs

    Can I make lasagna ahead of time?
    Yes, lasagna can be assembled ahead of time. You can store it in the refrigerator for a day before baking.

    What is the best way to reheat lasagna?
    The best way to reheat lasagna is in the oven. Cover it with aluminum foil and heat it at 350 degrees Fahrenheit (175 degrees Celsius) until warmed through.

    Can I freeze lasagna?
    Yes, lasagna freezes well. Make sure to wrap it tightly before freezing, and it can last for up to 3 months.

    Why does my lasagna come out watery?
    This can happen if the ingredients contain too much moisture. Make sure to drain any excess liquid from the meat or vegetables before assembly.

    Nutritional Information (per serving)

    • Calories: 450
    • Protein: 30g
    • Fat: 25g
    • Carbohydrates: 35g
    • Fiber: 2g
    • Sugar: 6g

    Now you are ready to enjoy making and sharing this delicious lasagna recipe!

  • Pasta with Chicken in Lemon Wine Sauce

    Pasta with Chicken in Lemon Wine Sauce

    Pasta with Chicken in Lemon Wine Sauce is a bright and flavorful dish that brings together succulent chicken, fresh pasta, and a zesty lemon wine sauce. This recipe is perfect for a weeknight dinner or a weekend gathering. The combination of lemon, wine, and garlic creates a delightful sauce that elevates the simple ingredients into something truly special.

    In this article, we will explore why you should make this recipe, detail the cooking process, provide you with the necessary ingredients, and share tips for serving and storing the dish.

    Why make this recipe

    There are many reasons why this Pasta with Chicken in Lemon Wine Sauce is a fantastic choice for your next meal. First, this dish is quick and easy to prepare, making it ideal for busy evenings. You can have a delicious home-cooked meal on the table in less than an hour.

    Second, the flavors in this recipe are incredibly vibrant. The addition of lemon zest and juice gives a fresh taste, while the white wine adds depth and richness. Together, these ingredients complement the chicken and pasta beautifully.

    Finally, this dish is versatile. You can serve it as a family dinner or on special occasions. It pairs wonderfully with a side salad or crusty bread, making it a complete and satisfying meal.

    How to make Pasta with Chicken in Lemon Wine Sauce

    Making Pasta with Chicken in Lemon Wine Sauce is straightforward. Just follow these easy steps, and you’ll have a delicious dish that everyone will enjoy.

    Ingredients:

    • 12 oz spaghetti (340 g)
    • 1 1/2 lbs chicken tenders (680 g)
    • 1 1/2 tsp fine sea salt, divided (9 g)
    • 1/2 tsp black pepper (1.5 g)
    • 1/2 cup all-purpose flour (60 g)
    • 2 tbsp olive oil, divided (30 ml)
    • 6 tbsp unsalted butter, divided (84 g)
    • 3/4 cup dry white wine (Chardonnay or Sauvignon Blanc) (180 ml)
    • 4 garlic cloves (approximately 1 tbsp minced) (12 g)
    • 1 tsp lemon zest (from 1 lemon) (5 g)
    • 1/4 cup lemon juice (from 2 lemons) (60 ml)
    • 1/3 cup parsley (finely chopped) (10 g)
    • Freshly shredded Parmesan cheese (for serving)

    Directions:

    1. Prepare your ingredients by chopping the parsley, zesting, and juicing the lemons, and mincing the garlic. Season the chicken with 1 tsp of salt and 1/2 tsp of black pepper, then dredge it in flour.

    2. Cook the spaghetti in a large pot of boiling water with 2 tbsp of salt according to package directions until al dente. Reserve 1/2 cup of pasta water, drain the pasta, and return it to the pot. Cover the pot partially to keep the pasta warm.

    3. In a large skillet over medium-high heat, add 1 tbsp of olive oil and 1 tbsp of butter. Sauté the chicken for about 2 minutes per side or until it turns golden brown and is cooked through (the internal temperature should reach 165°F or 74°C). Once cooked, remove the chicken to a plate. Repeat this process with the remaining chicken, adding another tbsp of oil and butter as needed, making sure to keep all cooked chicken warm.

    4. In the same skillet, add the dry white wine and deglaze by scraping the bottom of the pan to incorporate all those flavorful bits. Cook the wine until it reduces to about 1/4 cup (60 ml). Then, add the remaining 4 tbsp of butter and let it melt. Add the minced garlic and simmer for 30 seconds, just until it’s fragrant. Remove the skillet from heat and stir in the lemon juice, lemon zest, and finely chopped parsley. Adjust seasoning with the remaining 1/2 tsp of salt or to taste.

    5. Return the cooked chicken to the skillet, coating it in the delicious lemon wine sauce. Place the drained spaghetti in a large serving bowl. Spoon the sauce and chicken over the spaghetti and toss lightly to combine. Garnish with additional parsley and freshly shredded Parmesan cheese before serving.

    How to serve Pasta with Chicken in Lemon Wine Sauce

    Serving Pasta with Chicken in Lemon Wine Sauce is simple and enjoyable. Place the pasta in large serving bowls or on individual plates. Then, make sure to distribute the chicken and sauce evenly over the pasta. For an elegant touch, sprinkle some finely chopped parsley on top and add freshly grated Parmesan cheese. Serve immediately while it’s warm, pairing it with a light salad or a piece of crusty bread to soak up the delicious sauce.

    How to store Pasta with Chicken in Lemon Wine Sauce

    If you have leftovers, storing them is easy. Allow the dish to cool to room temperature before transferring it to an airtight container. You can store the Pasta with Chicken in Lemon Wine Sauce in the refrigerator for up to 3 days. When you are ready to eat, reheat it gently on the stove or in the microwave. Add a splash of water or broth to help revive the sauce if needed.

    Tips to make Pasta with Chicken in Lemon Wine Sauce

    1. Cooking Chicken: Make sure not to overcook the chicken. It should be golden brown and cooked through but still juicy.

    2. Wine Selection: Choose a dry white wine like Chardonnay or Sauvignon Blanc for the best flavor. If you’re not a fan of drinking wine, look for a cooking wine of good quality.

    3. Lemon Freshness: Use fresh lemons for the zest and juice to get the best flavor. Bottled lemon juice does not have the same brightness.

    4. Herb Freshness: Substitute parsley with basil or arugula for a different flavor profile.

    5. Adding Vegetables: You can add vegetables like spinach, asparagus, or cherry tomatoes to the dish. Sauté them along with the chicken for extra nutrition.

    Variation (if any)

    This recipe is flexible and can be adjusted to suit your tastes. If you prefer a creamy sauce, add a splash of heavy cream to the sauce after the lemon juice. This will give a nice richness to the dish. For a spicier kick, consider adding red pepper flakes to the sauce when you add the garlic.

    FAQs

    Q: Can I use pasta other than spaghetti?
    A: Yes, you can use any pasta shape you prefer, such as fettuccine, penne, or farfalle.

    Q: Is there a gluten-free option for this recipe?
    A: Substitute traditional pasta with gluten-free pasta and ensure the flour used is also gluten-free for dredging the chicken.

    Q: Can I make this recipe ahead of time?
    A: While it is best served fresh, you can prepare the chicken and sauce ahead of time and heat everything just before serving.

    Q: How do I know when the chicken is fully cooked?
    A: The chicken should have an internal temperature of 165°F (74°C). Using a meat thermometer will help ensure it cooks perfectly.

    Q: Can I freeze leftovers?
    A: Freezing is not recommended for this dish because the texture of the pasta may suffer when thawed. It’s best to enjoy it fresh or refrigerated.

    Nutritional Information

    • Servings: 4
    • Total Prep Time: 15 minutes
    • Total Cook Time: 30 minutes
    • Calories per serving: 520
    • Total Fat: 22g
    • Saturated Fat: 10g
    • Cholesterol: 120mg
    • Sodium: 760mg
    • Carbohydrates: 56g
    • Fiber: 2g
    • Sugar: 1g
    • Protein: 33g

    Pasta with Chicken in Lemon Wine Sauce is a delightful dish that will charm your palate. With its vibrant flavors and simple preparation, it’s certain to become a regular favorite in your kitchen. Enjoy this recipe for a satisfying meal that everyone will love!

  • Chinese Pepper Steak

    Chinese Pepper Steak

    Chinese Pepper Steak is a delicious and vibrant dish that brings the flavors of Chinese cuisine into your home. This meal combines tender slices of beef with colorful bell peppers and a savory sauce. It’s quick to prepare, making it perfect for busy weeknights or casual get-togethers. Not only is it flavorful, but it also looks beautiful on the plate, adding a burst of color to any meal.

    Why make this recipe

    There are many reasons to make Chinese Pepper Steak. First, it is a simple recipe that requires minimal ingredients but delivers maximum flavor. The quick cooking time allows you to put dinner on the table in about 30 minutes, which is ideal for families with busy schedules. Additionally, this dish is packed with protein and vegetables, providing a nutritious option that is also satisfying. The versatility of this recipe means you can customize it to your taste preferences or dietary needs.

    Moreover, with a few basic cooking techniques, you can recreate the flavors of your favorite Chinese restaurant right in your kitchen. Making Chinese Pepper Steak at home not only saves money but also gives you control over the ingredients. You can adjust the sodium levels, ensure freshness, and even make it gluten-free if needed.

    How to make Chinese Pepper Steak

    Making Chinese Pepper Steak is an easy process that includes marinating the beef, stir-frying the ingredients, and combining them for a delicious finish. Here is a step-by-step guide to help you through the cooking process.

    Ingredients:

    • 1 lb flank steak, sliced thinly against the grain (450 g)
    • 2 tablespoons soy sauce (30 ml)
    • 1 tablespoon oyster sauce (15 ml)
    • 2 teaspoons cornstarch (6 g)
    • 1/2 teaspoon sugar (2 g)
    • 1/2 teaspoon ground black pepper (2 g)
    • 2 tablespoons vegetable oil (30 ml)
    • 1 green bell pepper, sliced
    • 1 red bell pepper, sliced
    • 1 yellow bell pepper, sliced
    • 1 onion, sliced
    • 2 cloves garlic, minced
    • 1 teaspoon fresh ginger, minced

    Directions:

    1. Marinate the Steak: In a bowl, whisk together soy sauce, oyster sauce, cornstarch, sugar, and black pepper. Toss the sliced steak into the marinade, ensuring it is evenly coated. Let it rest for at least 15 minutes.

    2. Cook the Steak: Heat 1 tablespoon of vegetable oil in a wok or large skillet over high heat. Add the marinated steak to the hot pan and stir fry for 2-3 minutes until it is browned but not fully cooked through. Remove the steak from the pan and set it aside.

    3. Stir Fry Vegetables: In the same pan, add the remaining tablespoon of oil. Stir in the sliced bell peppers, onion, garlic, and ginger. Cook for about 2-3 minutes until the vegetables are tender but still crisp.

    4. Combine: Add the cooked steak back into the pan with the vegetables. Stir everything together and cook for another 2 minutes, making sure the flavors blend and the steak is fully cooked.

    How to serve Chinese Pepper Steak

    Serving Chinese Pepper Steak is simple and enjoyable. You can present it on a large plate or, for a more personal touch, serve it in individual bowls. Pair the dish with steamed rice or fried rice for a complete meal. The warm rice will absorb the delicious sauce from the stir-fried beef and vegetables, making every bite satisfying. You can also sprinkle some sesame seeds or chopped green onions on top as a garnish for added texture and flavor.

    How to store Chinese Pepper Steak

    If you have leftovers or want to make this dish in advance, storing Chinese Pepper Steak is easy. Allow it to cool completely before transferring it to an airtight container. Store in the refrigerator for up to 3 days. When you are ready to enjoy the leftovers, reheat them on the stovetop or in the microwave until warmed through. Do not reheating multiple times, as this can affect the texture of the beef.

    Tips to make Chinese Pepper Steak

    1. Use Flank Steak: Flank steak is ideal for this recipe because of its tenderness and flavor. Slice it thinly against the grain for the best results.

    2. Marinate Longer for More Flavor: While 15 minutes is enough, marinating for 30 minutes to 1 hour can enhance the flavors and tenderness of the steak.

    3. High Heat is Key: Cooking on high heat is essential for a good stir-fry. It cooks the meat quickly while preserving its juiciness.

    4. Keep Vegetables Crisp: Do not overcook the vegetables; you want them to be tender yet crisp. This adds texture and color to your dish.

    5. Customize with More Vegetables: Feel free to add or replace vegetables. Broccoli, snap peas, or mushrooms can work well in this recipe.

    Variation (if any)

    If you want to change things up, consider adding a sauce with a bit of heat, like Szechuan sauce or chili paste. You can make the dish vegetarian by replacing the beef with tofu or tempeh. Simply marinate and stir-fry the tofu in the same way. Other variations include adding different types of vegetables based on what you have at home, like carrots or zucchini.

    FAQs

    Can I use other cuts of beef?
    Yes, you can use other tender cuts of beef like sirloin or ribeye. Just make sure to slice it thinly.

    Is this dish gluten-free?
    This recipe is not gluten-free because of the soy sauce. However, you can substitute with gluten-free soy sauce or coconut aminos.

    Can I freeze Chinese Pepper Steak?
    Yes, you can freeze the cooked dish if you want to save leftovers. It’s best to consume frozen portions within 2-3 months for optimal flavor.

    What can I serve with Chinese Pepper Steak?
    Besides rice, you can serve it with quinoa, noodles, or steamed vegetables for a balanced meal.

    How spicy is this dish?
    The dish is not inherently spicy but can be made spicy by adding chili paste or fresh chili peppers according to your taste.

    Nutritional Information

    • Servings: 4
    • Prep Time: 15 minutes
    • Cook Time: 10 minutes
    • Total Time: 25 minutes

    Nutritional Information (per serving):

    • Calories: 320
    • Protein: 26 g
    • Total Fat: 18 g
    • Saturated Fat: 3 g
    • Carbohydrates: 12 g
    • Dietary Fiber: 2 g
    • Sugars: 2 g
    • Sodium: 680 mg

    Enjoy making and sharing this delicious Chinese Pepper Steak recipe with your family and friends!

  • Easy Berry Cake with Crumb Topping

    Easy Berry Cake with Crumb Topping

    Easy Berry Cake with Crumb Topping is a delightful dessert that brings together the best of sweet and tart flavors. This cake is perfect for any occasion, be it a family gathering or a simple afternoon tea. With its soft and moist texture, alongside the delicious crunch of the crumb topping, this cake is sure to impress everyone. It is easy to make, uses common ingredients, and requires minimal time in the kitchen. In this article, we will explore how to create this scrumptious cake that will have your friends and family asking for seconds.

    Why make this recipe

    You might wonder why you should try your hand at making Easy Berry Cake with Crumb Topping. The answer is straightforward. This dessert is not only easy to prepare, but it also showcases the beauty and flavor of fresh berries. Using a mix of berries, you get a wonderful burst of flavor in each bite. The cake itself is light and fluffy, thanks to the whipped eggs, while the crumb topping adds a satisfying crunch that perfectly complements the soft cake.

    This recipe is versatile, allowing you to use whatever berries you have on hand. You can try strawberries, blueberries, blackberries, or raspberries, creating a flavor combination that is refreshing and delicious. Making this cake at home also means you can control the ingredients, ensuring a fresh and wholesome treat. Plus, this recipe is perfect for those who love baking but prefer simple, straightforward steps.

    Whether you are an experienced baker or a beginner looking to impress, this Easy Berry Cake with Crumb Topping is a must-try. It is a wonderful way to showcase summer’s bounty or to enjoy frozen berries during the colder months.

    How to make Easy Berry Cake with Crumb Topping

    Making this Easy Berry Cake with Crumb Topping is a simple process that requires minimal equipment and time. You will enjoy the ease with which everything comes together while creating something truly delicious.

    Ingredients:

    • 1/4 cup light olive oil (60 ml)
    • 3 large eggs (room temperature)
    • 1 cup granulated sugar (200 g)
    • 2 cups all-purpose flour (240 g)
    • 2 1/2 tsp baking powder
    • 1 Tbsp lemon zest (finely grated)
    • 1 tsp vanilla extract
    • 1/3 cup seltzer water or club soda (80 ml)
    • 10 oz mixed berries (280 g)
    • 3/4 cup all-purpose flour (90 g, for crumb topping)
    • 1/4 cup granulated sugar (50 g, for crumb topping)
    • 4 Tbsp unsalted butter (softened, for crumb topping)
    • 1/4 tsp sea salt (for crumb topping)

    Directions:

    1. Preheat your oven to 350°F (175°C). As the oven heats up, prepare your springform pan by greasing it lightly with cooking spray or butter.

    2. In a large mixing bowl, beat the 3 large eggs and 1 cup of granulated sugar together for about 5 minutes until the mixture is light and fluffy.

    3. Stir in the 1/4 cup of light olive oil into the egg-sugar mixture until well combined.

    4. In another bowl, whisk together the 2 cups of all-purpose flour and 2 1/2 tsp of baking powder.

    5. Gradually add half of the dry flour mixture to the egg and sugar mixture, mixing well.

    6. Add the 1 Tbsp of lemon zest and 1 tsp of vanilla extract to the batter. Mix to combine.

    7. Stir in the 1/3 cup of seltzer water or club soda. This will help give the cake a light and airy texture.

    8. Finally, add the remaining dry ingredients and mix until just combined.

    9. Gently fold in the 10 oz of mixed berries into the batter, taking care not to break them apart.

    10. To make the crumb topping, combine 3/4 cup of flour, 1/4 cup of sugar, 4 Tbsp of softened butter, and 1/4 tsp of sea salt in a small bowl. Use your fingers to mix everything until the mixture resembles coarse crumbs.

    11. Pour the batter into the prepared springform pan and gently spread it out. Sprinkle the crumb topping evenly over the batter and berries.

    12. Bake in the preheated oven for 45-50 minutes, or until a toothpick inserted in the center comes out clean.

    13. Once baked, remove the cake from the oven and allow it to cool for about 10 minutes before transferring it to a wire rack to cool completely.

    How to serve Easy Berry Cake with Crumb Topping

    This Easy Berry Cake with Crumb Topping is delicious on its own, but you can enhance it further. Serve slices of the cake warm or at room temperature. For an extra touch of indulgence, you can dust the top with powdered sugar or serve it with a dollop of whipped cream or a scoop of vanilla ice cream.

    This cake pairs beautifully with tea or coffee, making it a perfect afternoon treat. You can also serve it at celebrations or brunch gatherings for a delightful surprise that everyone will love.

    How to store Easy Berry Cake with Crumb Topping

    To keep your Easy Berry Cake with Crumb Topping fresh, store it at room temperature, covered with plastic wrap or in an airtight container. This will keep the cake moist and flavorful. If you need to store it for more than a few days, consider refrigerating it. It will last in the fridge for about 3-4 days.

    If you want to store it for a longer time, you can freeze the cake. Let the cake cool completely, then wrap it tightly in plastic wrap and aluminum foil. Label it with the date and freeze. It can last up to 3 months in the freezer. When you’re ready to enjoy it, just thaw it overnight in the refrigerator.

    Tips to make Easy Berry Cake with Crumb Topping

    1. Use fresh berries if possible for the best flavor. If using frozen berries, do not thaw them before adding to the batter. This will help prevent the batter from becoming too watery.

    2. Properly measure your flour for accurate results. Spoon flour into your measuring cup and level it off with a knife instead of scooping directly from the container.

    3. Make sure your eggs are at room temperature. This allows them to whip more easily and create a light batter.

    4. Feel free to experiment with different types of berries or even nuts for additional flavor and texture. Personalizing your cake can lead to delightful results.

    5. For a more pronounced lemon flavor, increase the lemon zest or add a bit of lemon juice to the batter.

    Variation (if any)

    While this recipe focuses on a mixed berry cake, there are plenty of variations you can try. Substitute the berries with diced peaches or apples for a delicious twist. You could also add a teaspoon of cinnamon to the flour mixture for a warm spice flavor. If you are feeling adventurous, experiment with flavored extracts other than vanilla, such as almond or coconut, to impart a different taste to the cake.

    FAQs

    Q: Can I use gluten-free flour for this recipe?
    A: Yes, you can use a gluten-free flour blend to make this cake gluten-free. Make sure to choose a blend that is a 1:1 substitute for all-purpose flour.

    Q: Can I double this recipe?
    A: Absolutely! If you want to make a larger cake, double the ingredients and use a larger pan. Just remember that baking time may vary slightly.

    Q: Can I make this cake ahead of time?
    A: Yes, you can prepare the cake a day in advance. Store it in an airtight container at room temperature and enjoy it the next day.

    Q: Is the cake supposed to be dense?
    A: No, the texture should be light and fluffy. If your cake turns out dense, it could be due to overmixing the batter or not incorporating enough air during the egg and sugar beating stage.

    Q: Can I add frosting to this cake?
    A: This cake is delicious on its own and does not need frosting. However, you could top it with a light glaze or cream cheese frosting if desired.

    Nutritional Information (per serving, 1/12 of cake)

    • Calories: 200
    • Total Fat: 7g
    • Saturated Fat: 1g
    • Cholesterol: 55mg
    • Sodium: 50mg
    • Total Carbohydrates: 32g
    • Dietary Fiber: 1g
    • Sugars: 12g
    • Protein: 3g

    In conclusion, Easy Berry Cake with Crumb Topping is not just another cake; it’s a celebration of flavors and textures that you can easily prepare in your kitchen. With its straightforward steps and accessible ingredients, this recipe is perfect for anyone wanting to impress with minimal effort. Enjoy the baking process and the wonderful flavors that come together in this delightful treat!

  • Cowboy Cornbread Casserole

    Cowboy Cornbread Casserole

    Cowboy Cornbread Casserole is a delicious and hearty dish that combines the flavors of Mexican cuisine with a comforting cornbread topping. This casserole features ground beef, beans, salsa, and cheese, all baked together for a satisfying meal. Perfect for family dinners, potlucks, or any gathering, this recipe is sure to please everyone at your table. With its blend of flavors and textures, Cowboy Cornbread Casserole brings warmth and satisfaction in every bite.

    Why make this recipe

    Making Cowboy Cornbread Casserole is a great choice for several reasons. First, it is simple to prepare. You can have it ready for the oven in about 20 minutes. Second, it is a one-pan meal, which means fewer dishes to wash after cooking. Third, this recipe is highly customizable. You can add your favorite vegetables or adjust the spices to suit your taste. Finally, this casserole is filling and nutritious, making it a wholesome choice for busy weeknights or leisurely weekends.

    How to make Cowboy Cornbread Casserole

    Creating Cowboy Cornbread Casserole requires straightforward steps. It will take about 20 minutes to prepare and 35-40 minutes to bake. This recipe serves about 6-8 people, depending on portion sizes.

    Ingredients:

    • 1 1/2 pounds ground beef (680 grams)
    • 1 cup onion, diced (150 grams)
    • 3 tablespoons taco seasoning or 1 store-bought packet (40 grams)
    • 1 teaspoon salt (5 grams)
    • 1/2 teaspoon black pepper (2 grams)
    • 1 (14.5 ounce) can black beans, drained (410 grams)
    • 1 (14.5 ounce) can corn, drained (410 grams)
    • 24-ounce jar thick salsa (680 grams)
    • 4-ounce can green chiles (113 grams)
    • 2 cups shredded cheese (200 grams)
    • 1 (8.5 ounce) box Jiffy corn muffin mix (240 grams)
    • 1 (14 ounce) can creamed corn (400 grams)
    • 2 tablespoons milk (30 milliliters)
    • 1 egg
    • 1/4 cup sour cream (60 grams)

    Directions:

    1. Preheat your oven to 350 degrees Fahrenheit (175 degrees Celsius).
    2. Heat a large, oven-safe skillet over medium-high heat. Add the ground beef and diced onions to the skillet. Cook until the beef is browned, which should take about 6-7 minutes. Make sure to drain off any excess fat.
    3. Once the beef is cooked, add the taco seasoning, salt, black pepper, salsa, corn, black beans, and green chiles to the skillet. Mix all the ingredients together until they are well combined.
    4. Turn off the heat and evenly sprinkle the shredded cheese on top of the beef mixture.
    5. In a separate medium bowl, mix the Jiffy cornbread mix, creamed corn, milk, egg, and sour cream until everything is well blended.
    6. Spread the cornbread mixture evenly over the cheese layer in the skillet.
    7. Bake in the preheated oven for 35-40 minutes or until the cornbread topping is cooked through and a toothpick inserted into the center comes out clean.
    8. Once baked, let the dish cool slightly before serving. Enjoy it with your favorite taco toppings, such as sour cream, avocado, or fresh cilantro.

    How to serve Cowboy Cornbread Casserole

    Cowboy Cornbread Casserole is versatile when it comes to serving. You can slice it like a pie and serve it directly from the skillet. Top each serving with fresh ingredients like chopped cilantro, diced tomatoes, sliced avocado, or a dollop of sour cream. This casserole pairs well with a simple green salad or some tortilla chips on the side for added crunch.

    How to store Cowboy Cornbread Casserole

    If you have leftovers, Cowboy Cornbread Casserole stores well. Allow the dish to cool completely before transferring it to an airtight container. You can store it in the refrigerator for up to 3-4 days. If you want to keep it longer, you can freeze it. Wrap portions tightly with plastic wrap and then place them in a freezer-safe bag. The casserole can be frozen for up to 3 months. To reheat, thaw in the refrigerator overnight and then warm it in the oven at 350 degrees Fahrenheit (175 degrees Celsius) until heated through.

    Tips to make Cowboy Cornbread Casserole

    • Use lean ground beef to reduce excess fat in the dish. You can also substitute ground turkey or chicken for a lighter option.
    • Feel free to add vegetables like bell peppers, jalapeños, or zucchini for extra nutrition and flavor.
    • If you prefer a spicier casserole, use hot salsa and add diced jalapeños or increase the amount of taco seasoning.
    • Customize the cheese by using a blend of cheddar, Monterey Jack, or pepper jack for added flavor.
    • If you can’t find Jiffy cornbread mix, you can make your own using flour, cornmeal, baking powder, sugar, and salt.

    Variation (if any)

    You can create several variations of Cowboy Cornbread Casserole to suit your taste. Consider replacing the ground beef with shredded chicken or cooked sausage. You could also make a vegetarian version by omitting the meat and adding more beans or hearty vegetables like mushrooms or spinach. Experiment with different types of salsa for variations in flavor, such as corn salsa or pineapple salsa for a sweet twist.

    FAQs

    1. Can I make Cowboy Cornbread Casserole ahead of time?

    Yes, you can prepare the casserole a day in advance. Prepare the beef mixture and the cornbread batter separately. Assemble the dish the day of baking and adjust the baking time as needed.

    2. Can I make this recipe gluten-free?

    Yes, you can use a gluten-free cornbread mix to make this dish gluten-free. Ensure that other ingredients, such as salsa and taco seasoning, are also certified gluten-free.

    3. What toppings can I use?

    Toppings can vary according to your preference. You can use sour cream, shredded lettuce, diced tomatoes, sliced olives, or avocado to add freshness to each serving.

    4. How many calories are in a serving of Cowboy Cornbread Casserole?

    One serving of Cowboy Cornbread Casserole contains approximately 500-600 calories. However, this number may vary depending on portion size and specific ingredients used.

    5. Is Cowboy Cornbread Casserole suitable for meal prep?

    Yes, this dish keeps well and is great for meal prep. You can portion out servings and store them for quick lunches or dinners throughout the week.

    In conclusion, Cowboy Cornbread Casserole is a simple and satisfying dish that brings a delicious mix of flavors to your table. With minimal prep time and easy steps, it’s a great option for busy cooks who want a nutritious meal without the hassle. Try making Cowboy Cornbread Casserole for your next family dinner or gathering, and watch everyone enjoy this comforting comfort food.

  • Mini Cherry Cheesecakes

    Mini Cherry Cheesecakes

    Mini Cherry Cheesecakes are delightful bite-sized treats that satisfy any sweet tooth. These individual cheesecakes are perfect for parties, gatherings, or simply enjoying at home. With a creamy cheesecake filling and a sweet cherry topping, they bring a burst of flavor in every bite. This recipe is easy to follow, making it great for both beginners and experienced bakers.

    Why make this recipe

    Making Mini Cherry Cheesecakes allows you to showcase your baking skills without spending hours in the kitchen. They combine classic cheesecake flavors with a fruity topping that appeals to all ages. These mini desserts are great for portion control, making them perfect for sharing. You can serve them at birthdays, holidays, or any festive occasion. Additionally, they are visually appealing, adding a touch of elegance to your dessert table. Overall, these mini cheesecakes provide a delightful way to enjoy the rich and creamy texture of cheesecake alongside the tartness of cherries.

    How to make Mini Cherry Cheesecakes

    Making Mini Cherry Cheesecakes is a simple and fun process. The recipe takes about 15 minutes to prepare and 20-25 minutes to bake. Let’s gather the ingredients and get started.

    Ingredients:

    • 12 tablespoons unsalted butter, melted (170 grams)
    • 1 1/2 cups graham cracker crumbs (150 grams)
    • 16 ounces cream cheese, softened (450 grams)
    • 1 cup white sugar (200 grams)
    • 2 large eggs
    • 1/3 cup sour cream (80 milliliters)
    • 1 teaspoon vanilla extract
    • 1 tablespoon all-purpose flour (8 grams)
    • 1 can cherry pie filling (about 400 grams)

    Directions:

    1. Preheat your oven to 350°F (175°C). This temperature ensures that your mini cheesecakes cook evenly.
    2. Prepare your muffin tins by filling 18 muffin cups with foil-lined wrappers. Using foil wrappers not only helps with cleanup but also makes it easy to remove the cheesecakes after baking.
    3. In a medium bowl, combine the melted butter and graham cracker crumbs. Stir them together until well mixed. This mixture will form the crust of your cheesecakes.
    4. Press about 1 tablespoon of the graham cracker mixture into the bottom of each wrapper. Make sure it is packed down firmly to create a solid base.
    5. In a large bowl, beat the softened cream cheese and white sugar together until the mixture is smooth and creamy. This step is important as it creates a rich filling.
    6. Next, add the eggs one at a time, beating well after each addition. Then, mix in the sour cream, vanilla extract, and flour. Ensure everything is thoroughly combined.
    7. Scoop the cheesecake mixture into the prepared wrappers, filling each about 1/2 inch from the top. This allows room for the cheesecakes to rise slightly as they bake.
    8. Bake in the preheated oven for 20-25 minutes. The cheesecakes should be slightly jiggly in the middle. Overbaking can lead to dry cheesecakes, so keep an eye on them.
    9. Once baked, let the mini cheesecakes cool in the tins for about 20 minutes. After that, transfer them to the refrigerator to chill for at least two hours. This cooling step is essential for the texture.
    10. Just before serving, top each mini cheesecake with a generous spoonful of cherry pie filling. The sweet cherries perfectly complement the rich cheesecake.

    How to serve Mini Cherry Cheesecakes

    Serving Mini Cherry Cheesecakes is as easy as it gets. You can present them directly in their wrappers for a charming look. If you prefer, you can arrange them on a dessert platter for a more formal presentation. These cheesecakes are best served cold. You can add a dollop of whipped cream on the side if you desire extra sweetness or decoration. Consider serving them with coffee or tea for a delightful afternoon treat.

    How to store Mini Cherry Cheesecakes

    To store Mini Cherry Cheesecakes, keep them in an airtight container in the refrigerator. Proper storage allows them to stay fresh and delicious for up to a week. If you need to store them for longer, consider freezing them. To do this, wrap each cheesecake in plastic wrap and then place them in a freezer-safe bag or container. They can be frozen for up to three months. When ready to enjoy, thaw them in the refrigerator overnight.

    Tips to make Mini Cherry Cheesecakes

    • Use room temperature ingredients: Ensure your cream cheese and eggs are at room temperature. This helps achieve a smooth and creamy filling without lumps.
    • Avoid overmixing: When incorporating the eggs, mix just until blended. Overmixing can cause air bubbles, leading to cracks in your cheesecake.
    • Add flavor variations: Feel free to experiment with different toppings. Instead of cherry pie filling, you can use blueberry or strawberry topping for a change.
    • Personalize with spices: Adding a pinch of cinnamon or nutmeg to the crust can add an extra layer of flavor.

    Variation (if any)

    If you want to change things up, consider adding chocolate to your Mini Cherry Cheesecakes. You can swirl in melted chocolate into the filling before baking for a rich chocolate cherry cheesecake. Another variation is to create a no-bake version by using whipped cream cheese and gelatin. This involves layering the filling in the wrappers and chilling until set. You can still use cherry pie filling or any other fruit topping you prefer.

    FAQs

    What is the best way to remove the mini cheesecakes from the wrappers?
    Allow them to cool completely before attempting to remove them. Gently peel the wrappers away from the edges.

    Can I use fresh cherries instead of cherry pie filling?
    Yes, fresh cherries can be used! Pitted and halved fresh cherries work well, but you might want to sweeten them slightly or toss them in a bit of sugar for extra sweetness.

    How can I tell when the mini cheesecakes are done?
    They should be set around the edges but slightly jiggly in the center. The residual heat will continue to cook them as they cool.

    Can I make these mini cheesecakes gluten-free?
    Yes, simply use gluten-free graham cracker crumbs for the crust. Be sure to check other ingredients for gluten content as well.

    Can I double this recipe?
    Certainly! Just make sure to use larger pans or baking trays, and adjust the baking time as needed.

    Nutritional Info (per Mini Cherry Cheesecake):

    • Calories: 200
    • Total Fat: 10g
    • Saturated Fat: 6g
    • Cholesterol: 60mg
    • Sodium: 180mg
    • Total Carbohydrates: 25g
    • Dietary Fiber: 1g
    • Sugars: 12g
    • Protein: 3g

    With this easy-to-follow recipe, Mini Cherry Cheesecakes are sure to be a hit at your next gathering or as a sweet treat for yourself! Enjoy the delicious flavors and creamy texture of these delightful desserts.