Author: Maria

  • Cheesy Chicken Spaghetti Casserole

    Cheesy Chicken Spaghetti Casserole

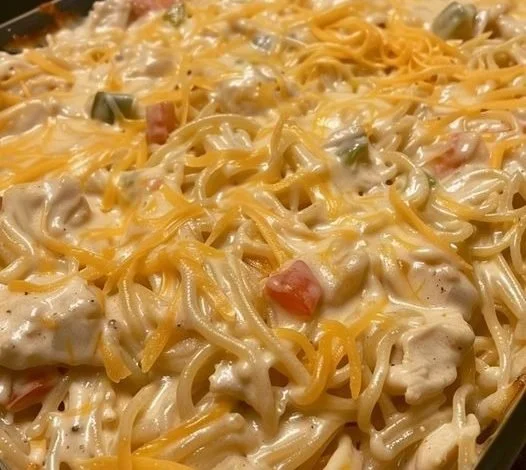
    Cheesy Chicken Spaghetti Casserole is a comforting and delicious dish perfect for family dinners or gatherings with friends. This casserole combines the flavors of cheesy goodness, tender chicken, and wholesome pasta all baked together to create a satisfying meal. With simple ingredients and straightforward steps, anyone can whip up this dish with ease. It promises to please even the pickiest eaters. Let’s explore why you should make this recipe and how to prepare it effortlessly.

    Why make this recipe

    This Cheesy Chicken Spaghetti Casserole offers a variety of benefits. First, it is a one-dish meal that saves time on cleanup. You can prepare it in only a single casserole dish, making it incredibly convenient. Second, it is a hearty recipe packed with protein from the chicken and stretching ingredients like spaghetti, which can feed a crowd or provide multiple meals. Third, this casserole is adjustable, allowing cookers to add their favorite vegetables or spices to bring personal flair to the recipe. Lastly, it’s a fantastic way to use up leftover chicken and can be made ahead of time for easy weeknight dinners.

    How to make Cheesy Chicken Spaghetti Casserole

    Creating the Cheesy Chicken Spaghetti Casserole is straightforward. Follow these easy steps to prepare a delightful meal that everyone will love.

    Ingredients:

    • 2 cups cooked chicken, shredded (about 280 grams)
    • 3 cups dry spaghetti, broken into 2-inch pieces (about 300 grams)
    • 2 cans cream of mushroom soup (about 800 grams total)
    • 2 cups grated sharp cheddar cheese, divided (about 200 grams)
    • 1/4 cup green pepper, finely diced (about 40 grams)
    • 1/4 cup onion, finely diced (about 40 grams)
    • 1 jar (4 oz) diced pimentos, drained (about 115 grams)
    • 2 cups chicken broth, reserved from cooking chicken (about 480 milliliters)
    • 1 tsp Lawry’s Seasoned Salt (about 5 grams)
    • 1/8 tsp cayenne pepper
    • Salt and pepper to taste

    Directions:

    1. Cook the Chicken: Boil a cut-up fryer chicken in a large pot until cooked through, around 30-40 minutes. Remove the chicken, reserve 2 cups of broth, and shred the meat to measure 2 cups.

    2. Cook the Spaghetti: In the same broth, bring the heat back up, then cook the broken spaghetti until al dente, about 8-10 minutes. Be careful not to overcook.

    3. Combine Ingredients: In a large bowl, mix the cooked spaghetti, shredded chicken, cream of mushroom soup, 1 cup of the grated cheddar cheese, green pepper, onion, pimentos, reserved broth, seasoned salt, cayenne, and salt and pepper to taste.

    4. Assemble: Pour the mixture into a casserole dish, ensuring even distribution. Top with the remaining 1 cup of grated cheddar cheese for a cheesy crust.

    5. Bake: Preheat the oven to 350°F (175°C). Place the casserole in the oven and bake for 45 minutes or until the mixture is bubbly and the cheese is melted. If the cheese starts to over-brown, cover it with aluminum foil.

    6. Store: This casserole can be made ahead of time and stored. Cover and freeze for up to 6 months or refrigerate for up to 2 days before baking.

    How to serve Cheesy Chicken Spaghetti Casserole

    To serve Cheesy Chicken Spaghetti Casserole, remove it from the oven and allow it to sit for about 10 minutes. This resting time helps the casserole set up nicely. Scoop generous portions onto plates or into bowls and garnish with a sprinkle of fresh herbs, such as parsley, or additional cheddar cheese, if desired. This casserole pairs well with a fresh garden salad or steamed vegetables for a balanced meal.

    How to store Cheesy Chicken Spaghetti Casserole

    Proper storage of your Cheesy Chicken Spaghetti Casserole can help maintain its delightful flavors. If you plan to eat it within two days, cover the casserole with plastic wrap or aluminum foil and store it in the refrigerator. For long-term storage, allow the casserole to cool completely before wrapping it tightly and placing it in the freezer. It can be safely frozen for up to 6 months. When ready to eat, thaw it in the refrigerator overnight and follow the baking instructions provided above.

    Tips to make Cheesy Chicken Spaghetti Casserole

    • Use Leftover Chicken: This casserole is a perfect way to use leftover rotisserie chicken or turkey. It can save you time on cooking.

    • Add Vegetables: Feel free to add more vegetables such as mushrooms, peas, or spinach for extra nutrition and flavor.

    • Adjust Cheese: For a different cheese flavor, utilize mozzarella or gouda along with or in place of cheddar cheese.

    • Spice it Up: If you enjoy some heat, increase the cayenne pepper, or add diced jalapeños to the mix.

    • Make it Gluten-Free: Substitute the spaghetti with gluten-free noodles for those following a gluten-free diet.

    Variation (if any)

    You can easily create variations of this Cheesy Chicken Spaghetti Casserole to suit different tastes. For a Mexican twist, add black beans, corn, and taco seasoning, and top with pepper jack cheese instead of cheddar. For a Creamy Alfredo version, swap out the cream of mushroom soup for Alfredo sauce and add broccoli for an additional layer of flavor and texture.

    FAQs

    Can I cook this casserole ahead of time?

    Yes, you can prepare the casserole ahead of time. Combine all the ingredients in the casserole dish, cover it tightly, and refrigerate it for up to 2 days before baking.

    How long does Cheesy Chicken Spaghetti Casserole last in the fridge?

    In the refrigerator, the casserole will last for up to 2 days when properly covered.

    Can I freeze the casserole?

    Yes, this casserole freezes well. Allow it to cool completely, then wrap it tightly and store it in the freezer for up to 6 months.

    What can I serve with Cheesy Chicken Spaghetti Casserole?

    This casserole goes well with a green salad, garlic bread, or steamed vegetables.

    Is it possible to make this casserole vegetarian?

    Yes, you can substitute the chicken with cooked lentils or vegetarian crumbles and use vegetable broth instead of chicken broth.

    Nutritional Information

    • Servings: 8
    • Prep Time: 20 minutes
    • Cook Time: 45 minutes
    • Total Calories: Approximately 400 calories per serving
    • Total Fat: 20g
    • Saturated Fat: 10g
    • Cholesterol: 75mg
    • Sodium: 850mg
    • Carbohydrates: 35g
    • Fiber: 2g
    • Protein: 25g

    In conclusion, Cheesy Chicken Spaghetti Casserole is a delightful addition to any meal plan. Its easy preparation and delicious flavors make it a favorite among families. Whether you are cooking for a crowd or just for your family, this casserole will be a hit. Try making it today!

  • Caramel Cheesecake Cookies

    Caramel Cheesecake Cookies

    Caramel Cheesecake Cookies are a delightful treat that combines the creamy goodness of cheesecake with the chewy texture of cookies. These cookies are the perfect dessert for any occasion and are sure to impress your family and friends. With their rich flavor and appealing presentation, they make for an irresistible dessert option that everyone will love.

    Why make this recipe

    Making Caramel Cheesecake Cookies is a great idea for many reasons. First, they are a unique twist on traditional cookies, which often lack the richness of cheesecake. By combining both desserts, you create a tasty and satisfying treat that stands out. Second, these cookies are easy to make, even for beginners. The process involves simple steps that anyone can follow. Finally, they are versatile and can be enjoyed at any time. Whether for a family gathering, a party, or just a sweet indulgence, these cookies will hit the spot.

    How to make Caramel Cheesecake Cookies

    Creating Caramel Cheesecake Cookies involves a few straightforward steps. Let’s break it down into easy sections, from the ingredients to the step-by-step directions.

    Ingredients:

    • 2 1/2 cups all-purpose flour (312.5 grams)
    • 1 tsp baking powder (4 grams)
    • 1/2 tsp salt (3 grams)
    • 1 cup unsalted butter, softened (226 grams)
    • 1 cup brown sugar (220 grams)
    • 1/2 cup granulated sugar (100 grams)
    • 2 large eggs
    • 1 1/2 tsp vanilla extract (7.5 milliliters)
    • 8 oz cream cheese, softened (227 grams)
    • 1/4 cup powdered sugar (30 grams)
    • 1 tsp vanilla extract (5 milliliters)
    • Caramel sauce (homemade or store-bought)
    • Toffee bits (optional)
    • Chopped chocolate or mini chocolate chips (optional)

    Directions:

    1. Mix Filling: Begin by preparing the cheesecake filling. In a mixing bowl, blend the softened cream cheese, powdered sugar, and vanilla extract until the mixture is smooth and creamy. Scoop this mixture into small rounds, roughly the size of a tablespoon. Place the rounds on a plate and freeze them for 20 to 30 minutes.

    2. Prepare Dough: While the cheesecake filling is freezing, you can prepare the cookie dough. In a large bowl, cream the softened butter with both the brown sugar and granulated sugar until it’s light and fluffy. Add the eggs, one at a time, beating well after each addition. Stir in the vanilla extract. In another bowl, combine the all-purpose flour, baking powder, and salt. Gradually add the dry ingredients to the butter and sugar mixture. Mix until everything is well combined. Once mixed, cover the dough and chill it in the refrigerator for about 30 minutes.

    3. Stuff & Bake: After the dough has chilled, preheat your oven to 350°F (175°C). Line a baking sheet with parchment paper. Take the chilled cookie dough and flatten a portion of it in the palm of your hand or on a clean surface. Place a frozen cheesecake round in the center of the flattened dough. Fold the edges of the dough up and around the cheesecake filling, sealing it well. Place the filled cookie dough on the prepared baking sheet. Bake in the preheated oven for 10 to 12 minutes or until the cookies are lightly golden around the edges.

    4. Top: Once the cookies are baked, allow them to cool slightly on the baking sheet. Drizzle warm caramel sauce over the top of each cookie. If desired, sprinkle with toffee bits and chopped chocolate or mini chocolate chips for an extra delicious touch. Serve the cookies warm for a gooey experience or let them chill for a delightful treat.

    How to serve Caramel Cheesecake Cookies

    Caramel Cheesecake Cookies can be served in several ways. For a warm treat, serve them fresh from the oven with a drizzle of caramel on top. They can also be plated nicely for a gathering or party. Accompany them with a scoop of vanilla ice cream or a dollop of whipped cream for an added indulgence. Coffee or tea pairs beautifully with these cookies, making for a relaxed dessert experience. You can also pack them for lunch or enjoy them as a mid-day snack.

    How to store Caramel Cheesecake Cookies

    To keep your Caramel Cheesecake Cookies fresh, store them in an airtight container at room temperature. They can be kept for 3 to 4 days this way. If you want to extend their shelf life, you can refrigerate them for up to a week. For longer storage, consider freezing the cookies. Place them in a freezer-safe container with parchment paper between layers to prevent sticking. They can last in the freezer for up to 3 months. When you’re ready to enjoy them, simply thaw at room temperature or warm them up in the oven.

    Tips to make Caramel Cheesecake Cookies

    1. Softening Cream Cheese: Make sure your cream cheese is at room temperature for easy blending into a creamy filling.

    2. Chilling the Dough: Don’t skip chilling the dough. This step helps the cookies maintain their shape while baking.

    3. Even Baking: Bake the cookies in batches to ensure even baking. If your oven is crowded, some cookies may not bake properly.

    4. Flavor Variations: Experiment with different flavorings in your cheesecake filling, like almond extract or a squeeze of lemon for a fresh twist.

    5. Serving Warm: Allow cookies to cool just slightly before serving. This will ensure the cheesecake filling remains creamy while avoiding burns.

    Variation (if any)

    You can customize these Caramel Cheesecake Cookies in various ways. For a different flavor, consider adding chocolate chips to the dough or using flavored cream cheese, such as strawberry or pumpkin. You might also swap the caramel sauce with chocolate ganache for a more intense chocolate flavor. Adding nuts, such as pecans or walnuts, can provide a delightful crunch. The options are endless, allowing you to create a cookie that suits your taste preferences.

    FAQs

    Q: Can I make these cookies in advance?
    A: Yes, you can prepare the cheesecake filling and dough in advance. Store them separately in the refrigerator and assemble before baking the next day.

    Q: Can I use low-fat cream cheese?
    A: Sure! Low-fat cream cheese works, but it may not be as creamy as full-fat options.

    Q: What if I don’t have toffee bits?
    A: If toffee bits are unavailable, you can leave them out or substitute with crushed cookies, nuts, or other candy.

    Q: How do I know when the cookies are done?
    A: The cookies will change color and be lightly golden around the edges. They will also appear set but slightly soft in the center, which is ideal.

    Q: Can I freeze the dough?
    A: Yes, you can freeze the unbaked cookie dough for up to 3 months. Just make sure to wrap it tightly before freezing.

    Nutritional Information (per cookie, assuming 24 cookies)

    • Calories: 180
    • Total Fat: 9g
    • Saturated Fat: 5g
    • Cholesterol: 30mg
    • Sodium: 105mg
    • Total Carbohydrates: 23g
    • Dietary Fiber: 0g
    • Sugars: 10g
    • Protein: 2g

    Enjoy making and sharing these delightful Caramel Cheesecake Cookies! They are perfect for any occasion and will surely become a beloved recipe.

  • Applesauce Cake with Cinnamon Cream Cheese Frosting

    Applesauce Cake with Cinnamon Cream Cheese Frosting

    Applesauce Cake with Cinnamon Cream Cheese Frosting is a delightful dessert that combines the moistness of applesauce with the warmth of spices. This cake is easy to prepare and perfect for any occasion, whether it’s a family gathering, a potluck, or just a cozy afternoon snack. The creamy cinnamon frosting adds a touch of sweetness that perfectly complements the rich flavors of the cake. With simple ingredients and straightforward steps, you can make this delicious dessert in no time.

    Why make this recipe

    There are many reasons to make Applesauce Cake with Cinnamon Cream Cheese Frosting. Firstly, applesauce adds moisture and flavor to the cake without making it too sweet. The blend of spices like cinnamon, nutmeg, and cloves enhances the taste, providing a comforting and warm aroma that fills your kitchen.

    This cake is also versatile. You can serve it for brunch, as a dessert after dinner, or even as a snack. It is suited for special occasions or a regular day when you crave something sweet. Additionally, this cake is easy to make, which makes it an excellent choice for beginner bakers. It requires minimal equipment and is forgiving, ensuring you end up with a delicious result even if you are not an experienced baker.

    How to make Applesauce Cake with Cinnamon Cream Cheese Frosting

    Making Applesauce Cake with Cinnamon Cream Cheese Frosting is a straightforward process. It involves preparing the cake batter, baking it, and then making the frosting to top it off. The steps are simple and can be followed easily, even by those new to baking.

    Ingredients:

    1 1/2 cups all-purpose flour (190 g)
    1 teaspoon baking soda (5 g)
    1/2 teaspoon baking powder (2 g)
    1/2 teaspoon ground cinnamon (1.5 g)
    1/4 teaspoon ground nutmeg (0.5 g)
    1/4 teaspoon ground cloves (0.5 g)
    1/4 teaspoon salt (1.5 g)
    1/2 cup unsalted butter, softened (113 g)
    1 cup granulated sugar (200 g)
    1 large egg
    1 cup unsweetened applesauce (240 ml)
    1 teaspoon vanilla extract (5 ml)

    For the Frosting:
    8 oz cream cheese, softened (225 g)
    1/4 cup unsalted butter, softened (57 g)
    3 cups powdered sugar (360 g)
    1 teaspoon vanilla extract (5 ml)
    1 teaspoon ground cinnamon (2 g)

    Directions:

    Prepare the Cake Batter:

    Start by preheating your oven to 350°F (175°C). Greasing and flouring an 8×8-inch baking dish is essential to prevent the cake from sticking. In a medium bowl, whisk together the flour, baking soda, baking powder, cinnamon, nutmeg, cloves, and salt. This combination of dry ingredients will create the flavorful base for your cake.

    Mix Wet Ingredients:

    In a large mixing bowl, cream together the softened butter and granulated sugar until light and fluffy. This step is important, as it adds air into the batter, contributing to a light texture. After that, beat in the egg, followed by the applesauce and vanilla extract. Stir these wet ingredients until well combined.

    Combine and Bake:

    Gradually add the dry ingredients to the wet mixture. It is crucial to mix until just combined to avoid over-mixing, which can make the cake tough. Once your batter is ready, pour it into the prepared baking dish and smooth the top with a spatula. Place it in the oven and bake for 30-35 minutes. To check if it is done, insert a toothpick into the center of the cake; it should come out clean. After baking, allow the cake to cool completely before frosting.

    Make the Frosting:

    For the frosting, take a large mixing bowl and beat together the softened cream cheese and butter until smooth and creamy. Next, gradually add the powdered sugar, mixing until combined. Finally, add the vanilla extract and cinnamon, beating until light and fluffy. This frosting will add a creamy texture and delightful taste to your cake.

    Frost and Serve:

    Once the cake has cooled completely, evenly spread the cinnamon cream cheese frosting over the top using a spatula. Slice the cake into squares and serve. This moist, spiced applesauce cake with its deliciously creamy frosting will surely please everyone.

    How to serve Applesauce Cake with Cinnamon Cream Cheese Frosting

    Serve your Applesauce Cake with Cinnamon Cream Cheese Frosting with a hot cup of coffee or tea. It can be enjoyed as a dessert or an afternoon snack. You might also add a scoop of vanilla ice cream on the side for extra indulgence. For an added touch, sprinkle a bit of extra cinnamon on top of the frosting or garnish each slice with thin apple slices. It’s a great option for holiday gatherings or any casual get-together.

    How to store Applesauce Cake with Cinnamon Cream Cheese Frosting

    To store the cake, first, allow it to cool completely. Cover it with plastic wrap or place it in an airtight container. Keep the cake in the refrigerator, where it will stay fresh for up to 5 days. If you have leftover cake without frosting, wrap it well and store it at room temperature for up to 3 days. You can also freeze the unfrosted cake for up to 3 months. Just be sure to wrap it tightly in plastic wrap and then in aluminum foil before freezing. Thaw it overnight in the refrigerator before serving.

    Tips to make Applesauce Cake with Cinnamon Cream Cheese Frosting

    1. Use room temperature ingredients: Make sure your butter, cream cheese, and egg are at room temperature. This helps to create a more homogenous batter and a better texture.

    2. Applesauce choice: For the best flavor, use unsweetened applesauce. You can also make your own applesauce if you prefer a fresh taste.

    3. Spice it up: Feel free to adjust the spices according to your taste. If you love cinnamon, add a bit more, or try incorporating other spices like ginger for added warmth.

    4. Don’t overmix: When combining the dry and wet ingredients, mix gently until just incorporated. Overmixing can lead to a dense cake.

    5. Frost it right: Make sure the cake is completely cooled before frosting. This prevents the frosting from melting and makes for a neat appearance.

    Variation (if any)

    You can customize this recipe in several ways. For a nutty flavor, consider adding chopped nuts like walnuts or pecans to the batter. If you want a chocolate twist, substitute a portion of the flour with cocoa powder. You can also use flavored applesauce, like cinnamon applesauce, to increase the flavor profile.

    FAQs

    1. Can I make this cake ahead of time?
    Yes, you can bake the cake a day ahead. Store it in the refrigerator and frost it on the day you plan to serve it.

    2. Can I use store-bought frosting?
    Yes, if you’re short on time, using store-bought cream cheese frosting is an option. Choose a high-quality frosting for the best taste.

    3. Is there a gluten-free version of this cake?
    You can substitute the all-purpose flour with a gluten-free flour blend to make this recipe gluten-free. Ensure the baking powder and other ingredients are also gluten-free.

    4. How can I keep the cake moist?
    Keeping the cake covered and stored properly in the refrigerator will help maintain its moisture. You can also ensure you do not overbake it, as this can lead to dryness.

    5. Can I serve this cake warm?
    Yes, serving the cake warm enhances its flavors. Just be sure to let it cool slightly before frosting.

    Nutritional Info (per serving):

    • Calories: 300
    • Total Fat: 15g
    • Saturated Fat: 8g
    • Cholesterol: 40mg
    • Sodium: 150mg
    • Total Carbohydrates: 38g
    • Dietary Fiber: 1g
    • Sugars: 28g
    • Protein: 3g

    This Applesauce Cake with Cinnamon Cream Cheese Frosting is a guaranteed hit for anyone who enjoys a sweet and spiced dessert. Its simplicity and delicious taste make it worthy of your baking repertoire. Enjoy every slice with friends and family!

  • Brown Sugar Pineapple Wings Chicken

    Brown Sugar Pineapple Wings Chicken

    Brown Sugar Pineapple Wings Chicken is a delicious and easy-to-make dish that combines the sweetness of brown sugar and pineapple with the savory flavor of chicken wings. This recipe is perfect for parties, weeknight dinners, or game day snacks. The glaze is sticky, sweet, and full of flavor, making it an irresistible treat for everyone. With just a few ingredients and simple steps, you can enjoy this mouthwatering dish that’s sure to impress.

    Why make this recipe

    Making Brown Sugar Pineapple Wings Chicken at home has many advantages. First, you can customize the flavor profile to suit your taste preferences. Whether you like it sweeter or spicier, you can adjust the ingredients accordingly. This recipe also allows you to avoid preservatives and additives often found in store-bought sauces. Additionally, cooking at home can be more economical than dining out or ordering takeout. Plus, this dish is perfect for gatherings, making it a hit at potlucks and family get-togethers. With its vibrant flavors and attractive presentation, it’s a crowd-pleaser.

    How to make Brown Sugar Pineapple Wings Chicken

    Making this recipe is straightforward, requiring minimal preparation and cooking time. Below are the ingredients and step-by-step directions that will guide you through the process of preparing this delightful dish.

    Ingredients:

    • 2 lbs chicken wings, split and tips removed
    • 1 cup pineapple juice (240 ml)
    • 1/2 cup brown sugar, packed (100 g)
    • 1/4 cup soy sauce (60 ml)
    • 2 tablespoons ketchup (30 g)
    • 1 tablespoon apple cider vinegar (15 ml)
    • 2 cloves garlic, minced
    • 1/2 teaspoon ground ginger (1 g)
    • 1/2 teaspoon chili flakes (optional for heat)
    • 1 tablespoon cornstarch (8 g)
    • 1 tablespoon water (15 ml)
    • Salt and pepper to taste
    • Green onions and sesame seeds for garnish

    Directions:

    1. Preheat your oven to 400°F (200°C).
    2. Line a baking sheet with foil and place a wire rack on top. Spray the rack with nonstick spray to prevent sticking.
    3. Season the chicken wings with salt and pepper. Arrange the wings in a single layer on the rack.
    4. Bake the wings for 40-45 minutes. Flip the wings halfway through the cooking time. They should become golden and crispy.
    5. While the wings are baking, prepare the glaze. In a saucepan over medium heat, combine the pineapple juice, brown sugar, soy sauce, ketchup, apple cider vinegar, garlic, ground ginger, and chili flakes. Bring the mixture to a simmer, stirring occasionally to mix well.
    6. In a separate small bowl, mix the cornstarch with water to create a slurry. Whisk this mixture into the sauce in the saucepan. Continue to simmer the sauce until it thickens, about 5 minutes, stirring carefully.
    7. Once the wings are done baking, transfer them to a large bowl. Pour the glaze over the wings and toss them to coat evenly.
    8. Return the glazed wings to the rack and bake for an additional 10 minutes. This step helps to caramelize the glaze on the wings.
    9. After baking, garnish the wings with sliced green onions and sesame seeds before serving. Enjoy them hot and sticky!

    How to serve Brown Sugar Pineapple Wings Chicken

    Serving Brown Sugar Pineapple Wings Chicken is easy and enjoyable. You can present the wings on a large platter or individual plates. Pair them with fresh vegetable sticks, such as carrots and celery, for added crunch. A side of ranch or blue cheese dressing can also complement the flavor of the wings. For a complete meal, consider serving rice or a simple salad on the side. Your guests will appreciate the combination of flavors, and it will make for a fantastic dining experience.

    How to store Brown Sugar Pineapple Wings Chicken

    If you have leftovers of Brown Sugar Pineapple Wings Chicken, storing them is simple. Allow the wings to cool completely before transferring them to an airtight container. Store the container in the refrigerator for up to 3 days. You can reheat the wings in the oven for the best results. Preheat the oven to 350°F (175°C) and bake the wings for about 10-15 minutes until heated through. Avoid microwaving as it can make the wings soggy.

    Tips to make Brown Sugar Pineapple Wings Chicken

    To enhance your cooking experience, consider the following tips when making Brown Sugar Pineapple Wings Chicken:

    1. Choose quality wings: Fresh or good-quality frozen wings will result in better flavor and texture.
    2. Make the glaze ahead of time: You can prepare the glaze and store it in the fridge for up to a week before using it.
    3. Adjust the sweetness: If you prefer less sweetness, reduce the amount of brown sugar or pineapple juice.
    4. Experiment with spices: Feel free to add spices or herbs to your wings for more flavor, such as smoked paprika or cayenne pepper.
    5. Grill instead of bake: If you want a smoky flavor, consider grilling the wings instead of baking them.

    Variation (if any)

    You can customize Brown Sugar Pineapple Wings Chicken in various ways. For a tropical twist, add some diced fresh pineapple into the glaze for extra texture and sweetness. If you want to enhance the heat, incorporate more chili flakes or fresh chopped jalapeños. Alternatively, for a different flavor profile, consider using honey instead of brown sugar for a unique sweet glaze. Each variation can give you a new twist on this classic recipe.

    FAQs

    Q: Can I use other cuts of chicken?
    A: Yes, you can use drumsticks or boneless chicken pieces. Just adjust the cooking time accordingly.

    Q: Can I make the wings in an air fryer?
    A: Yes, air frying is a great way to cook the wings. Cook at 375°F (190°C) for about 25-30 minutes, tossing halfway through.

    Q: Is the glaze gluten-free?
    A: To make it gluten-free, you can use gluten-free soy sauce or tamari in place of regular soy sauce.

    Q: Can I freeze the wings?
    A: Yes, you can freeze the wings before baking. Thaw them in the refrigerator overnight before cooking as directed.

    Q: How spicy are these wings?
    A: The spice level can be adjusted by omitting the chili flakes or adding more, depending on your preference.

    Nutritional Information

    • Servings: 4
    • Prep Time: 10 minutes
    • Cook Time: 55 minutes
    • Calories: Approximately 350 calories per serving
    • Total Fat: 18g
    • Saturated Fat: 5g
    • Cholesterol: 120mg
    • Sodium: 700mg
    • Total Carbohydrates: 25g
    • Dietary Fiber: 1g
    • Sugars: 15g
    • Protein: 25g

    Enjoy your homemade Brown Sugar Pineapple Wings Chicken, and savor the delightful blend of sweet and savory flavors!

  • Lazy Day Lemon Cream Pie Bars

    Lazy Day Lemon Cream Pie Bars

    Lazy Day Lemon Cream Pie Bars are a delightful dessert that captures the bright and zesty flavor of lemons in a creamy, easy-to-make bar form. Perfect for those casual days when you want something sweet without too much fuss, these bars will impress your family and friends. With a quick preparation time and simple ingredients, you can enjoy a refreshing lemon treat that is both satisfying and delicious.

    Why make this recipe

    There are many reasons to try making Lazy Day Lemon Cream Pie Bars. Firstly, they are incredibly easy to prepare, making them suitable for both novice and experienced bakers. Secondly, the combination of creamy filling and tangy lemon flavor creates a perfect balance that is sure to please any palate. Furthermore, this dessert can be made ahead of time and stored in the refrigerator, making it an excellent choice for gatherings, picnics, or simply as an afternoon treat while lounging at home. Whether you have a sweet tooth or simply want to brighten up your day with something delicious, these bars are the way to go.

    How to make Lazy Day Lemon Cream Pie Bars

    Ingredients:

    • 1 cup graham cracker crumbs (120 g)
    • 1/4 cup sugar (50 g)
    • 1/2 cup unsalted butter, melted (115 g)
    • 8 oz cream cheese, softened (225 g)
    • 1/2 cup powdered sugar (60 g)
    • 1 cup whipped topping (240 ml)
    • 2 cups lemon pie filling (480 ml)
    • Whipped cream for topping
    • Lemon slices for garnish
    • Powdered sugar for dusting

    Directions:

    1. Preheat your oven to 350°F (180°C).
    2. Grease a 9×9 inch (23×23 cm) baking dish.
    3. In a medium bowl, mix together the graham cracker crumbs, sugar, and melted butter until well combined. This mixture will be your crust.
    4. Press the graham cracker mixture into the bottom of the prepared baking dish. Make sure to spread it evenly to form a solid crust.
    5. In a separate bowl, beat together the softened cream cheese and powdered sugar until the mixture is smooth and creamy.
    6. Gently fold in the whipped topping into the cream cheese mixture until fully incorporated.
    7. Spread the cream cheese mixture evenly over the graham cracker crust.
    8. Pour the lemon pie filling over the cream cheese layer, spreading it out evenly.
    9. Place the baking dish in the preheated oven and bake for 25-30 minutes, or until the edges are set and the center is slightly jiggly.
    10. Once baked, remove the baking dish from the oven and let it cool to room temperature.
    11. After cooling, refrigerate the lemon cream pie bars for at least 2 hours to allow them to set properly.
    12. Once set, cut the bars into squares. Top with whipped cream, garnish with lemon slices, and dust with powdered sugar.
    13. Serve each square chilled for a refreshing dessert that everyone will enjoy.

    How to serve Lazy Day Lemon Cream Pie Bars

    These Lazy Day Lemon Cream Pie Bars make for a wonderful dessert after any meal. Serve them as they are or add a dollop of whipped cream on top. Fresh lemon slices make for a lovely garnish, adding an extra touch of freshness. For an elegant presentation, consider dusting the bars with powdered sugar before serving. These bars shine during summer gatherings, picnics, or even as a sweet end to holiday meals.

    How to store Lazy Day Lemon Cream Pie Bars

    To store your Lazy Day Lemon Cream Pie Bars, simply place them in an airtight container. They can be kept in the refrigerator for up to five days. If you desire to keep them longer, you can freeze the bars. Wrap the bars tightly in plastic wrap and then place them in an airtight container or freezer bag. When ready to enjoy, thaw them in the refrigerator overnight before serving.

    Tips to make Lazy Day Lemon Cream Pie Bars

    1. Use fresh ingredients: Fresh lemon juice can enhance the flavor of the lemon pie filling. If you use fresh lemons, you can also grate some lemon zest to sprinkle on top for added zing.
    2. Chill adequately: Allowing the bars to chill for at least two hours helps them to set properly, making them easier to cut without falling apart.
    3. Experiment with toppings: While whipped cream and lemon slices are great, consider adding fresh berries or a berry sauce for an extra fruity twist.
    4. Check for doneness: Since ovens can vary, keep an eye on your bars as they bake. You want them slightly jiggly in the center but firm around the edges.

    Variation (if any)

    Lazy Day Lemon Cream Pie Bars can be tweaked to suit your tastes. Consider adding coconut flakes to the graham cracker crust for a tropical twist. You could also incorporate different flavors by using different pie fillings, such as lime or orange. Feel free to adjust the sweetness by using less powdered sugar depending on your preference.

    FAQs

    Q: Can I use low-fat cream cheese?
    A: Yes, low-fat cream cheese can be used in this recipe, but it may affect the creaminess of the final product.

    Q: Is there a gluten-free option for the crust?
    A: Definitely! Use gluten-free graham cracker crumbs to make the crust and ensure the rest of your ingredients are gluten-free.

    Q: Can I make these bars in advance?
    A: Yes, you can make Lazy Day Lemon Cream Pie Bars a day in advance. They store well in the refrigerator.

    Q: How do I know when the bars are done baking?
    A: The edges of the bars should be set while the center remains slightly jiggly. The bars will firm up as they cool.

    Q: Can I use homemade whipped cream?
    A: Yes, homemade whipped cream works wonderfully and adds a fresh touch to the recipe.

    Nutritional Information

    • Serving Size: 1 square (based on 16 servings)
    • Calories: 220
    • Total Fat: 12 g
    • Saturated Fat: 7 g
    • Cholesterol: 35 mg
    • Sodium: 130 mg
    • Total Carbohydrates: 25 g
    • Dietary Fiber: 0 g
    • Sugars: 12 g
    • Protein: 2 g

    Enjoy your Lazy Day Lemon Cream Pie Bars, a sweet escape that pairs perfectly with lazy afternoons and special occasions alike!

  • Peach and Mascarpone Cake

    Peach and Mascarpone Cake

    Peach and Mascarpone Cake is a delightful dessert that combines the sweetness of ripe peaches with the rich, creamy texture of mascarpone cheese. This cake is perfect for any occasion, whether it’s a special celebration or a cozy afternoon treat. Its light and fluffy texture paired with the fruity flavor of peaches makes it a favorite among dessert lovers. In this article, we will explore why you should make this fluffy cake, how to prepare it, and some tips to enhance your baking experience.

    Why make this recipe

    There are many reasons to choose Peach and Mascarpone Cake as your next dessert. Firstly, it is easy to prepare and requires simple ingredients that are often found in your kitchen. Secondly, the cake offers a perfect balance of flavors with sweet, juicy peaches and a luscious mascarpone filling. It not only pleases the palate but also presents beautifully, making it ideal for gatherings. Thirdly, this cake can be enjoyed on its own or paired with a scoop of vanilla ice cream for an added treat. Lastly, the preparation time is reasonable, making it a great option for busy bakers.

    How to make Peach and Mascarpone Cake

    Making Peach and Mascarpone Cake involves straightforward steps that result in a scrumptious final product. With just a bit of preparation and baking time, you can create a cake that will impress your family and friends.

    Ingredients:

    • 2 eggs (2 large eggs)
    • 100 grams of sugar (1/2 cup granulated sugar)
    • 10 grams of vanilla sugar (2 teaspoons vanilla sugar)
    • 120 ml of sunflower oil (1/2 cup sunflower oil)
    • 120 grams of natural yogurt (1/2 cup natural yogurt)
    • 200 grams of flour (1 1/2 cups all-purpose flour)
    • 10 grams of baking powder (2 teaspoons baking powder)
    • 100 grams of mascarpone cheese (1/2 cup mascarpone cheese)
    • 2 tablespoons of sugar (2 tablespoons granulated sugar)
    • 1 egg (1 large egg)
    • 100 grams of peaches in syrup (about 1/2 cup peaches in syrup)
    • 20 grams of sliced almonds (2 tablespoons sliced almonds)

    Directions:

    1. Preheat the oven to 180°C (350°F). Prepare a baking pan by greasing it with butter. This prevents the cake from sticking.

    2. In a bowl, beat the eggs with the sugar and vanilla sugar. Mix well until the mixture becomes frothy and light in color.

    3. Add the sunflower oil and natural yogurt to the egg and sugar mixture. Stir until everything is well combined.

    4. Gradually add the sifted flour and baking powder to the wet mixture. Mix gently until you have a smooth batter with no lumps.

    5. Pour this cake batter into the prepared baking mold, spreading it evenly across the bottom.

    6. In another bowl, mix the mascarpone cheese with 2 tablespoons of sugar and 1 egg. Beat until you achieve a smooth and creamy consistency.

    7. Spread the mascarpone cream evenly over the surface of the batter in the baking mold.

    8. Slice the peaches from the syrup and arrange them on top of the mascarpone cream. Sprinkle the sliced almonds over the peaches for added texture and flavor.

    9. Bake the cake in the preheated oven for about 30-35 minutes or until the top is golden brown and a toothpick inserted into the center comes out clean.

    10. Once ready, remove the cake from the oven and let it cool in the pan for a few minutes before transferring it to a wire rack to cool completely.

    How to serve Peach and Mascarpone Cake

    Serve Peach and Mascarpone Cake at room temperature or chilled. It pairs wonderfully with a dollop of whipped cream or a scoop of vanilla ice cream on the side. You can also dust the top with powdered sugar for a classic finish. This cake makes an excellent dessert for gatherings, celebrations, or even a sweet treat after dinner.

    How to store Peach and Mascarpone Cake

    To store Peach and Mascarpone Cake, cover it tightly with plastic wrap or place it in an airtight container. This will help keep the cake fresh and moist. Store the cake in the refrigerator, where it can last for up to 5 days. If you prefer, you can freeze the cake as well. Wrap it tightly in plastic wrap followed by aluminum foil to prevent freezer burn. The cake can be frozen for up to 2 months. Thaw it in the fridge overnight before serving.

    Tips to make Peach and Mascarpone Cake

    1. Ensure that all your ingredients are at room temperature. This helps the batter mix more evenly.

    2. Use fresh peaches when available for the best flavor. If using canned peaches, be sure to drain them well to prevent excess moisture.

    3. Experiment with different fruits if desired, such as blueberries, raspberries, or nectarines.

    4. For added flavor, consider adding a teaspoon of almond extract to the batter or mascarpone mixture.

    5. Keep an eye on the cake while it bakes, as oven temperatures can vary.

    Variation (if any)

    Consider adding a crumb topping made of flour, butter, and sugar if you want a crunchy texture. You could also infuse the cake with lemon zest or a sprinkle of cinnamon for a unique twist. Additionally, replace the peaches with seasonal fruits to change the flavors according to your preference.

    FAQs

    1. Can I use low-fat mascarpone cheese?
    Yes, low-fat mascarpone can be used, but it may affect the creaminess of the cake.

    2. How can I make this cake gluten-free?
    To make a gluten-free version, substitute regular flour with a gluten-free flour blend.

    3. Can I make this cake in advance?
    Yes, you can bake the cake a day in advance. It actually tastes better after the flavors settle.

    4. What are some good drink options to serve with this cake?
    This cake pairs well with coffee, tea, or a light sparkling wine.

    5. Can I use frozen peaches?
    Yes, you can use frozen peaches. Thaw them and drain any excess moisture before using.

    Nutritional Information (per serving)

    • Calories: 250
    • Protein: 5g
    • Fat: 11g
    • Carbohydrates: 35g
    • Fiber: 1g
    • Sugar: 18g

    Peach and Mascarpone Cake is a simple yet impressive dessert that can delight any crowd. Follow this easy recipe, and you will be well on your way to baking a fantastic cake that is sure to be a hit!

  • Fried Toasts

    Fried Toasts

    Fried toasts are a delicious and satisfying treat that can brighten your day. This recipe is simple, perfect for breakfast, brunch, or a snack. Made with basic ingredients, these crispy delights are easy to prepare and even easier to enjoy. Whether you eat them plain or topped with your favorite sweet treats, fried toasts will become a staple in your kitchen.

    Why make this recipe

    Making fried toasts at home has many advantages. First, it allows you to customize the flavors and sweetness to your liking. You can use fresh ingredients and avoid preservatives found in store-bought options. Second, this recipe is cost-effective. You can prepare a large batch for a fraction of the price of buying similar snacks. Lastly, frying the toasts brings out a wonderful aroma and texture that ensures enjoyment in each bite. Fried toasts are versatile and can be paired with different toppings, making them suitable for various occasions.

    How to make Fried Toasts

    Making fried toasts is a straightforward process. With just a few steps, you can create a batch of warm, fluffy, and crispy treats. The ingredients are simple and common in most kitchens. Follow the recipe below for perfect fried toasts every time.

    Ingredients:

    • 230 ml warm milk (1 cup)
    • 15 tablespoons sugar (200 g)
    • 8 g dry yeast (2 1/4 teaspoons)
    • 1 egg
    • 1 packet vanilla sugar (approximately 10 g)
    • 1/2 teaspoon salt (3 g)
    • Approximately 360 g flour (3 cups)
    • Oil for frying
    • Powdered sugar for decorating

    Directions:

    1. Activate the yeast: Start by pouring warm milk into a bowl. Add sugar and dry yeast to the milk. Stir well and let the mixture activate for 5 minutes. You should see some bubbling, indicating that the yeast is working.

    2. Prepare the dough: Once the yeast is activated, add the egg, vanilla sugar, and salt to the mixture. Gradually mix in the flour until a dough forms. The dough should be slightly sticky but manageable.

    3. Knead the dough: Turn the dough onto a floured surface and knead it until it is smooth and compact. This will take about 5 to 10 minutes. Proper kneading helps develop the gluten, giving the toasts their desired texture.

    4. Let the dough rest: Grease a bowl with a bit of oil, place the dough in it, and cover it with a cloth. Let it rise in a warm place until it doubles in size. This will take about 30 minutes to 1 hour, depending on the temperature of your kitchen.

    5. Shape the toasts: After the dough has risen, turn it out onto a floured surface. Roll the dough into logs and then divide it into equal pieces. Shape each piece into a ball. Let the balls rest for another 15-20 minutes covered with a cloth.

    6. Fry the toasts: Heat a generous amount of oil in a frying pan over medium heat. Once the oil is hot, take each ball of dough and flatten it slightly. Make a few cuts on the surface of the flattened dough for decoration and to help it cook evenly. Fry each piece in the hot oil until they are golden brown on both sides, about 2-3 minutes per side.

    7. Enjoy: Once cooked, remove the fried toasts from the pan and place them on a paper napkin to drain the excess oil. Sprinkle with powdered sugar if desired and serve warm.

    How to serve Fried Toasts

    Fried toasts can be served in various ways, making them fun and versatile. They are delightful on their own, but you can also enhance their flavor by pairing them with different toppings. Consider serving them with fruit preserves, honey, or fresh fruit. A dollop of whipped cream or a drizzle of chocolate sauce can make them extra special for dessert. For breakfast, you might enjoy them with butter and syrup or even a sprinkle of cinnamon sugar for an extra kick. No matter how you serve them, fried toasts are sure to be a hit!

    How to store Fried Toasts

    If you find that you have leftover fried toasts, you can store them easily. First, allow the toasts to cool completely. Then, place them in an airtight container. You can store them at room temperature for a day or two. For longer storage, consider placing them in the refrigerator, where they will last for up to a week. If you want to enjoy them later, fried toasts can also be frozen. Just place them in a freezer-safe bag, and they can last up to three months. To reheat, simply warm them in a toaster or a pan.

    Tips to make Fried Toasts

    1. Use warm milk: Make sure the milk is warm, not hot. Hot milk can kill the yeast, while cold milk won’t activate it properly.

    2. Let the dough rise properly: Ensure the dough rises in a warm environment to encourage proper yeast activity. This will lead to a fluffier texture.

    3. Don’t overcrowd the pan: Fry only a few toasts at a time to avoid lowering the oil temperature. This ensures that each toast fries evenly and gets that golden brown color.

    4. Adjust sweetness: Feel free to adjust the sugar in the recipe according to your taste. You can also use alternatives like honey or maple syrup for different flavor profiles.

    Variation (if any)

    Fried toasts can be customized in many ways. Consider adding spices like cinnamon or nutmeg to the dough for a warm flavor. For a savory option, add herbs and garlic powder to the dough. You can even stuff the toasts with cheese or chocolate before frying them for a delightful surprise. There are countless variations to explore, making fried toasts endlessly versatile.

    FAQs

    1. Can I use whole wheat flour?
    Yes, you can substitute whole wheat flour for all-purpose flour. However, the texture may be denser.

    2. How can I tell when the oil is hot enough?
    You can check the oil temperature by dropping a small piece of dough into the oil. If it sizzles and rises to the surface, the oil is ready.

    3. Can I make the dough ahead of time?
    Absolutely! You can prepare the dough, let it rise, and refrigerate it. When you are ready to fry, simply take it out and let it come to room temperature.

    4. Are fried toasts suitable for freezing?
    Yes, you can freeze fried toasts. Just make sure they are completely cool before placing them in a freezer-safe bag.

    5. What’s the best way to reheat fried toasts?
    The best way to reheat fried toasts is in a toaster or a hot pan for a bit of crispiness. You can also use an oven, but be wary of making them too dry.

    Nutritional Information:

    • Serving Size: 1 fried toast
    • Calories: 150
    • Total Fat: 7g
    • Saturated Fat: 1g
    • Cholesterol: 20mg
    • Sodium: 90mg
    • Total Carbohydrates: 22g
    • Dietary Fiber: 1g
    • Sugars: 5g
    • Protein: 3g

    Fried toasts are a delightful addition to any meal, offering a perfect blend of sweetness and crunch. Enjoy making these tasty treats at home!

  • Lemon Cake

    Lemon Cake

    Lemon cake is a delightful dessert that brings a burst of freshness to your table. Its zesty flavor and moist texture make it a favorite for many. Whether you are celebrating a special occasion, hosting a casual get-together, or simply craving something sweet, lemon cake fits the bill. Here’s a simple and easy recipe for a classic lemon cake that anyone can make at home.

    Why make this recipe

    Making lemon cake at home is rewarding. The tangy flavor from the lemon juice combined with the sweetness of the cake creates a perfect balance. It is not only delicious but also visually appealing with its bright yellow color. This lemon cake recipe is easy to follow and does not require any fancy ingredients or equipment. It is perfect for bakers of all skill levels, and the preparation time is short. Moreover, a homemade lemon cake can impress your friends and family, and it’s a fantastic way to brighten up any meal.

    How to make Lemon Cake

    Follow these simple steps to create a delightful lemon cake that will have everyone asking for seconds. The preparation time is about 15 minutes, and the baking time is around 40 minutes.

    Ingredients:

    • 3 eggs (150 grams)
    • 150 grams sugar (3/4 cup)
    • 10 grams vanilla sugar (1 tablespoon)
    • 50 grams sour cream (1/4 cup)
    • 150 ml vegetable oil (2/3 cup)
    • Juice of half a lemon
    • 250 grams flour (2 cups)
    • 15 grams baking powder (1 tablespoon)
    • Powdered sugar for dusting

    Directions:

    1. Preheat your oven to 180°C (350°F). This is an important step to ensure that your cake bakes evenly.

    2. In a large mixing bowl, beat together the eggs, sugar, and vanilla sugar until the mixture is fluffy. You can use an electric mixer or whisk by hand to achieve this texture.

    3. Once fluffy, add the sour cream, vegetable oil, and the juice of half a lemon to the egg mixture. Mix well until all the ingredients are combined.

    4. In another bowl, sift together the flour and baking powder. Gradually add this dry mixture to the wet ingredients, stirring gently to combine. Mix until the batter is smooth and there are no lumps.

    5. Prepare a baking pan by greasing it with butter and flour. This step will prevent the cake from sticking.

    6. Pour the batter into the prepared baking pan, ensuring it is evenly spread.

    7. Place the pan in the preheated oven and bake for approximately 40 minutes, or until the top of the cake is golden brown and a toothpick inserted into the center comes out clean.

    8. Once baked, remove the cake from the oven and allow it to cool in the pan for about 10 minutes. Then, transfer it to a wire rack to cool completely.

    9. Before serving, dust the cooled lemon cake with powdered sugar for a pretty presentation.

    How to serve Lemon Cake

    Lemon cake can be served in various ways to enhance its flavor and presentation. You can serve it plain, or pair it with fresh whipped cream, berries, or a scoop of vanilla ice cream. For an extra touch, consider drizzling a lemon glaze over the top. To do this, mix powdered sugar with a little lemon juice until you reach your desired consistency. This addition will elevate the flavor and make it an even more enjoyable dessert.

    How to store Lemon Cake

    To store lemon cake, first ensure it is completely cooled. Wrap the cake in plastic wrap or aluminum foil to keep it fresh. You can store it at room temperature for up to 2 days. For longer storage, place it in the refrigerator, where it can last up to a week. If you want to keep it for an extended period, consider freezing the cake. Wrap it tightly in plastic wrap and then place it in an airtight container. When properly stored, lemon cake can last in the freezer for up to 3 months.

    Tips to make Lemon Cake

    1. Use Fresh Lemons: For the best flavor, use fresh lemons to extract the juice. It makes a significant difference compared to store-bought lemon juice.

    2. Room Temperature Ingredients: Ensure that your eggs and sour cream are at room temperature before mixing. This helps the batter combine more easily.

    3. Do Not Overmix: When combining the dry and wet ingredients, mix just until you see no more flour. Overmixing can lead to a dense cake.

    4. Check for Doneness: Since oven temperatures can vary, always check your cake a few minutes before the indicated baking time.

    5. Experiment with Flavors: You can add lemon zest for extra citrus flavor or substitute different types of oils like olive oil for a unique taste.

    Variation (if any)

    While this recipe is for a classic lemon cake, you can create variations to suit your taste. Consider adding poppy seeds to the batter for a nice crunch. You can also make a lemon blueberry cake by folding in fresh or frozen blueberries before baking. Creating a lemon cream cheese frosting instead of simply dusting with powdered sugar can also add a rich and creamy element to the dessert.

    FAQs

    1. Can I use a different type of flour?

    Yes, you can substitute all-purpose flour with cake flour for an even lighter texture. However, if you want a gluten-free option, use a gluten-free flour blend, but make sure it contains xanthan gum.

    2. Can I make this cake ahead of time?

    Absolutely! You can make the lemon cake a day ahead of time. Just store it in an airtight container and keep it at room temperature.

    3. What can I do if my cake sinks in the middle?

    A sinking cake can happen if the batter is too wet, or if it is not baked long enough. Ensure proper measurements and check your oven temperature.

    4. Can I add frosting to my lemon cake?

    Yes, lemon cake pairs beautifully with frosting. A lemon buttercream or cream cheese frosting can complement the flavors perfectly.

    5. Is there a dairy-free alternative for this lemon cake?

    Yes, you can use non-dairy sour cream or a plant-based yogurt as a substitute for sour cream and use vegetable oil as your fat source.

    Nutritional Information (per slice, assuming 12 servings)

    • Calories: 190
    • Protein: 3g
    • Total Fat: 7g
    • Saturated Fat: 1g
    • Carbohydrates: 30g
    • Sugar: 15g
    • Fiber: 0g

    Enjoy making and sharing your homemade lemon cake! With its bright flavor and simple ingredients, it’s sure to become a favorite in your household.

  • Peach Cream Cake

    Peach Cream Cake

    Peach Cream Cake is a delightful dessert that combines the sweetness of peaches with a rich and creamy filling. This cake is perfect for summer gatherings, birthdays, or any occasion where you want to impress your family and friends. Its light texture and delicious flavor make it a favorite among dessert lovers. With its beautiful presentation, Peach Cream Cake also serves as a stunning centerpiece at any event.

    In this article, we will explore why you should make this recipe, how to prepare it, and share some tips to make your baking experience easy and enjoyable. Let’s dive into the sweet world of Peach Cream Cake!

    Why make this recipe

    There are several reasons to make Peach Cream Cake. First, it’s an excellent way to enjoy fresh peaches, especially during peach season. The cake captures the essence of summer with its fruity flavor and creamy texture. Additionally, this recipe is straightforward, making it accessible for bakers of all skill levels.

    This cake is versatile, whether you want to serve it as a dessert after dinner or as a sweet treat during the day. The creamy filling combined with the peaches creates a heavenly bite that will leave everyone wanting more. Plus, baking this cake fills your kitchen with delightful aromas that make your home feel warm and inviting.

    How to make Peach Cream Cake

    Making Peach Cream Cake may seem complicated, but with a clear set of instructions, it becomes manageable and fun. Below, you will find the ingredients and step-by-step directions to create this sweet masterpiece.

    Ingredients:

    • 140 grams (5 ounces) of butter
    • 1 egg
    • 100 grams (½ cup) of sugar
    • 10 grams (2 teaspoons) of vanilla sugar
    • Zest of 1 orange
    • 300 grams (2½ cups) of flour
    • 10 grams (2 teaspoons) of baking powder
    • 500 ml (2 cups) of milk
    • 1 egg yolk
    • 10 grams (2 teaspoons) of vanilla sugar
    • 4 tablespoons of sugar
    • 5 tablespoons of cornstarch
    • 50 ml (3 tablespoons) of orange juice
    • 150 ml (⅔ cup) of already sweetened whipped cream
    • 200 grams (7 ounces) of peaches in syrup, drained

    Directions:

    1. In a large bowl, mix the softened butter with the sugar until it becomes creamy. Use a hand mixer if you prefer, but a whisk will work as well.
    2. Add the egg, orange zest, and baking powder to the bowl and mix until everything is well incorporated.
    3. Gradually add the flour to the mixture, stirring continuously until a homogeneous dough is formed.
    4. Once the dough is ready, wrap it in plastic wrap and let it rest in the refrigerator for about 30 minutes. Chilling the dough helps it to be easier to handle.
    5. While the dough is resting, prepare the cream filling. In a saucepan, heat the milk mixed with sugar, vanilla sugar, and orange juice over medium heat. Stir until the sugar dissolves and the mixture is warm, but do not boil.
    6. In a separate bowl, whisk the egg yolk with the cornstarch until smooth.
    7. Gradually add the hot milk mixture to the egg yolk and cornstarch mixture, mixing constantly to prevent any lumps from forming.
    8. Return this mixture to the heat. Cook over low heat while stirring until the cream thickens. This process usually takes about 5 minutes.
    9. Once the cream has thickened, remove it from the heat and let it cool down.
    10. Preheat your oven to 180°C (350°F).
    11. Take the chilled dough from the refrigerator. Roll it out on a floured surface or between two pieces of parchment paper until it is large enough to cover your greased and floured baking pan.
    12. Gently place the rolled-out dough into the baking pan and press it into the bottom and sides.
    13. Pour the prepared cream filling over the dough and spread it evenly.
    14. Lastly, arrange the drained peaches in syrup on top of the cream filling, decorating them as you like.
    15. Bake in the preheated oven for approximately 40-45 minutes or until the cake is golden brown on top and fully cooked through.
    16. When it’s done, remove it from the oven and allow it to cool for a few minutes.

    How to serve Peach Cream Cake

    Peach Cream Cake can be served warm or chilled, depending on your preference. Cut it into slices and plate it for serving. If desired, you can top each slice with a dollop of whipped cream or a sprinkle of powdered sugar for extra sweetness. Fresh mint leaves can also make a lovely garnish. This dessert pairs well with a scoop of vanilla ice cream or a glass of iced tea, enhancing the delightful peach flavors.

    How to store Peach Cream Cake

    To store Peach Cream Cake, let it cool completely first. Place any leftover cake in an airtight container and store it in the refrigerator. It can last for up to 3 days. If you want to keep it for a longer period, consider freezing it. Wrap individual slices in plastic wrap and then foil, and store them in the freezer. The cake can be frozen for up to 2 months. Thaw it in the refrigerator overnight when you’re ready to enjoy.

    Tips to make Peach Cream Cake

    • Use ripe, juicy peaches for the best flavor. If fresh peaches are not available, canned peaches can also work well.
    • Make sure the butter is at room temperature for easier mixing.
    • When rolling out the dough, keep it floured to prevent it from sticking.
    • If the cream filling is too hot when added to the egg yolks, it might scramble the eggs. Always whisk while adding hot mixtures.
    • Feel free to adjust the sugar level in the recipe based on your taste preferences.

    Variation (if any)

    You can switch up the fruit in this cake for a different flavor profile. Consider using pears, apricots, or berries as lovely alternatives. You can also add spices like cinnamon or nutmeg to the cream filling for an extra layer of flavor. Additionally, try adding a bit of almond extract to the dough for a nutty touch.

    FAQs

    Q: Can I use fresh peaches instead of peaches in syrup?
    A: Yes, fresh peaches can be used. Just make sure to slice them thinly and toss them in a bit of sugar to enhance their sweetness.

    Q: Can I use gluten-free flour for this recipe?
    A: Yes, gluten-free flour can be used in place of regular flour. Make sure to choose a blend that works for baking.

    Q: How can I make the cake more flavorful?
    A: You can enhance the flavor by adding almond or lemon extract to the dough or cream.

    Q: How do I know when the cake is done baking?
    A: The cake is done when it’s golden brown on top and a toothpick inserted in the center comes out clean.

    Q: Is it necessary to chill the dough?
    A: While it’s not strictly necessary, chilling the dough makes it easier to roll out and shapes it well in the baking pan.

    Nutritional Information

    One slice of Peach Cream Cake (based on 12 servings) contains approximately:

    • Calories: 250
    • Protein: 4g
    • Fat: 12g
    • Carbohydrates: 34g
    • Fiber: 1g
    • Sugar: 14g

    Enjoy making and savoring this delightful Peach Cream Cake! With its creamy filling and sweet peach topping, it’s sure to bring a smile to your face and warmth to your gatherings.

  • Orange Cream Dessert

    Orange Cream Dessert

    Orange Cream Dessert is a delightful treat that combines the bright, tangy taste of oranges with a creamy texture that melts in your mouth. This dessert is perfect for any occasion, whether you’re hosting a dinner party or simply want to enjoy a sweet dish at home. The vibrant flavor of oranges paired with a smooth, creamy base creates a refreshing finish to any meal. In this article, you will learn how to prepare this easy yet delicious dessert, as well as find tips for serving and storing it.

    Why make this recipe

    There are many reasons to make Orange Cream Dessert. First, it offers a refreshing taste that can brighten your day. The natural sweetness of oranges paired with the creamy texture appeals to both children and adults alike. Additionally, this dessert is simple to prepare, requiring just a few ingredients that you may already have in your pantry. This means you can whip it up on a whim without a trip to the grocery store. Finally, the bright color and lightness of this dessert make it visually appealing, making it a great choice for gatherings or celebrations.

    How to make Orange Cream Dessert

    Making Orange Cream Dessert is a straightforward process that can be completed in a short amount of time. With just a few steps, you can create a delicious and satisfying treat that will impress your guests.

    Ingredients:

    • 2 oranges (approximately 300 grams)
    • 3 tablespoons sugar (37.5 grams)
    • 3 tablespoons cornstarch (24 grams)
    • 40 grams butter (approximately 3 tablespoons)
    • Coconut flour for garnish (optional)

    Directions:

    1. Begin by grating the zest of two oranges. Make sure to avoid the white pith, as this can add bitterness to your dessert.
    2. Next, juice the oranges. You should have about half a cup of fresh orange juice.
    3. In a medium saucepan, combine the sugar and cornstarch, mixing them well.
    4. Slowly pour the orange juice into the saucepan while stirring continuously to avoid lumps forming.
    5. Add the grated orange zest to the mixture.
    6. Heat the saucepan over medium-low heat, stirring constantly. The mixture will begin to thicken as it cooks.
    7. Once it reaches the desired creamy consistency, add the butter. Stir until the butter is fully melted and the mixture is smooth.
    8. Remove the saucepan from the heat and let the mixture cool slightly.
    9. Pour the creamy orange mixture into molds or individual serving bowls.
    10. Once cooled, garnish each serving with coconut flour if desired for added texture and flavor.

    How to serve Orange Cream Dessert

    Serving Orange Cream Dessert is easy and flexible. You can serve it in various ways based on the occasion. If you are hosting a casual dinner, pour the dessert into individual serving bowls for a charming presentation. For a more formal gathering, use elegant glass molds. The coconut flour garnish adds a nice touch, giving your dessert a bit of texture. You can also pair the dessert with whipped cream or fresh fruit for extra flavor.

    How to store Orange Cream Dessert

    If you happen to have leftovers of this delightful Orange Cream Dessert, you can easily store them. Allow the dessert to cool completely before covering it with plastic wrap or placing it in an airtight container. Store it in the refrigerator, where it will stay fresh for up to three days. It is best to consume it within this time frame for optimal flavor and texture. If you wish to preserve it longer, you can try freezing it.

    To freeze, pour the cooled dessert into a freezer-safe container. Leave a little space at the top for expansion. When you are ready to enjoy it again, thaw it in the refrigerator overnight before serving. Note that the texture might slightly change after freezing, but it will still taste delicious.

    Tips to make Orange Cream Dessert

    Here are some practical tips to help you make the best Orange Cream Dessert possible:

    • Use fresh oranges for the best taste and quality. Freshly squeezed juice provides the most vibrant flavor.
    • Be attentive while cooking. Stir constantly to prevent the mixture from sticking to the bottom of the saucepan and scorching.
    • If you prefer a sweeter dessert, feel free to adjust the amount of sugar to suit your taste.
    • Experiment with different garnishes. Besides coconut flour, you could use crumbled cookies, chopped nuts, or a sprinkle of cinnamon for variation.
    • For a richer flavor, consider adding a splash of vanilla extract while cooking the mixture.

    Variation (if any)

    While this recipe is already beautiful in its simplicity, you can make a few variations to suit your personal taste. One delightful option is to incorporate other citrus fruits, such as lemons or limes, for a citrus medley flavor. Simply replace some of the orange juice with lemon or lime juice, adjusting the sugar accordingly.

    For those who enjoy a more tropical twist, adding a few tablespoons of shredded coconut into the mixture can enhance the dessert’s creaminess and flavor. If you like a bit more texture, consider folding in some fresh orange segments after cooking.

    FAQs

    Can I make this dessert ahead of time?
    Yes, you can prepare Orange Cream Dessert ahead of time. It can be made a day in advance and stored in the refrigerator.

    Can I use bottled orange juice?
    While fresh orange juice is highly recommended for the best flavor, you can use bottled orange juice if that’s what you have on hand. The taste may not be as vibrant, but it will still work.

    Is this dessert gluten-free?
    Yes, this dessert is gluten-free, especially if you use coconut flour for garnish. Always double-check the packaging of your ingredients to ensure there are no hidden gluten sources.

    What should I do if the mixture doesn’t thicken?
    If your mixture does not thicken, reheat it over low heat while continuing to stir. Make sure the heat is not too high, as this can cause the cornstarch to cook unevenly.

    How many servings does this recipe make?
    This recipe typically serves 4 to 6 people, depending on the portion sizes.

    Nutritional Information

    Each serving of Orange Cream Dessert contains approximately:

    • Calories: 180
    • Total Fat: 10 grams
    • Saturated Fat: 6 grams
    • Cholesterol: 35 mg
    • Sodium: 15 mg
    • Total Carbohydrates: 22 grams
    • Dietary Fiber: 1 gram
    • Sugars: 15 grams
    • Protein: 2 grams

    In conclusion, Orange Cream Dessert is a lively and satisfying dish that anyone can enjoy. Simple to make and bursting with flavor, it is the perfect way to treat yourself or impress guests. Follow this easy guide, and you will end up with a delicious dessert that is sure to please.