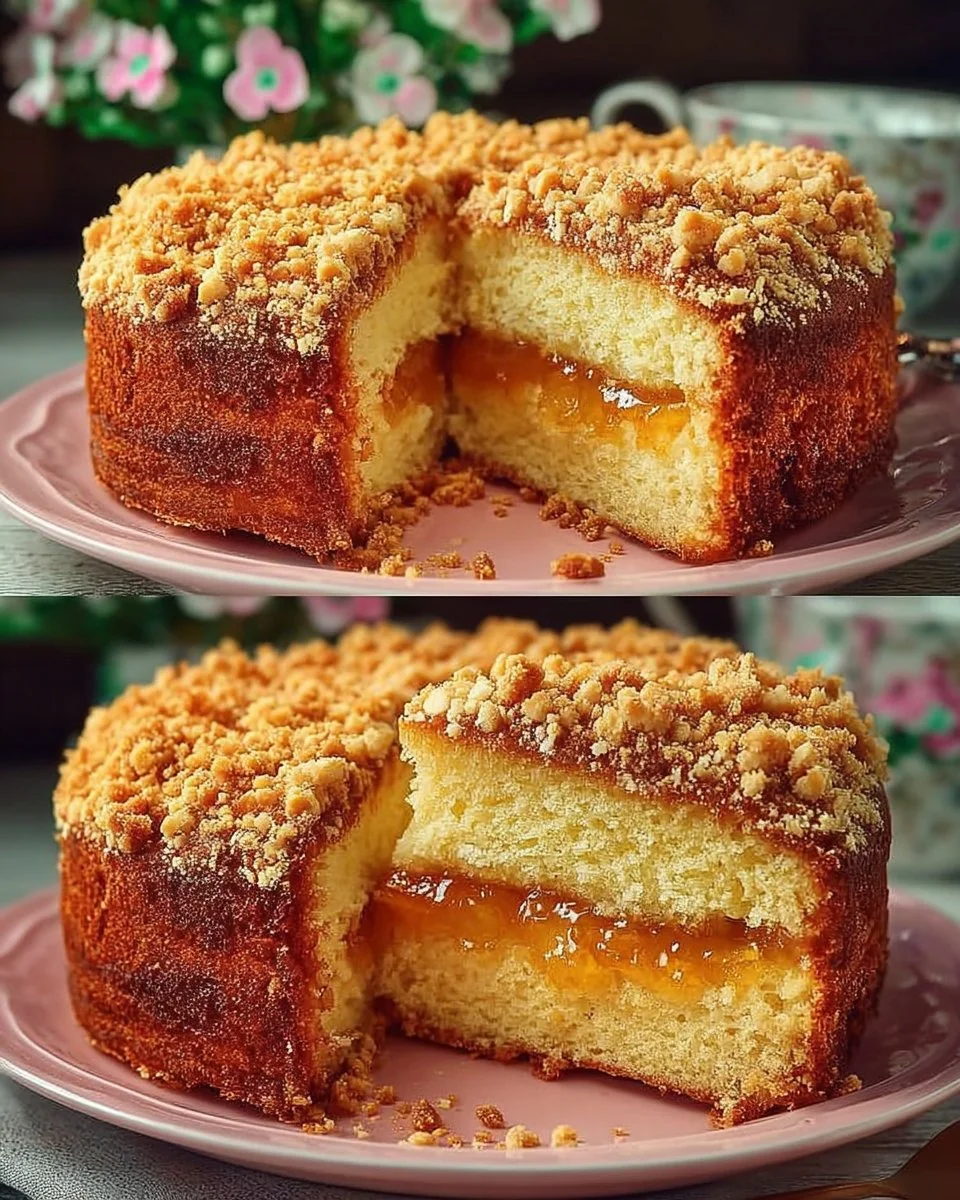
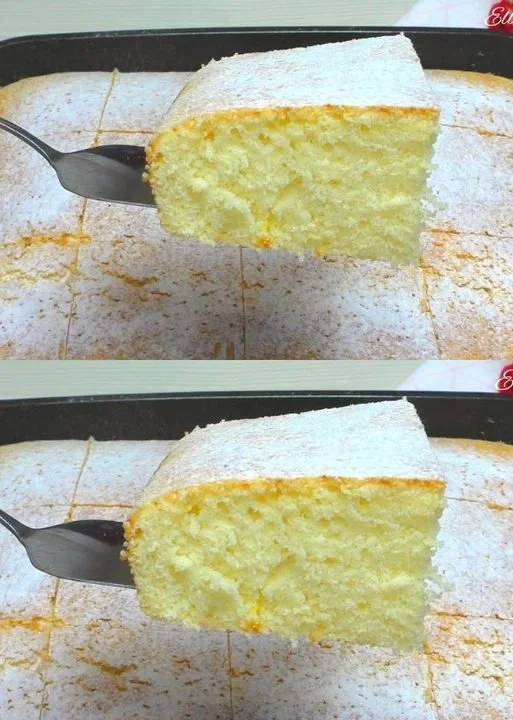
Author: Maria

  • Lemon Yogurt Cake

    Lemon Yogurt Cake

    Lemon Yogurt Cake is a delightful dessert that combines the tangy flavor of lemon with the creaminess of yogurt. This cake is moist, fluffy, and has a refreshing citrus taste that makes it perfect for any occasion. Whether you want to enjoy it with your afternoon tea, serve it at a gathering, or simply indulge in a sweet treat at home, this recipe is easy to follow and yields a delicious result. It is a charming cake that your friends and family will love.

    Why make this recipe

    Making Lemon Yogurt Cake is a great way to introduce a burst of fresh flavor into your dessert repertoire. The primary ingredients—yogurt and lemon—bring both moisture and zest to the cake. Unlike traditional cakes that can be dense or overly sweet, this recipe strikes a perfect balance with its light texture and slight tartness. Additionally, using yogurt helps to keep the cake moist while reducing the amount of fat needed. It’s a simple recipe that anyone can follow, even if you do not have baking experience. Lemon Yogurt Cake is also versatile; you can enjoy it plain, dress it up with frosting, or serve it with fresh fruit. Moreover, this cake is perfect for any season, brightening up your table in winter or enhancing your summer picnics.

    How to make Lemon Yogurt Cake

    Making Lemon Yogurt Cake involves a few simple steps. You will begin by assembling all your ingredients and preheating your oven. As you mix the ingredients, you will notice the smooth batter coming together beautifully. Once baked, this cake will fill your kitchen with a delightful lemon aroma that is absolutely irresistible.

    The following details the exact steps you need to take to create this delightful dessert.

    Ingredients:

    • 4 eggs (large)
    • 150 grams of sugar (¾ cup)
    • 1 teaspoon of vanilla extract
    • A pinch of salt
    • 150 grams of yogurt (¾ cup)
    • 100 ml of melted butter (⅓ cup)
    • 230 grams of flour (1 ⅔ cups)
    • 16 grams of baking powder (1 tablespoon)
    • Zest of one lemon
    • 2 tablespoons of lemon juice

    Directions:

    1. Preheat your oven to 180°C (350°F). Prepare a baking pan by lining it with parchment paper or lightly greasing it with butter and flour. This step ensures the cake releases easily after baking.

    2. In a large bowl, beat the eggs with the sugar, vanilla extract, and a pinch of salt. Use a whisk or a mixer to blend these ingredients until they are frothy and light in color. This aeration is key to achieving a light texture in the cake.

    3. Next, add the yogurt and melted butter to the egg and sugar mixture. Combine these ingredients gently until you create a homogeneous batter. Be careful not to over-mix, as it may affect the cake’s fluffiness.

    4. Sift the flour along with the baking powder into the mixture. Gently fold the dry ingredients into the wet mixture using a spatula. Continue to mix until the batter is smooth and lacking lumps.

    5. Incorporate the lemon zest and lemon juice into the batter, mixing well to ensure the fresh citrus flavor is evenly distributed throughout.

    6. Pour the batter into the prepared baking pan, using a spatula to level the surface if necessary.

    7. Bake in the preheated oven for about 35-40 minutes, or until the top is golden brown. To check for doneness, insert a toothpick into the center of the cake; it should come out clean if the cake is fully baked.

    8. Once baked, remove the cake from the oven and allow it to cool in the pan for a few minutes. Then, transfer it to a wire rack to cool completely. After cooling, cut the cake into desired portions and serve.

    How to serve Lemon Yogurt Cake

    Serving Lemon Yogurt Cake is simple. You can enjoy it plain, allowing the lemon flavor to shine through. For a more indulgent experience, consider dusting it with powdered sugar or drizzling it with a simple lemon glaze. To make the glaze, combine powdered sugar with a bit of lemon juice until you achieve your desired consistency. Fresh berries or a scoop of whipped cream can complement the cake beautifully, adding color and extra flavor.

    This cake is excellent for breakfast, dessert, or as a snack. Pair it with coffee or tea to enhance the refreshing lemon taste.

    How to store Lemon Yogurt Cake

    To keep your Lemon Yogurt Cake fresh, store it in an airtight container at room temperature for up to three days. If you want to prolong its freshness, consider refrigerating it. Wrap it tightly in plastic wrap or place it in an airtight container; it should last up to a week in the fridge. If you need to store the cake for more extended periods, you can freeze it. Wrap individual slices tightly in plastic wrap and place them in a freezer-safe container. The cake can last for up to three months in the freezer. When ready to enjoy, simply let it thaw at room temperature.

    Tips to make Lemon Yogurt Cake

    • If you like a stronger lemon flavor, consider adding more lemon juice or zest according to your taste.
    • Use a high-quality yogurt for the best results. Greek yogurt will yield a denser, creamier cake, while regular yogurt will give a lighter texture.
    • To prevent the cake from sticking to the pan, make sure to use enough butter and flour for greasing, or line your pan with parchment paper.
    • Experiment with different flavor combinations by adding poppy seeds or using different citrus fruits like orange or lime.

    Variation (if any)

    While Lemon Yogurt Cake is delightful on its own, you can easily customize it. Here are a few variations:

    • Berry Lemon Yogurt Cake: Fold in fresh or frozen berries such as blueberries or raspberries for a fruity twist.
    • Lemon Lavender Yogurt Cake: Add dried culinary lavender to the batter for an aromatic flavor.
    • Lemon Coconut Yogurt Cake: Incorporate shredded coconut into the batter for a tropical flair.

    FAQs

    Can I use low-fat yogurt for this recipe?

    Yes, you can use low-fat yogurt; however, full-fat yogurt will yield a richer flavor and texture.

    How do I know when the cake is done baking?

    Check by inserting a toothpick into the center of the cake. It should come out clean when the cake is done.

    Can I make this cake in advance?

    Absolutely! This cake stays fresh up to a week in the refrigerator, making it perfect for make-ahead desserts.

    Is it necessary to sift the flour?

    Sifting is not mandatory, but it helps remove any lumps and aerates the flour, which can lead to a lighter cake.

    Can I substitute baking powder for baking soda?

    Baking powder is preferred in this recipe for the right leavening. However, if you only have baking soda, you may need to add an acid like buttermilk or vinegar for the right reaction.

    Nutritional Information

    • Serving Size: 1 slice (approximately 80 grams)
    • Calories: 230
    • Protein: 4g
    • Carbohydrates: 35g
    • Dietary Fiber: 1g
    • Sugars: 12g
    • Total Fat: 9g
    • Saturated Fat: 5g
    • Cholesterol: 75mg
    • Sodium: 150mg

    Lemon Yogurt Cake is a refreshing, easy-to-make dessert that can brighten your day. Try making it today and enjoy the delightful flavors it offers!

  • Apricot Jam Cake

    Apricot Jam Cake

    Apricot Jam Cake is a delightful dessert that combines the sweetness of fresh apricot jam with a light, fluffy cake. This recipe is simple, making it perfect for novice bakers and experienced ones alike. The cake not only tastes fantastic but also looks beautiful when served. With just a few ingredients, you can create a memorable treat that is sure to impress your friends and family. Whether you want to serve it as a dessert or enjoy it with your afternoon tea, this cake will become a favored recipe in no time.

    Why make this recipe

    Making Apricot Jam Cake is an excellent choice for several reasons. First, it is a great way to use apricot jam, especially if you have some left over from previous baking projects. The jam adds a rich flavor and a lovely color to the cake. Additionally, this cake is versatile; you can serve it for birthdays, afternoon teas, or even a casual dessert after dinner. The combination of soft cake and sweet jam creates a delicious treat that appeals to all ages.

    Another wonderful reason to make this cake is its simplicity. The recipe requires minimal hands-on time and ingredients, making it a great option for a busy schedule or for unexpected guests. Finally, this cake is quite forgiving. Even if you are not an expert baker, it is hard to get it wrong!

    How to make Apricot Jam Cake

    Making an Apricot Jam Cake takes about 10 minutes to prepare and 30 to 35 minutes to bake. The total time from start to finish is approximately 45 to 50 minutes, and this recipe yields about 8 servings.

    Ingredients:

    • 2 eggs (2 large eggs)
    • 50 g sugar (1/4 cup sugar)
    • 8 g vanilla sugar (1 teaspoon vanilla sugar or 1 teaspoon vanilla extract)
    • 50 ml milk (3 tablespoons milk)
    • 50 ml vegetable oil (3 tablespoons vegetable oil)
    • 110 g wheat flour (1 cup all-purpose flour)
    • 16 g baking powder (1 teaspoon baking powder)
    • Apricot jam (to taste)
    • Chopped peanuts (optional, for decoration)

    Directions:

    1. Preheat your oven to 180°C (350°F). Prepare an 18 cm (7-inch) baking pan by lining it with parchment paper. Then, grease and flour the sides of the pan.

    2. In a mixing bowl, beat the eggs together with the sugar and vanilla sugar until the mixture is fluffy and light in color.

    3. Pour in the milk and vegetable oil into the egg mixture. Mix well until all ingredients are combined.

    4. Sift together the wheat flour and baking powder. Gradually add this to the wet ingredients. Mix until you have a smooth batter.

    5. Pour half of the batter into the prepared baking pan. Place it in the oven and bake for about 15 minutes.

    6. After 15 minutes, carefully take the pan out of the oven and spread a generous layer of apricot jam evenly over the baked layer.

    7. Cover the jam layer with the remaining batter. Return the pan to the oven and bake for an additional 15 to 20 minutes until the cake is golden and a toothpick inserted into the center comes out clean.

    8. Once baked, let the cake cool completely in the pan.

    9. For decoration, spread a thin layer of apricot jam on top of the cake. If desired, sprinkle chopped peanuts on top for added texture and flavor.

    How to serve Apricot Jam Cake

    Once your Apricot Jam Cake has cooled and is decorated, it is ready to serve! Cut the cake into slices, and place it on a serving platter. You can serve it as is, or with a dollop of whipped cream or a scoop of vanilla ice cream for an extra treat. This cake pairs wonderfully with a cup of tea or coffee, making it a perfect addition to any gathering or celebration.

    How to store Apricot Jam Cake

    To keep your Apricot Jam Cake fresh, store it in an airtight container. You can keep it at room temperature for up to 2 days. If you want to store it for a longer period, you can refrigerate it. Properly wrapped, the cake can last in the refrigerator for about a week. If you need to store it even longer, you can freeze the cake. Wrap it tightly in plastic wrap, then place it in a freezer-safe container. It can last in the freezer for up to three months. To enjoy, simply thaw it in the refrigerator overnight.

    Tips to make Apricot Jam Cake

    1. Use Quality Jam: For the best flavor, use high-quality apricot jam. Homemade jam works wonderfully if you have it, but store-bought is fine too.

    2. Add Nuts: If you like a bit of crunch, consider adding chopped peanuts or other nuts to the batter. This will add texture to the cake.

    3. Flavor Variations: You can experiment with different types of jam, like peach or raspberry, for a unique twist on this recipe.

    4. Check for Doneness: Cake baking times can vary depending on your oven. Always check for doneness a few minutes early to avoid overbaking.

    Variation (if any)

    For a more tropical flavor, try adding shredded coconut to the batter. You can substitute part of the wheat flour with coconut flour for added taste. If you want a richer cake, consider adding a few tablespoons of almond milk or flavored extracts.

    FAQs

    1. Can I use other types of jam?

    Yes, you can substitute apricot jam with other jams like peach, raspberry, or strawberry. Each variation will bring its unique flavor to the cake.

    2. How can I make this cake gluten-free?

    You can replace the wheat flour with a gluten-free flour blend. Make sure that the baking powder is also gluten-free.

    3. How do I know when the cake is done?

    To check if the cake is done, insert a toothpick into the center. If it comes out clean or with a few crumbs, the cake is ready.

    4. Can I add fruit to the batter?

    Yes, you can fold in some fresh or dried apricots or other fruits into the batter for added flavor.

    5. Is this cake suitable for freezing?

    Yes, this cake freezes well. Just ensure it is wrapped tightly to avoid freezer burn. Thaw in the refrigerator when you are ready to eat it.

    Nutritional Info

    Each serving of Apricot Jam Cake contains approximately:

    • Calories: 180
    • Total Fat: 7 g
    • Saturated Fat: 1 g
    • Cholesterol: 50 mg
    • Sodium: 80 mg
    • Total Carbohydrates: 24 g
    • Dietary Fiber: 1 g
    • Sugars: 10 g
    • Protein: 3 g

    Enjoy making your Apricot Jam Cake, and share the joy of this simple yet delicious dessert with others!

  • Berry Jam Cake

    Berry Jam Cake

    Berry Jam Cake is a delightful and simple dessert that everyone can enjoy. This cake blends the sweetness of berry jam with a light and fluffy texture. It is a great option for gatherings, birthdays, or any celebration. In just a few steps, you can create a treat that your friends and family will love.

    Why make this recipe

    There are many reasons to make Berry Jam Cake. First, it is incredibly easy to prepare. With just a few ingredients and minimal effort, you can bake a cake that tastes like it took hours to make. This recipe is perfect for beginners, as it doesn’t require baking skills or advanced techniques. Additionally, it is a versatile cake. You can use any berry jam you like, making it a fantastic way to use up leftover jams from earlier meals or baking projects. Finally, this cake is light and not overly sweet, making it ideal for any time of the day, whether as a dessert or a snack with tea or coffee.

    How to make Berry Jam Cake

    Making Berry Jam Cake is fast and simple. You do not need complicated equipment or elaborate techniques. Just follow these straightforward steps:

    Ingredients:

    • 4 eggs (240g)
    • 120g of flour (1 cup)
    • 3 tablespoons of powdered sugar (30g)
    • 8g of baking powder (2 teaspoons)
    • 2 tablespoons of oil (30ml)
    • 1 tablespoon of lemon juice (15ml)
    • Berry jam (as desired)

    Directions:

    1. Prepare the Eggs: Start by beating the 4 eggs in a large mixing bowl. Use a whisk or an electric mixer. Beat until the eggs are smooth and airy. This step is important as it helps to create a light texture in the cake.

    2. Add Sugar: Gradually add the 3 tablespoons of powdered sugar to the eggs while continuing to mix. Blend until the mixture is homogeneous.

    3. Incorporate Oil and Lemon Juice: Next, add the 2 tablespoons of oil and the 1 tablespoon of lemon juice to the mixture. Stir well until everything is combined.

    4. Sift in Dry Ingredients: Now, sift the 120g of flour and 8g of baking powder into the egg mixture. Sifting helps to aerate the flour and remove any lumps, which makes the cake lighter.

    5. Combine the Mixture: Gently fold the dry ingredients into the wet mixture using a spatula. Mix until well combined, but do not over-mix.

    6. Prepare for Baking: Preheat your oven to 180°C (350°F). Meanwhile, grease your baking pan. A round or square pan will work well for this cake.

    7. Bake the Cake: Pour the cake batter into the prepared pan. Spread it evenly. Place it in the preheated oven and bake for about 25 minutes. Keep an eye on the cake, and you can perform the toothpick test; insert a toothpick in the middle and see if it comes out clean.

    8. Cool and Serve: Once done, remove the cake from the oven and let it cool in the pan for a few minutes. Later, transfer it to a wire rack to cool down completely. Once cooled, spread your favorite berry jam on top before serving.

    How to serve Berry Jam Cake

    Berry Jam Cake is best served fresh and at room temperature. You can slice it into pieces and plate them nicely. It is a great idea to serve it with extra berry jam on the side for those who prefer a more intense flavor. Pair it with a cup of tea or coffee for even more enjoyment. If you want, you can even dust the top with powdered sugar for an attractive finish. This cake is not only delicious but also visually appealing, making it perfect for special occasions.

    How to store Berry Jam Cake

    To store your Berry Jam Cake, let it cool completely. Once cool, wrap it tightly in plastic wrap or place it in an airtight container. This way, it will stay fresh for up to 3 days at room temperature. If you want to keep it longer, consider refrigerating it. In the fridge, it can last for about a week. You can also freeze the cake for up to three months. If freezing, avoid adding the jam until you are ready to serve, to keep the texture intact.

    Tips to make Berry Jam Cake

    • Use Fresh Ingredients: Make sure your eggs and baking powder are fresh. This makes a big difference in the cake’s rise and texture.

    • Choose Quality Jam: The quality of the berry jam can significantly affect the flavor of the cake. Use a jam that you really enjoy.

    • Don’t Overmix: When combining the dry and wet ingredients, mix just until combined. Overmixing can lead to a denser cake.

    • Experiment with Flavors: Feel free to add a little vanilla extract for extra flavor or include grated lemon zest for a citrusy kick.

    • Add a Topping: You can top your Berry Jam Cake with whipped cream or a scoop of vanilla ice cream as an added treat.

    Variation (if any)

    Berry Jam Cake is quite versatile. You can easily swap out the berry jam for different flavors. Try using strawberry, raspberry, or blueberry jam to suit your taste. You can even create a mixed berry jam cake by combining different types of jams. Additionally, for a healthier option, consider using sugar-free jam or making your own berry compote as a topping.

    FAQs

    Can I use fresh berries instead of jam?

    While this recipe is designed for berry jam, you can use fresh berries mixed with a little sugar to create a topping. However, this may change the texture and moisture content of the cake.

    Can I double this recipe?

    Yes, you can double the ingredients to make a larger cake. Just ensure you use a bigger pan and increase the baking time slightly.

    Is this cake suitable for freezing?

    Yes, Berry Jam Cake freezes well. Wrap it tightly in plastic wrap and store it in an airtight container. Thaw it at room temperature when you are ready to eat.

    How long does the cake last?

    When stored properly, Berry Jam Cake can last up to three days at room temperature or a week in the refrigerator. It can also be frozen for about three months.

    Can I add nuts to this recipe?

    Yes, you can add nuts such as almonds or walnuts to the batter for added texture and flavor. Just chop them finely and fold them into the batter before baking.

    What should I serve with Berry Jam Cake?

    Berry Jam Cake pairs nicely with coffee, tea, or even a scoop of ice cream. You can also serve it with a dollop of whipped cream for a delightful treat.

    What is the nutritional information for Berry Jam Cake?

    Each serving of Berry Jam Cake contains approximately:

    • Calories: 150
    • Protein: 4g
    • Fat: 7g
    • Carbohydrates: 20g
    • Sugar: 8g
    • Fiber: 1g

    With this simple and delicious Berry Jam Cake recipe, you can impress your loved ones with a homemade dessert that everyone will enjoy. It’s easy to make, fun to customize, and perfect for any occasion. Happy baking!

  • Fried Smoked Cheese Potatoes

    Fried Smoked Cheese Potatoes

    Fried Smoked Cheese Potatoes are a delightful dish that combines the comfort of crispy fried potatoes with the rich flavor of smoked cheese. This recipe is perfect for those who love the taste of smoky cheese and the satisfying crunch of fried food. Whether you serve them as a side dish, snack, or appetizer, these fried potatoes are sure to impress everyone at the table. This article will guide you through the process of making this delicious dish, providing easy-to-follow steps and useful tips.

    Why make this recipe

    Fried Smoked Cheese Potatoes are not just any ordinary potatoes; they bring an exciting twist to a classic favorite. The smoked cheese adds depth and a unique flavor that elevates regular fried potatoes to a gourmet level. Making this recipe is straightforward and enjoyable, making it a great option for both experienced cooks and beginners. Not only are these potatoes crispy and savory, but they also offer flexibility in serving. You can enjoy them with various dipping sauces or as a side to your main courses.

    Moreover, these potatoes are a fantastic way to experiment with flavors. You can easily customize the spices and dips to match your personal tastes. The combination of textures—crispy on the outside, soft on the inside—makes each bite satisfying. If you’re looking for a crowd-pleaser for parties, gatherings, or simply a tasty snack at home, Fried Smoked Cheese Potatoes are a great choice.

    How to make Fried Smoked Cheese Potatoes

    Making Fried Smoked Cheese Potatoes is an easy and straightforward process. It involves boiling potatoes, preparing a coating, and frying them to crispy perfection. This dish is simple enough for a weeknight dinner, yet impressive enough for special occasions. Keep reading to see how to create this mouthwatering dish step by step.

    Ingredients:

    • 6-7 potatoes (around 1.5-2 pounds or 1 kg)
    • 80 g smoked cheese (approximately 3 ounces)
    • 4 tablespoons potato starch (about 40 g)
    • Fresh parsley, chopped (for garnish)
    • Salt (to taste)
    • Pepper (to taste)
    • Paprika (to taste)
    • Vegetable oil for frying (enough for frying)

    Directions:

    1. Start by boiling the potatoes. Place 6-7 potatoes in a large pot and cover with water. Bring the water to a boil. Cook the potatoes until they are tender when pierced with a fork, typically around 15-20 minutes depending on the size of the potatoes.

    2. Once the potatoes are cooked, drain them and let them cool slightly. You can peel them or leave the skin on, depending on your preference.

    3. In a bowl, mix 4 tablespoons of potato starch with salt, pepper, and paprika. Adjust the seasonings to your taste. This mixture will create a crispy coating for your potatoes.

    4. Slice the cooled potatoes into round slices or cut them into strips. The shape is up to you, but aim for even sizes for uniform cooking.

    5. Take each potato slice or strip and coat it in the potato starch mixture. Ensure all sides are evenly coated to achieve the best crispy texture.

    6. Grate 80 g of smoked cheese. Once you have your grated cheese, sprinkle it over the coated potatoes evenly. This will add the smoky flavor that makes this dish special.

    7. Heat vegetable oil in a frying pan over medium-high heat. Make sure there is enough oil to cover the bottom of the pan adequately.

    8. Once the oil is hot, carefully place the coated potatoes into the pan. Fry them in batches if necessary to avoid overcrowding the pan. Fry until they are golden brown and crispy, typically around 4-5 minutes on each side.

    9. Once fried, use a slotted spoon to transfer the potatoes to a paper towel-lined plate to drain excess oil.

    10. Finally, sprinkle chopped parsley over the fried potatoes for an added fresh flavor and color before serving.

    How to serve Fried Smoked Cheese Potatoes

    Fried Smoked Cheese Potatoes are versatile and can be served in various ways. They make a great appetizer or side dish. Serve them hot with your favorite dipping sauces like garlic aioli, ranch, or a spicy mayo for a kick of flavor. You can also sprinkle some extra smoked cheese on top for added richness. This dish pairs well with grilled meats, burgers, or as part of a cozy movie night snack spread. The crispy texture and smoky flavor create a wonderful combination with any meal.

    How to store Fried Smoked Cheese Potatoes

    If you have leftovers, it’s best to store Fried Smoked Cheese Potatoes in an airtight container in the refrigerator. They can last for 2-3 days. However, it’s important to note that the potatoes may lose their crispiness when stored. To reheat, place them on a baking sheet and heat in a preheated oven at 375°F (190°C) for about 10-15 minutes until warmed through and crispy again. Avoid reheating in the microwave, as this may make them soggy.

    Tips to make Fried Smoked Cheese Potatoes

    • Choose the right potatoes: For frying, starchy potatoes like Russets or Yukon Golds work best. They create the ideal texture—crispy on the outside and fluffy on the inside.
    • Don’t skip the seasoning: The potato starch mixture is key for flavor. Feel free to experiment with spices like garlic powder or onion powder for added depth.
    • Maintain oil temperature: If the oil is too cool, the potatoes will absorb too much oil. If too hot, they may burn before cooking through. Aim for a medium-high heat.
    • Experiment with cheese: While smoked cheese gives a unique flavor, you can mix and match different types of cheese. Try cheddar, gouda, or even feta for a different twist.

    Variation (if any)

    You can customize Fried Smoked Cheese Potatoes in numerous ways. Add herbs like rosemary or thyme to the potato starch mixture for an aromatic flavor. You could also introduce a spicy kick by adding cayenne pepper or chili flakes. For a fun twist, try adding cooked bacon bits to the cheese mix for added flavor and texture. These variations keep the dish exciting and tailored to your taste preferences.

    FAQs

    1. Can I use pre-cooked potatoes?

      • Yes, pre-cooked or leftover potatoes can work. Just make sure they are chilled before coating.
    2. Is it possible to make this recipe gluten-free?

      • Yes, potato starch is naturally gluten-free, so this recipe is suitable for those with gluten intolerance.
    3. Can I bake these instead of frying?

      • While frying gives the best texture, you can bake them at 425°F (220°C) on a greased baking sheet. Make sure to turn them halfway through cooking for even browning.
    4. What dipping sauces go well with Fried Smoked Cheese Potatoes?

      • Popular options include garlic aioli, ranch dressing, sriracha mayo, or even a simple ketchup.
    5. How long does it take to make Fried Smoked Cheese Potatoes?

      • The total prep time is about 10 minutes, and cook time is around 30 minutes, making it a quick and easy recipe.

    Nutritional Information (per serving)

    • Calories: 220
    • Protein: 4g
    • Total Fat: 12g
    • Saturated Fat: 5g
    • Carbohydrates: 25g
    • Fiber: 3g
    • Sugar: 1g
    • Sodium: 300mg

    Enjoy making and serving these delicious Fried Smoked Cheese Potatoes! They will surely become a favorite in your home.

  • Peach Jam Crepes

    Peach Jam Crepes

    Peach Jam Crepes are a delightful treat that can brighten up any meal. Whether it is breakfast, brunch, or dessert, these crepes filled with sweet peach jam are a sumptuous choice. They offer a wonderful combination of flavors and textures, making them a favorite among both children and adults. Plus, they are easy to make and require minimal ingredients. With their thin, delicate texture and rich taste of peaches, these crepes are sure to become a staple in your kitchen.

    Why make this recipe

    Making Peach Jam Crepes is a great way to enjoy a tasty meal while using simple ingredients. This recipe empowers you to create a lovely dish that is light yet satisfying. Homemade crepes also bring a personal touch to your cooking, allowing you to customize them to your liking. Utilizing peach jam means that you capture the essence of summer, even if it’s off-season. They are versatile enough to serve on special occasions or as a quick weekday breakfast. Making crepes can be a fun activity to do with family or friends, providing quality moments together in the kitchen.

    How to make Peach Jam Crepes

    Making Peach Jam Crepes involves straightforward steps that lead to delicious results. Follow these easy directions to impress your family and friends.

    Ingredients:

    • 400 grams of flour (about 3 ⅓ cups)
    • 200 ml of milk (about ¾ cup)
    • 3 tablespoons of sugar
    • 1 egg
    • 3 tablespoons of seed oil
    • Pinch of salt
    • 7 g of dry yeast (about 2 teaspoons)
    • Lemon zest from one lemon
    • 1 tablespoon of butter
    • Peach jam

    Directions:

    1. Begin by combining flour, sugar, dry yeast, and a pinch of salt in a large bowl. Use a whisk to mix these dry ingredients so that everything is evenly distributed.

    2. Next, add the egg, seed oil, lemon zest, and milk to the bowl with your dry mixture. Stir everything together until you obtain a smooth batter without lumps.

    3. Heat a non-stick pan over medium heat. Once hot, lightly grease it with butter to ensure that the crepes do not stick.

    4. Pour a portion of the batter into the hot pan. Swirl the pan around to spread the batter evenly, forming a thin crepe.

    5. Cook the crepe until you see bubbles forming on the surface. This usually takes about 1-2 minutes.

    6. Carefully flip the crepe over with a spatula, cooking the other side until it turns a lovely golden brown, approximately another 1-2 minutes.

    7. Once cooked, remove the crepe from the pan and place it on a plate. Add a generous amount of peach jam to the center of the crepe.

    8. Roll up the crepe carefully to contain the peach jam.

    9. Repeat the process with the remaining batter and jam until all the crepes are prepared.

    10. Your Peach Jam Crepes are now ready to be served!

    How to serve Peach Jam Crepes

    Serving Peach Jam Crepes is simple and fun. You can top them with additional peach slices, whipped cream, or a sprinkle of powdered sugar for extra flair. They can be served warm or at room temperature, making them suitable for various occasions. For breakfast, they pair wonderfully with coffee or tea. If you choose to serve them for dessert, consider adding a scoop of vanilla ice cream on the side. This adds a creamy contrast to the sweetness of the jam.

    How to store Peach Jam Crepes

    If you have leftover Peach Jam Crepes, storing them is easy. Allow the crepes to cool completely before stacking them. Place parchment paper between each crepe to prevent them from sticking together. Store the stacked crepes in an airtight container in the refrigerator. They should stay fresh for up to three days. To reheat, simply warm them in a non-stick pan over low heat or in the microwave for a few seconds. If you have extra peach jam, keep that separate in a jar, as it can last longer.

    Tips to make Peach Jam Crepes

    Here are a few tips to elevate your crepe-making game:

    1. Batter Consistency: Make sure your batter is smooth and free of lumps. If it seems too thick, you can add a little more milk.

    2. Resting the Batter: Letting the batter rest for about 30 minutes before cooking can improve the texture of the crepes.

    3. Flavor Variations: Experiment with different jams like strawberry or apricot for a twist on the classic peach flavor.

    4. Cooking Temperature: Use medium heat for cooking crepes. Too hot, and they will burn; too low, and they won’t cook evenly.

    5. Non-Stick Pan: A good quality non-stick pan is essential for cooking crepes, as it helps achieve that perfect, thin texture without sticking.

    Variation (if any)

    Feel free to experiment with Peach Jam Crepes! You can add different fillings such as cream cheese for a richer taste, or mix some cinnamon into the batter for added spice. You can also try making savory crepes by leaving out the sugar and filling them with cheese or vegetables.

    FAQs

    Can I make these crepes gluten-free?

    Yes, you can substitute regular flour with a gluten-free flour blend. Just ensure that the blend you choose is suitable for baking.

    Can I use fresh peaches instead of peach jam?

    Absolutely! If you prefer fresh fruit, you can slice ripe peaches and add them as a filling. Consider adding a little sugar or honey to enhance the sweetness.

    Is this recipe suitable for vegan diets?

    Yes, you can make it vegan by using plant-based milk and substituting the egg with a flaxseed or chia seed mixture.

    How do I know when the crepes are ready to flip?

    Look for small bubbles forming on the surface of the crepe. When the edges begin to lift slightly or appear set, it’s time to flip.

    What can I do with leftover crepes?

    Leftover crepes can be stored in the refrigerator or freezer. They are great as a base for wraps filled with sweet or savory fillings.

    Can I freeze Peach Jam Crepes?

    Yes! Place parchment paper between each crepe before stacking them in a freezer-safe container. They can last in the freezer for up to two months. Thaw them in the refrigerator before reheating.

    Total Prep Time: 15 minutes
    Cook Time: 20 minutes
    Servings: 4

    Nutritional Information (per serving):
    Calories: 250
    Protein: 6g
    Carbohydrates: 40g
    Fat: 8g
    Sugar: 10g
    Fiber: 1g

    Making Peach Jam Crepes is a simple, enjoyable process that leads to a delicious result. Whether enjoyed for breakfast or dessert, they are sure to please everyone at the table. So why not give them a try? You may just discover a new favorite recipe!

  • Fluffy Vanilla Cake

    Fluffy Vanilla Cake

    Fluffy Vanilla Cake is a delightful dessert that brings joy to any occasion. Its soft, light texture paired with a rich vanilla flavor makes it a favorite among cake lovers. Whether it’s for a birthday celebration, a family gathering, or an afternoon tea, this cake is simple to make and incredibly satisfying. In this article, we will guide you through each step of making a Fluffy Vanilla Cake that will leave your friends and family asking for more.

    Why make this recipe

    There are many reasons to make Fluffy Vanilla Cake. First, it is an incredibly versatile cake. You can enjoy it on its own, or you can dress it up with frostings, fruits, or whipped cream. Secondly, this recipe uses basic ingredients, making it easy to whip up with what you already have in your pantry. Additionally, the preparation time isn’t long, and it bakes up beautifully in about 40 minutes. Once baked, you can serve it warm or allow it to cool for later enjoyment. Its fluffy texture is sure to impress everyone who takes a bite.

    How to make Fluffy Vanilla Cake

    Making a Fluffy Vanilla Cake is straightforward. Follow the step-by-step instructions and you’ll find yourself with a delicious cake in no time. With a little patience, you can master this recipe and create a cake that everyone will love.

    Ingredients:

    • 4 eggs
    • 1 cup and 3 tablespoons (250g) of sugar
    • 2 and 3/4 cups (350g) of flour
    • 2 teaspoons of baking powder
    • A pinch of salt
    • 1/3 cup (70g) of butter
    • 1 cup (240g) of milk
    • 1 teaspoon of vanilla sugar

    Directions:

    1. Prepare the egg mixture: In a large bowl, add the 4 previously broken eggs, a pinch of salt, and 1 cup and 3 tablespoons (250g) of sugar. Beat these ingredients together until the mixture is fluffy and has lightened in color.

    2. Mix the dry ingredients: In another bowl, mix 2 and 3/4 cups (350g) of flour with 2 teaspoons of baking powder. This will ensure that your cake rises well.

    3. Combine first half of dry ingredients: Add half of the flour mixture to the egg mixture. Beat until fully incorporated. It is important to mix until there are no lumps.

    4. Heat the wet mixture: In a saucepan, pour 1 cup of milk, 1/3 cup of butter, and 1 teaspoon of vanilla sugar. Heat this mixture over medium heat until the butter melts, stirring constantly to combine the ingredients smoothly.

    5. Incorporate the wet mixture: Gradually pour this warm milk mixture into the batter while beating continuously. This helps in creating a consistent batter.

    6. Add the remaining dry ingredients: Once the wet mixture is integrated, add the rest of the flour mixture into the batter. Mix until a smooth batter is obtained.

    7. Prepare the baking pan: Prepare a baking pan by lining it with parchment paper to ensure that the cake does not stick.

    8. Pour the batter: Carefully pour the batter into the prepared baking pan. Make sure to spread it evenly.

    9. Bake the cake: Place the pan in a preheated oven at 200 degrees Celsius (400 degrees Fahrenheit) and bake for 35 to 40 minutes. Keep an eye on the cake towards the end; it’s done when a toothpick inserted into the center comes out clean.

    10. Cool and decorate: After 40 minutes, remove the cake from the oven. Allow it to cool slightly before sprinkling some powdered sugar on top. This gives it a lovely finish.

    11. Serve and enjoy: Cut the cake into portions and serve it fresh. Everyone will be eager to have a piece of your Fluffy Vanilla Cake!

    How to serve Fluffy Vanilla Cake

    Fluffy Vanilla Cake can be served in various ways. You may enjoy it plain or topped with a dusting of powdered sugar for a simple presentation. If you want to add a special touch, try serving it with whipped cream and fresh strawberries or a scoop of vanilla ice cream. For a richer experience, top it with chocolate or cream cheese frosting. You can also create a layered cake by slicing it horizontally and adding your favorite frosting between the layers.

    How to store Fluffy Vanilla Cake

    If you have leftover Fluffy Vanilla Cake, storing it is easy. Allow the cake to cool completely. Then, wrap it tightly in plastic wrap or aluminum foil. You can also place it in an airtight container. The cake can be stored at room temperature for up to 2-3 days. If you want to keep it longer, you can refrigerate it for about a week. For even longer storage, consider freezing the cake. Wrap it well and place it in the freezer where it can last up to 3 months. Thaw at room temperature before serving.

    Tips to make Fluffy Vanilla Cake

    • Use room temperature ingredients: For best results, use eggs, butter, and milk at room temperature. This helps to create a fluffy texture.
    • Don’t overmix the batter: Mix just until ingredients are combined to avoid a dense cake. Overmixing can lead to tough texture.
    • Test your oven temperature: Ovens can vary in temperature. Consider using an oven thermometer to ensure it’s accurately set.
    • Let the cake cool in the pan for a few minutes: This can prevent it from breaking apart when transferring it to a plate.

    Variation (if any)

    If you’re looking for variations to the classic Fluffy Vanilla Cake, consider adding lemon zest or almond extract for a twist in flavor. You can also incorporate chocolate chips or fresh berries into the batter for added fun. For a decadent treat, try making a layered version with buttercream frosting or ganache. You can also experiment with different toppings such as fresh fruit, nuts, or a drizzle of syrup.

    FAQs

    How do I know if my cake is done?
    To check if your cake is done, insert a toothpick into the center. If it comes out clean or with a few crumbs, the cake is ready. If it has wet batter on it, it needs a bit more time.

    Can I use gluten-free flour?
    Yes, you can use gluten-free flour as a substitute. Make sure to check the packaging for baking instructions as the ratios may differ.

    Why did my cake sink in the middle?
    A cake may sink in the middle if it is undercooked or if it is overmixed which can lead to a weak structure. Ensure proper baking time and mix gently.

    Can I add a frosting to this cake?
    Absolutely! Fluffy Vanilla Cake pairs well with many types of frosting, from buttercream to whipped cream. Feel free to top it with your favorite.

    How long will the cake stay fresh?
    When properly stored, Fluffy Vanilla Cake can last for 2-3 days at room temperature, up to a week in the refrigerator, or up to 3 months in the freezer.

    Nutritional Information (per serving)

    • Calories: 240
    • Total Fat: 9g
    • Saturated Fat: 5g
    • Cholesterol: 70mg
    • Sodium: 150mg
    • Total Carbohydrates: 36g
    • Dietary Fiber: 1g
    • Sugars: 15g
    • Protein: 4g

    Now that you have this detailed guide, you can confidently make a Fluffy Vanilla Cake that everyone will enjoy. The delightful taste and fluffy texture will surely become a family favorite!

  • Apple Tart with Soufflé Cream

    Apple Tart with Soufflé Cream

    Apple Tart with Soufflé Cream is a delicious dessert that combines the warmth of baked apples with a light and airy soufflé topping. This tart is not only a feast for the eyes but also a treat for your taste buds. It is perfect for family gatherings, special occasions, or just when you want to indulge in something sweet. The balance of sweet and tangy flavors makes this dish delightful and memorable.

    Why make this recipe

    Making Apple Tart with Soufflé Cream allows you to explore the wonderful world of baking. This recipe is simple enough for beginners but also satisfying for experienced bakers. The tart features a flaky pastry base topped with fresh apples, which are both tasty and nutritious. The addition of soufflé cream makes it unique and adds an elegant touch. This dessert is sure to impress your guests, and it can be served warm or cold.

    Additionally, this recipe uses easily accessible ingredients, making it a great choice for any season. Whether you have a surplus of apples or just crave a comforting dessert, this Apple Tart with Soufflé Cream is an ideal option.

    How to make Apple Tart with Soufflé Cream

    Ingredients:

    • Flour: 250 grams (2 cups)
    • Baking powder: 1 teaspoon
    • Butter: 90 grams (6 tablespoons)
    • Salt: a pinch
    • Egg yolks: 2
    • Sugar: 80 grams (1/3 cup)
    • Apples: 3 (approximately 500 grams)
    • Lemon juice: 4 to 5 tablespoons
    • Egg whites: 2
    • Vanilla sugar: 1 teaspoon
    • Plain yogurt: 400 grams (1.5 cups)
    • Cornstarch: 30 grams (1/4 cup)

    Directions:

    1. Preheat the oven to 170°C (approximately 338°F).

    2. Prepare the pastry. In a mixing bowl, combine the flour, baking powder, butter, a pinch of salt, egg yolks, and 40 grams (1/5 cup) of sugar. Mix everything until smooth.

    3. Roll out the pastry into a circular shape and fit it into a mold that is 20 cm in diameter. Make sure to cover the base evenly.

    4. Take the apples, wash them thoroughly, peel, and thinly slice them. Arrange the apple slices evenly over the pastry in the mold.

    5. Sprinkle the remaining 40 grams (1/5 cup) of sugar over the apples. Drizzle lemon juice on top of the apples to enhance the flavor and prevent browning.

    6. Now, prepare the soufflé cream. In a separate clean bowl, beat the egg whites with a mixer until stiff peaks form.

    7. Gradually add the 40 grams (1/5 cup) of sugar and the vanilla sugar while continuing to beat the egg whites. Make sure the mixture is smooth and glossy.

    8. Gently fold in the plain yogurt and cornstarch into the egg white mixture. Make sure everything is well combined.

    9. Carefully pour the prepared soufflé cream over the apples in the mold.

    10. Bake in the preheated oven for 40 to 45 minutes. The tart surface should turn golden brown, and the soufflé cream should be firm.

    11. Once baked, remove the tart from the oven and let it cool before serving.

    How to serve Apple Tart with Soufflé Cream

    Serve Apple Tart with Soufflé Cream slightly warm or at room temperature for the best taste. You can slice it into wedges and present it on dessert plates. For added flair, consider garnishing with a sprinkle of powdered sugar or a dollop of whipped cream. Pairing the tart with vanilla ice cream or fresh whipped cream can enhance the dessert experience.

    How to store Apple Tart with Soufflé Cream

    To store Apple Tart with Soufflé Cream, let it cool completely. You can keep it in an airtight container in the refrigerator for up to three days. If you want to store it longer, consider freezing the tart. Wrap it tightly in plastic wrap or aluminum foil, and it can last in the freezer for up to a month.

    When ready to enjoy, let the frozen tart thaw in the refrigerator overnight. Then, you can warm individual slices in the oven or the microwave for a delicious treat.

    Tips to make Apple Tart with Soufflé Cream

    1. Choose the Right Apples: Use firm apples like Granny Smith, Honeycrisp, or Fuji for the best texture and flavor.

    2. Don’t Overmix: When combining the ingredients, especially the soufflé cream, be gentle to maintain the airiness in the egg whites.

    3. Add Spices: For extra flavor, you can add cinnamon or nutmeg to the apple layer.

    4. Serving Temperature: This tart is delightful when served warm, but it can also be enjoyed cold, making it versatile for different occasions.

    Variation (if any)

    You can customize your Apple Tart with Soufflé Cream by using different fruits like pears or berries. Mixing apples with pears can add another layer of flavor. Additionally, you can experiment with different types of extracts for the soufflé cream, like almond or hazelnut, for a unique taste twist.

    FAQs

    Q: Can I make the pastry ahead of time?
    A: Yes, you can prepare the pastry and refrigerate it for up to a day in advance. Just roll it out when you’re ready to bake.

    Q: What can I substitute for plain yogurt?
    A: For a dairy-free option, consider using coconut yogurt or almond yogurt instead of plain yogurt.

    Q: How can I tell when the tart is done baking?
    A: The tart is done when the surface is golden brown, and the soufflé cream appears firm and set. A toothpick inserted into the soufflé cream should come out clean.

    Q: Can I use store-bought pastry instead of making my own?
    A: Absolutely! Using store-bought pastry can save you time without sacrificing flavor.

    Nutritional Information (per serving)

    • Calories: 250
    • Protein: 5g
    • Fat: 10g
    • Carbohydrates: 36g
    • Fiber: 2g
    • Sugar: 12g

    This Apple Tart with Soufflé Cream recipe is not only simple and delicious but also a perfect choice for any occasion. Enjoy creating this delightful dessert that brings warmth and comfort to your table!

  • Chocolate Oatmeal Bars

    Chocolate Oatmeal Bars

    Are you looking for a delicious and healthy treat? Chocolate Oatmeal Bars are the perfect choice! These bars combine the hearty goodness of oats with rich dark chocolate, making them not only satisfying but also energizing. Whether you need a quick breakfast, a snack for the kids, or a sweet treat for yourself, these Chocolate Oatmeal Bars will hit the spot. They are easy to make and use simple ingredients that you likely already have in your pantry.

    Why make this recipe

    There are many reasons to make Chocolate Oatmeal Bars. First, they are packed with nutrients and energy. Oats provide fiber, which is essential for a healthy digestive system. Adding walnuts offers healthy fats and protein, while the banana introduces natural sweetness without the need for added sugar. Moreover, dark chocolate offers antioxidants and improves mood!

    This recipe is also very customizable. You can adjust the ingredients based on your preferences. You can swap in different nuts or dried fruits, and even make them gluten-free by using certified gluten-free oats. They also store well, making them a great batch-cooking option for busy weeks.

    How to make Chocolate Oatmeal Bars

    Making your own Chocolate Oatmeal Bars is simple and quick. With just a few straightforward steps, you can create a tasty and healthy snack that your whole family will love. This recipe takes about 60 minutes total, including preparation and cooking time. You will end up with about 10 servings, making it perfect for sharing or enjoying all week long.

    Ingredients:

    • 80 g (1 cup) oat flakes
    • 100 g (1 cup) raisins
    • 80 g (1 cup) walnuts, chopped
    • 100 g (1 cup) dried apricots, chopped
    • 1 ripe banana, mashed
    • 160 g (5.6 oz) dark chocolate without sugar
    • 1 teaspoon vegetable oil

    Directions:

    1. Begin by mixing the oat flakes, raisins, chopped walnuts, chopped dried apricots, and mashed banana in a large mixing bowl. Ensure that all the ingredients combine well to form a thick mixture.

    2. Next, prepare a baking form that is about 25 x 15 cm (10 x 6 inches). Line the bottom with baking paper. Then, spread the oat mixture evenly into the form, pressing it down to make it compact. This will help the bars hold their shape once cooked.

    3. Preheat your oven to 180°C (350°F) and bake the mixture for 20 minutes. This will allow the ingredients to bind together and create a solid base for your bars.

    4. While the oat base is baking, melt the dark chocolate together with the vegetable oil in a small saucepan over low heat. Stir it until it is completely smooth and combined.

    5. Once the baking time is complete, remove the oat mixture from the oven and let it cool slightly. Then, carefully take it out of the mold and place it on a cutting board. Pour the melted chocolate over the top and spread it evenly with a spatula.

    6. Finally, refrigerate the covered bars for about 40 minutes. This will allow the chocolate to set and make the bars easier to cut.

    How to serve Chocolate Oatmeal Bars

    Chocolate Oatmeal Bars are very versatile when it comes to serving. You can cut them into small squares or rectangles and enjoy them as a snack. They also make a great addition to breakfast when paired with fresh fruit or yogurt. The sweetness of the chocolate and the nutritious oats create a perfect balance of flavors. For a fun twist, consider serving them warm with a scoop of ice cream.

    How to store Chocolate Oatmeal Bars

    To keep your Chocolate Oatmeal Bars fresh, store them in an airtight container. They can last for up to a week at room temperature, or you can store them in the refrigerator for longer shelf life—up to two weeks. If you want to keep them even longer, consider freezing them. Wrap individual bars in foil or plastic wrap, place them in a freezer-friendly bag or container, and freeze them for up to three months. When you’re ready to enjoy, simply thaw them at room temperature.

    Tips to make Chocolate Oatmeal Bars

    • Ensure that your ingredients are well mixed for even flavor and texture in every bite.
    • Don’t be afraid to experiment with different nuts and dried fruits. Almonds, pecans, cranberries, or dates can all work beautifully in this recipe.
    • For an extra touch, sprinkle some sea salt on top of the melted chocolate before it sets for a delicious sweet and salty flavor.
    • If you prefer a sweeter bar, you can add a tablespoon of honey or maple syrup to the mixture before baking.

    Variation (if any)

    You can easily modify this recipe to suit your taste preferences. For a nut-free version, simply exclude the walnuts or replace them with pumpkin seeds or sunflower seeds. If you would like a protein-packed version, consider adding a scoop of protein powder to the mixture. For those who enjoy a tropical twist, you could substitute the dried apricots with dried mango or pineapple.

    FAQs

    1. Can I use instant oats in this recipe?
    Yes, you can use instant oats, but the texture will be softer compared to using rolled oats. Rolled oats are preferred for a chewier texture.

    2. Is it possible to make these bars vegan?
    Yes, this recipe is naturally vegan since it does not contain any dairy. Just ensure the dark chocolate you use is dairy-free.

    3. Can I replace the banana with something else?
    Yes, if you don’t have a banana, you can use applesauce or mashed sweet potatoes as a substitute.

    4. How do I know when the bars are done baking?
    The edges should turn a light golden brown, and the center should be firm to the touch.

    5. Can I add chocolate chips to the mixture?
    Absolutely! Adding chocolate chips can provide an extra burst of chocolate flavor and sweetness.

    Nutritional Information

    Each serving of Chocolate Oatmeal Bars contains approximately:

    • Calories: 210
    • Total Fat: 10g
    • Saturated Fat: 3g
    • Cholesterol: 0mg
    • Sodium: 2mg
    • Total Carbohydrates: 29g
    • Dietary Fiber: 3g
    • Sugars: 9g
    • Protein: 4g

    With these ingredients and steps, you’ll have a delightful snack that is not only easy to make but also packed with nutrients. Enjoy your Chocolate Oatmeal Bars!

  • Apple Oatmeal Bowl

    Apple Oatmeal Bowl

    Breakfast is often called the most important meal of the day. Starting your day with a healthy meal can set a positive tone for the rest of the day. One delicious and nutritious option is the Apple Oatmeal Bowl. This simple dish combines the goodness of oats, apples, and spices, creating a warm and comforting breakfast. It is quick to prepare, making it perfect for busy mornings. Whether you are at home or on the go, this recipe can easily become a staple in your breakfast routine.

    Why make this recipe

    There are many reasons to make an Apple Oatmeal Bowl. Firstly, it is healthy. Oats provide fiber that helps with digestion and keeps you feeling full longer. Apples add natural sweetness and essential vitamins. Including nuts and seeds, like pumpkin seeds, boosts the nutritional value even further. This bowl is also versatile. You can adapt it to your preferences by adding different fruits or spices. Additionally, it is quick to make. In just a few minutes, you can prepare a nourishing meal that fuels your body for the day. Plus, it is easy to clean up. You only need one bowl, which makes your morning routine smoother.

    How to make Apple Oatmeal Bowl

    Making an Apple Oatmeal Bowl is simple. With just a few steps, you can create a tasty and wholesome breakfast. This recipe focuses on easy preparation and delicious flavors.

    Ingredients:

    • 30 g rolled oats (approximately 1/3 cup)
    • Water at room temperature for soaking oats
    • 1 medium apple, diced
    • 2 Medjool dates, chopped
    • 1/2 teaspoon cinnamon
    • 1 tablespoon pumpkin seeds
    • 200 ml of your favorite milk (approximately 3/4 cup)
    • Cinnamon for optional decoration

    Directions:

    1. Soak the rolled oats in a bowl with water at room temperature for 5-10 minutes. This softens the oats and makes them easier to digest.
    2. Peel and dice the apple into small pieces, ensuring they are bite-sized.
    3. Chop the Medjool dates into small pieces, adding a touch of sweetness to the bowl.
    4. Add the diced apple and chopped dates to the bowl with the soaked oats. Mix well to combine the ingredients.
    5. Sprinkle in the half teaspoon of cinnamon. This adds a warm flavor that enhances the dish.
    6. Pour the milk into the bowl and add the tablespoon of pumpkin seeds. Mix everything together.
    7. Finalize by decorating with a sprinkle of cinnamon for added flavor and visual appeal.

    How to serve Apple Oatmeal Bowl

    Serving an Apple Oatmeal Bowl is easy. You can enjoy it in the same bowl you prepared it. If you have guests, consider using a larger bowl and allowing everyone to serve themselves. This dish is delicious on its own, but you can also serve it with a side of yogurt or extra fruit for a more filling meal. Pair it with a warm beverage like tea or coffee for a complete breakfast experience.

    How to store Apple Oatmeal Bowl

    If you have leftovers or want to prepare this dish in advance, storing it is simple. Place the Apple Oatmeal Bowl in an airtight container and refrigerate. It should last for up to 2 days. When ready to eat, reheat it in the microwave for 30-60 seconds. You may also want to add a little extra milk to achieve your desired consistency.

    Tips to make Apple Oatmeal Bowl

    • Soaking the Oats: Soaking oats can enhance their texture. If you prefer a creamier bowl, soak the oats longer.
    • Choosing Apples: Different apple varieties offer unique flavors. Sweet apples like Fuji or Honeycrisp work well, while tart apples like Granny Smith add a contrasting taste.
    • Sweetness Levels: You can adjust the sweetness by adding more or fewer Medjool dates or using honey or maple syrup according to your taste.
    • Adding Protein: To make your meal even more filling, consider adding nuts, nut butter, or protein powder.
    • Spice Variations: Experiment with spices like nutmeg or vanilla for different flavor profiles.

    Variation (if any)

    Feel free to experiment with the Apple Oatmeal Bowl. You can add different fruits like bananas or berries for a change. You can also try using different types of milk, such as almond, soy, or oat milk, for a plant-based option. If you want more crunch, consider swapping pumpkin seeds for almonds or walnuts. You can make a baked version by baking the mixture instead of serving it raw. This can create a warm and comforting dish that is perfect for cold mornings.

    FAQs

    Can I make the Apple Oatmeal Bowl vegan?
    Yes, this recipe is naturally vegan if you use plant-based milk.

    How long does it take to prepare?
    The total prep time is about 10 minutes. There is no cooking time, making it ideal for a quick breakfast.

    Can I reheat the Apple Oatmeal Bowl?
    Yes, you can reheat it in the microwave. Just add a splash of milk if it seems too thick.

    Is this recipe sugar-free?
    Yes, the only sweetness comes from the apple and Medjool dates. There is no added sugar in this recipe.

    Is this Apple Oatmeal Bowl gluten-free?
    Yes, as long as you use certified gluten-free oats, this recipe is gluten-free.

    Nutritional Information

    This Apple Oatmeal Bowl serves one and contains approximately:

    • Calories: 300
    • Protein: 7 g
    • Total Fat: 7 g
    • Saturated Fat: 1 g
    • Carbohydrates: 54 g
    • Dietary Fiber: 8 g
    • Sugars: 12 g

    In conclusion, the Apple Oatmeal Bowl is a nutritious, quick, and delicious breakfast option. Its simplicity and flexibility make it a wonderful choice for anyone looking to start their day right. Try it today and enjoy the benefits of a healthy, homemade breakfast!

  • Zucchini Rice Patties

    Zucchini Rice Patties

    Zucchini Rice Patties are a simple and delicious dish that you can easily make at home. They combine the freshness of zucchini with the heartiness of rice, creating a satisfying meal. These patties are a great way to use up any extra zucchini you might have during the gardening season. Not only are they tasty, but they are also nutritious and can be enjoyed in many ways. Serve them as a snack, side dish, or even as a main course. Making Zucchini Rice Patties is quick and easy, making them a perfect recipe for busy weeknights or a delightful treat for any gathering.

    Why make this recipe

    There are many reasons to make Zucchini Rice Patties. First, they are incredibly versatile. You can serve them at any time of day! Enjoy them for breakfast, lunch, or dinner. They are also a great option for vegetarians or anyone looking to add more vegetables to their diet. Zucchini is low in calories but high in nutrients, making these patties a healthy choice.

    Another reason to make Zucchini Rice Patties is that they are perfect for families. Kids love the fun shape and texture. As a parent, you can feel good about serving them a dish made with wholesome ingredients. This recipe is also an excellent way to sneak in extra vegetables without them even noticing! With just a few steps, you can create a delicious meal that everyone will enjoy.

    How to make Zucchini Rice Patties

    Making Zucchini Rice Patties is a straightforward process. Follow these simple steps to create a tasty and nutritious dish that you can share with family and friends.

    Ingredients:

    1 cup of rice (about 185 g),
    2 zucchini (about 600 g),
    1 onion (about 150 g),
    1 egg,
    1 red sweet pepper (about 150 g),
    1 red hot pepper (optional, about 50 g),
    Salt to taste,
    2 tablespoons of plain flour (20 g),
    Plant oil for frying.

    Directions:

    1. Wash the rice thoroughly under cold water. Place it in a pot, add salt and enough water to cover the rice. Cook over low heat for 15-20 minutes or until the rice is tender. Once done, set it aside in a large bowl to cool.

    2. Clean the zucchini by rinsing it under water. Grate the zucchini using a box grater or food processor. After grating, squeeze out the excess juice with your hands or using a clean kitchen towel. This step is crucial to avoid soggy patties.

    3. Chop the onion finely and add it to the bowl with the cooled rice. Then, mix in the grated zucchini, and crack in the egg.

    4. Next, finely chop the red sweet pepper and, if using, the red hot pepper. Add both peppers to the rice mixture along with salt. Mix everything well until combined.

    5. Add two tablespoons of plain flour to the mixture. This will help bind the ingredients together. Stir it in until the mixture is well-blended.

    6. Heat a generous amount of plant oil in a frying pan over medium heat. Once the oil is hot, use a spoon or your hands to shape small patties from the mixture. Carefully place them in the hot oil.

    7. Fry the patties for about 2-3 minutes on one side until they turn golden brown. Then, flip them over and cook for another 2-3 minutes on the other side. Remove patties from the pan and place them on paper towels to drain excess oil.

    How to serve Zucchini Rice Patties

    Zucchini Rice Patties can be served in many ways. For a simple meal, pair them with a fresh salad or a side of yogurt or sour cream for dipping. You can also enjoy them on their own as a snack. For a complete meal, consider serving them with a protein like grilled chicken or fish. They are also delicious inside a sandwich or wrap, adding a lovely crunch and flavor.

    How to store Zucchini Rice Patties

    If you have leftover Zucchini Rice Patties, you can store them easily. Place them in an airtight container and keep them in the refrigerator. They should stay fresh for about 3 to 4 days. To reheat, simply warm them in a pan over low heat, or place them in a toaster oven to regain their crispiness. Alternatively, you can freeze the patties. Place them in a freezer-safe bag, separating each with parchment paper to prevent them from sticking. They can be frozen for up to 3 months.

    Tips to make Zucchini Rice Patties

    Here are some helpful tips to enhance your experience while making Zucchini Rice Patties:

    • If you want extra flavor, consider adding some herbs like parsley or dill to the mixture.
    • Make sure to squeeze out the excess moisture from the zucchini well, as this will help the patties hold their shape when frying.
    • You can customize your patties by adding grated cheese or other vegetables.
    • To make the patties spicier, increase the amount of red hot pepper according to your taste.

    Variation (if any)

    You can easily modify this recipe to fit your dietary preferences or what you have on hand. For instance, you can swap out the rice for quinoa or couscous to introduce different flavors and textures. You can also use yellow squash in place of zucchini. To make these patties gluten-free, you can substitute the plain flour with almond flour or a gluten-free blend. Experiment with different spices and herbs to create your unique version of Zucchini Rice Patties!

    FAQs

    Can I make Zucchini Rice Patties ahead of time?
    Yes, you can prepare the mixture ahead of time and store it in the refrigerator for a few hours before cooking.

    How do I know when the patties are done frying?
    The patties should be golden brown on both sides. You can also break one open to check if it’s hot and cooked through.

    Can I bake these patties instead of frying them?
    Yes, you can bake the patties! Place them on a baking sheet lined with parchment paper and spray them with some cooking oil. Bake in a preheated oven at 375°F (190°C) for about 20-25 minutes, flipping halfway through.

    What serving suggestions do you recommend?
    Serve Zucchini Rice Patties with a side of fresh salad, yogurt sauce, or your favorite dipping sauce. They make a great addition to wraps or sandwich fillings too.

    How can I make these patties vegan?
    You can replace the egg with a flax egg or applesauce for binding. Simply mix 1 tablespoon of flaxseed meal with 2.5 tablespoons of water and let it sit until it thickens.

    Nutritional Information (per serving):

    • Calories: 180
    • Total Fat: 8g
    • Saturated Fat: 1g
    • Cholesterol: 55mg
    • Sodium: 250mg
    • Total Carbohydrates: 24g
    • Dietary Fiber: 2g
    • Sugars: 2g
    • Protein: 4g

    Zucchini Rice Patties are not only simple to make but also packed with flavor and nutrition. They are perfect for a quick weeknight meal or a crowd-pleasing snack. Try making this recipe today!