Author: Maria

  • Strawberry Dump Cake Recipe

    Strawberry Dump Cake Recipe

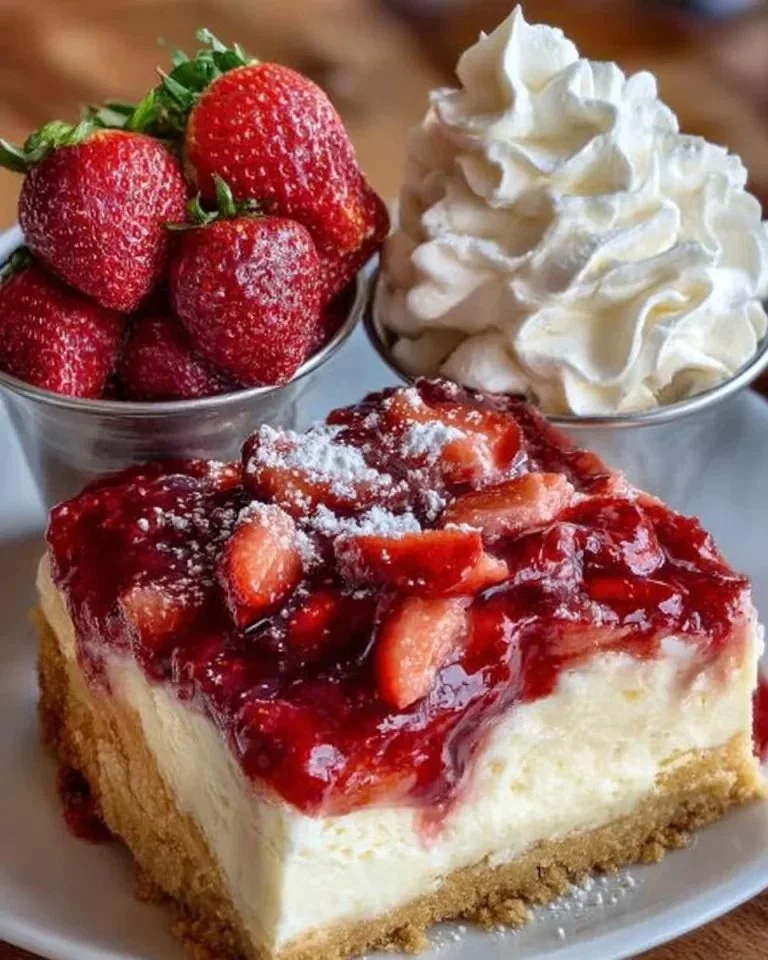
    Delicious Strawberry Dump Cake Recipe

    If you’re looking for a quick and easy dessert that bursts with flavor, this Strawberry Dump Cake is the perfect choice! Made with simple ingredients like strawberry pie filling, cream cheese, and cake mix, it’s an unbeatable combination of sweet and creamy. This fuss-free dessert is perfect for gatherings, family dinners, or just to satisfy your sweet tooth.

    Ingredients:

    • 2 (21-ounce) cans of strawberry pie filling (600g)
    • 8 ounces cream cheese, cubed (225g)
    • 1 box of yellow or white cake mix (425g)
    • 1/2 cup melted unsalted butter (120ml)
    • 1 teaspoon vanilla extract (optional)
    • Crushed graham crackers (optional)
    • Fresh strawberries (optional)
    • Whipped cream (optional)

    Directions:

    1. Preheat your oven to 350°F (175°C).
    2. Grease a 9×13-inch baking pan (23x33cm).
    3. Spread the strawberry pie filling evenly in the bottom of the greased pan.
    4. Next, evenly spread the cubed cream cheese over the strawberry filling.
    5. Sprinkle the dry cake mix over the cream cheese layer to create an even layer.
    6. Pour the melted butter evenly over the top of the cake mix.
    7. Bake in the preheated oven for 45-50 minutes or until the top is golden brown.
    8. Once baked, let the dump cake rest for 15 minutes before serving. It can be enjoyed warm or chilled.
    9. Garnish as desired with crushed graham crackers, sliced fresh strawberries, or a dollop of whipped cream.

    How to Serve Strawberry Dump Cake Recipe

    Serving this Strawberry Dump Cake is simple and delicious. It’s delightful on its own, but you can elevate the experience by adding toppings like fresh strawberries or whipped cream. Pair it with a scoop of vanilla ice cream for an extra treat. This recipe is sure to be a hit, whether you serve it at a picnic, potluck, or family gathering!

  • Italian Sausage Pasta

    Italian Sausage Pasta

    Delicious Italian Sausage Pasta: A Comfort Food Classic

    Italian Sausage Pasta is a warm, hearty dish that combines the rich flavors of spicy or sweet Italian sausage with fresh bell peppers and aromatic herbs. This one-pot recipe is not only easy to make but also perfect for busy weeknights or cozy gatherings with family and friends. With the delightful addition of egg noodles and a simple tomato sauce, it’s a meal that everyone will love.

    Ingredients:

    • 1 pound (450 g) Italian sausage (spicy or sweet)
    • 1/2 teaspoon salt
    • 1 teaspoon Italian seasoning
    • 1/2 teaspoon black pepper
    • 1 red bell pepper, diced
    • 1 yellow bell pepper, diced
    • 1 orange bell pepper, diced
    • 4 cloves garlic, minced
    • 1/2 cup (120 ml) white wine (such as Chardonnay)
    • 1 (28-ounce/800 g) can diced tomatoes with juice
    • 2 tablespoons chopped parsley
    • 2 ounces (60 g) fresh basil, julienned (reserve half for garnish)
    • 12 ounces (340 g) egg noodles
    • Fresh Parmesan cheese (optional for garnish)
    • Olive oil (to taste)

    Directions:

    1. Brown the sausage: In a large pot, heat 2 tablespoons of olive oil over medium heat. Add the crumbled sausage and cook for 5-7 minutes until browned. Remove the sausage from the pot and set aside.

    2. Sauté the vegetables: In the same pot, add the diced bell peppers, salt, Italian seasoning, and black pepper. Cook for 2 minutes, then add the minced garlic and cook for an additional 30 seconds until fragrant.

    3. Deglaze with white wine: Pour in the white wine, scraping up any browned bits from the bottom of the pot. Allow the wine to reduce for 2-3 minutes until it’s almost evaporated.

    4. Create the sauce: Add the diced tomatoes with juice, olive oil, chopped parsley, and half of the julienned basil to the mixture. Return the cooked sausage to the pot and simmer for 3-4 minutes to combine the flavors.

    5. Cook the noodles: Prepare the egg noodles according to package directions until they are al dente. Once cooked, drain the noodles.

    6. Combine and serve: Add the cooked noodles to the sauce and toss everything together until the noodles are well coated. Adjust the seasoning if needed and serve hot, garnished with fresh basil, Parmesan cheese, and a drizzle of olive oil.

    How to Serve Italian Sausage Pasta

    Serve this Italian Sausage Pasta as a comforting main dish, perfect for a family dinner or casual gathering. Pair it with a simple green salad and crusty garlic bread for a complete meal. For those who enjoy a bit of heat, a sprinkle of red pepper flakes on top can enhance the flavors. Enjoy the deliciousness of this Italian classic, and watch it become a household favorite!

  • Eggplant and Chicken Lasagna

    Eggplant and Chicken Lasagna

    Delicious Eggplant and Chicken Lasagna: A Flavorful Twist

    Eggplant and chicken lasagna is a delightful and hearty dish that’s perfect for family dinners or gatherings. Layered with grilled eggplant, tender chicken, and gooey mozzarella cheese, this recipe brings comfort food to a whole new level. It’s a fantastic way to incorporate vegetables into a classic Italian favorite!

    Ingredients:

    • 1 pound (450 grams) eggplant, sliced 0.5 cm thick
    • 4 tablespoons (60 ml) olive oil
    • 1 pound (450 grams) boneless skinless chicken breasts
    • 2 cups (480 ml) tomato pasta sauce
    • 8 ounces (225 grams) fresh mozzarella cheese, shredded
    • 1/3 cup (40 grams) parmesan cheese, grated
    • 0.5 ounces (15 grams) basil leaves, optional
    • Salt and pepper to taste

    Directions:

    1. Preheat your grill. While it’s heating up, oil two baking sheets and arrange a single layer of eggplant on each sheet. Season the eggplant slices with salt, pepper, and a drizzle of olive oil.
    2. Grill the eggplant for a couple of minutes on each side or until golden brown. Once done, turn off the grill and preheat your oven to 425°F (220°C).
    3. In a large nonstick skillet, heat 1 tablespoon (15 ml) of olive oil over medium-high heat. Season the chicken breasts with 1/4 teaspoon of salt and 1/8 teaspoon of pepper before adding them to the skillet.
    4. Cook the chicken for about 2 minutes per side until partially cooked, then remove it from the skillet. Allow the chicken to cool enough to handle, then slice it crosswise into strips.
    5. In a lasagna pan, add a layer of grilled eggplant, followed by a layer of chicken slices, and top with tomato sauce, mozzarella cheese, parmesan cheese, and basil leaves if you are using them. Repeat these layers with the remaining ingredients.
    6. Finish with a final layer of the remaining cheeses on top. Bake for 20 minutes or until the cheeses are melted and bubbly.
    7. Once out of the oven, let your lasagna stand for 5 minutes before cutting it into servings.

    How to Serve Eggplant and Chicken Lasagna

    Serve your eggplant and chicken lasagna hot, accompanied by a fresh salad for a complete meal. A simple green salad with vinaigrette pairs beautifully, adding a refreshing crunch to the rich flavors of the lasagna. For an added touch, sprinkle some fresh basil on top for a lovely garnish. Enjoy this delicious dish with family and friends!

  • Preserved Lemons

    Preserved Lemons

    Preserved lemons are a unique and flavorful addition to your culinary repertoire. With just a few simple ingredients—lemons, salt, and time—you can create a vibrant ingredient that enhances a variety of dishes. These tangy, salty lemons are traditionally used in Mediterranean cuisine and can elevate everything from salads to stews.

    Ingredients:

    • 6-8 whole lemons
    • 4-5 tablespoons of salt
    • Fresh lemon juice (if needed)

    Note: For European equivalents, use approximately 1 to 1.5 kilograms of lemons (depending on size), 60-75 grams of salt, and milliliters of fresh lemon juice as necessary.

    Directions:

    1. Begin by cleaning a quart jar in hot, soapy water, and dry it thoroughly with a clean towel.
    2. Clean the outsides of the lemons by rinsing them under water, then dry with a cloth.
    3. Slice the ends of the lemons to create a flat top and bottom.
    4. Stand each lemon on one of its flat ends.
    5. Make an ‘X’ cut in each lemon, stopping about 1/2 inch from completely slicing through, so the sections remain attached at the base.
    6. Open each lemon and pour in 1/2 tablespoon of salt, allowing any spills to collect in the bottom of the jar.
    7. Once all lemons are salted, pack them tightly into the jar using a pestle or a wooden spoon.
    8. Add an additional 1 tablespoon of salt and press down to encourage juice to escape from the lemons.
    9. Ensure the lemons are fully submerged in their juice; add fresh lemon juice if necessary.
    10. Alternatively, you can cut the lemons into quarters and layer them in the jar with salt placed between each layer.
    11. After filling the jar, sprinkle 1 tablespoon of salt over the final layer.
    12. Press down again to extract more juice, topping off with fresh lemon juice if needed.
    13. Seal the jar and store it in a cool, dry place for at least 1 week, shaking it occasionally.
    14. After a week, transfer the jar to the refrigerator.
    15. The preserved lemons are ready to use once the peels become translucent.
    16. To use a lemon, rinse it to remove excess salt. Discard the pulp and white pith, and chop the preserved peel as desired.
    17. Store your preserved lemons in the refrigerator for up to 6 months.

    How to Serve Preserved Lemons

    Preserved lemons add a delightful burst of flavor to many dishes. Try using them in salads, tagines, or pastas to impart a unique tanginess. They pair exceptionally well with grilled meats, fish, and roasted vegetables. Consider serving them chopped in a simple olive oil dressing or blending them into a flavorful dip. With preserved lemons, you can enhance your meals and impress your guests with minimal effort.

  • Pasta with Chicken and Parmesan Sauce

    Pasta with Chicken and Parmesan Sauce

    Creamy Whole Wheat Pasta with Chicken and Spinach

    If you’re looking for a comforting and nutritious meal, this creamy whole wheat pasta with chicken is just the ticket. With a delightful blend of whole wheat penne and a rich Parmesan sauce, this dish is both satisfying and easy to prepare. The addition of spinach adds a pop of color and nutrients, making this a well-rounded dinner option for the whole family.

    Ingredients:

    • 8 ounces (230 grams) whole wheat penne or fettuccine
    • 2 tablespoons (30 milliliters) olive oil
    • 3 cloves garlic, minced
    • 1 pound (450 grams) boneless skinless chicken breasts, cubed
    • Salt and black pepper to taste
    • 1/2 teaspoon paprika
    • 1/2 teaspoon Italian seasoning
    • 1 tablespoon (8 grams) whole wheat flour
    • 1 cup (240 milliliters) low sodium chicken broth
    • 1/2 cup (120 milliliters) low-fat milk
    • 1/2 cup (120 milliliters) nonfat plain Greek yogurt
    • 1/2 cup (50 grams) freshly grated Parmesan cheese
    • 2 cups (about 60 grams) baby spinach (optional but recommended)
    • Fresh chopped parsley for garnish

    Directions:

    1. Cook the pasta in a pot of salted water according to package instructions until al dente. Reserve about a cup of the pasta water, then drain the remaining water and set the pasta aside.

    2. In a large skillet, heat the olive oil over medium heat. Season the cubed chicken with salt, black pepper, paprika, and Italian seasoning. Add the chicken to the skillet and cook until golden brown, about 5-7 minutes. Remove the chicken from the skillet and set aside.

    3. In the same skillet, sauté the minced garlic until fragrant, about 1 minute. Add the whole wheat flour, stirring to create a roux. Gradually whisk in the chicken broth until smooth. Bring the mixture to a boil.

    4. Reduce the heat, then stir in the low-fat milk, nonfat Greek yogurt, and grated Parmesan cheese. Mix until the cheese is melted and the sauce is creamy.

    5. Return the cooked chicken to the skillet and add the pasta and baby spinach. Toss everything together until well combined. If the sauce is too thick, add a little of the reserved pasta water until desired consistency is reached.

    6. Serve the pasta hot, garnished with fresh chopped parsley on top.

    How to Serve Pasta with Chicken and Parmesan Sauce

    This creamy whole wheat pasta pairs beautifully with a side salad or garlic bread for a complete meal. For an extra kick, consider adding crushed red pepper flakes. Enjoy this dish on busy weeknights or whenever you’re craving a comforting yet healthy dinner that the whole family will love.

  • Pumpkin Fritters

    Pumpkin Fritters

    Delicious Yellow Squash Fritters Recipe

    If you’re looking for a tasty appetizer or side dish that showcases the vibrant flavors of summer, these Yellow Squash Fritters are perfect for you! Made with fresh yellow squash and a blend of spices, these golden-brown fritters are crispy on the outside and soft on the inside. Plus, they’re easy to make and are sure to impress your family and friends.

    Ingredients:

    • 5 medium yellow squash (about 680 g)
    • 1 1/2 cups self-rising cornmeal (180 g)
    • 2 tablespoons all-purpose flour (30 g)
    • 1 tablespoon sugar (15 g)
    • 1 teaspoon salt (5 g)
    • 1/4 teaspoon freshly ground black pepper (1 g)
    • A pinch of cayenne pepper
    • 1/2 sweet onion, chopped
    • 1/2 jalapeño, finely chopped
    • 1/2 cup buttermilk (120 ml)
    • 1 egg, lightly beaten
    • Vegetable oil for frying

    Directions:

    1. Prepare and mash the squash: Cut the yellow squash in half lengthwise, then slice it into 2-inch pieces. Steam the squash for 12-15 minutes until tender, then mash it into a puree. Set aside to cool.

    2. Mix dry ingredients: In a large bowl, combine the cornmeal, flour, sugar, salt, black pepper, and cayenne pepper.

    3. Mix wet ingredients: In another bowl, combine the squash puree, chopped onion, jalapeño, buttermilk, and beaten egg. Mix until everything is well combined.

    4. Combine wet and dry: Pour the wet ingredients into the dry ingredients and stir until a smooth batter forms.

    5. Heat oil: Heat 1 inch of vegetable oil in a skillet over medium-high heat until it reaches 360-375°F (180-190°C).

    6. Fry the fritters: Using a spoon, drop generous spoonfuls of batter into the hot oil. Fry for about 3 minutes on each side, or until the fritters are golden brown.

    7. Drain and season: Remove the fritters with a slotted spoon and drain them on paper towels. Sprinkle with salt while they’re still hot.

    8. Repeat: Continue frying the remaining batter in batches.

    How to Serve Yellow Squash Fritters

    These Yellow Squash Fritters are delicious served hot, either on their own or with your favorite dipping sauce. Consider pairing them with a tangy yogurt sauce or a fresh salsa for an added burst of flavor. They also make a fantastic side dish alongside grilled meats or a fresh salad. Enjoy these crunchy treats as an appetizer at your next gathering or as a delightful addition to your family meals!

  • Tipsy Peach Lemonade

    Tipsy Peach Lemonade

    Tipsy Peach Lemonade is a refreshing and delicious drink perfect for warm days. It combines the sweetness of ripe peaches with the tartness of lemonade. This drink is easy to make and can be enjoyed by everyone, with or without alcohol. Adding vodka gives it a fun twist, making it ideal for summer parties or relaxing afternoons. Let’s dive into the ingredients and directions to make this delightful beverage!

    Ingredients:

    • 2 fresh peaches, peeled and diced
    • 200 grams granulated sugar
    • 1 liter water
    • 180 milliliters lemon juice, fresh if you have it
    • 30 milliliters vodka per serving, omit for non-alcoholic version
    • Peach slices and lemon zest, for garnish

    Directions:

    1. Put diced peaches, sugar, and water into a 2-liter pot. Bring to a boil. Lower the heat and simmer until the sugar is completely dissolved; approximately 10 minutes.
    2. Allow the mixture to cool to room temperature. Strain through a sieve, pressing to extract as much juice as possible, saving the extracted juice in a separate container. If you would like to use the pulp, you can skip the straining procedure, but it will be very thick.
    3. Stir lemon juice into the cooked juice, with or without the fruit.
    4. Ladle into a tall glass that has been filled with ice.
    5. Add vodka and stir.
    6. Garnish with fresh peach slices if desired.

    How to serve Tipsy Peach Lemonade

    Serve Tipsy Peach Lemonade in tall glasses filled with ice. For a beautiful presentation, add peach slices and a sprinkle of lemon zest on top. This drink is perfect for entertaining or enjoying on your own. Cheers to a refreshing summer beverage that combines the sweetness of peaches with the zing of lemonade!

  • Zesty Lemon Orzo Chicken

    Zesty Lemon Orzo Chicken

    Lemon Orzo Chicken is a delightful dish that combines tender chicken, creamy orzo pasta, and zesty lemon flavors. It is easy to prepare and perfect for any family meal or gathering. This recipe is not only delicious but also comforting and satisfying. Let’s get started on making this tasty dish!

    Ingredients:

    • 960 milliliters chicken broth, low salt
    • 14 grams unsalted butter
    • 7 grams coarse salt
    • 1 gram ground pepper
    • 450 grams orzo
    • 450 grams chicken tenders, cut into 2.5 cm pieces
    • 113 grams crumbled Feta cheese
    • 15 grams chopped fresh dill
    • 10 grams grated lemon zest
    • 15 milliliters fresh lemon juice
    • 100 grams grated Parmesan cheese

    Directions:

    1. Preheat oven to 200 degrees Celsius. In a saucepan, bring the chicken stock, butter, salt, and pepper to a boil.
    2. In a 3-quart baking dish, place the orzo and chicken.
    3. Add the dill, lemon zest, lemon juice, and Feta cheese to the dish.
    4. Pour the broth over the orzo and chicken.
    5. Stir once to mix everything.
    6. Bake uncovered for about 40 minutes until the orzo is done and the liquid is creamy.
    7. Sprinkle Parmesan on top and let stand for 5 minutes until the cheese melts a bit.

    How to serve Lemon Orzo Chicken

    Serve Lemon Orzo Chicken warm. It pairs well with a fresh green salad or steamed vegetables. Enjoy this tasty dish with family and friends for a perfect meal!

  • Ultimate Oreo and Fudge Ice Cream Cake

    Ultimate Oreo and Fudge Ice Cream Cake

    Oreo and Fudge Ice Cream Cake is a delightful dessert that combines the rich flavors of chocolate and vanilla. This cake is perfect for any occasion, whether it’s a birthday party or a family gathering. It is easy to make and will surely impress your guests. With layers of ice cream sandwiches, whipped topping, and chopped Oreo cookies, this cake promises a delicious treat for everyone.

    Ingredients:

    • 120 milliliters fudge ice cream topping, warmed
    • 225 grams Cool Whip topping, thawed and divided
    • 1 package (96 grams) chocolate instant pudding/pie filling mix
    • 8 Oreo cookies, chopped
    • 12 vanilla ice cream sandwiches

    OPTIONAL BEFORE SERVING

    • Cool Whip
    • Oreo cookies, crushed
    • Chocolate syrup

    Directions:

    1. In a medium bowl, whisk together 120 milliliters of warmed hot fudge and 225 grams of whipped topping. Mix well until blended.
    2. Add the dry pudding mix and stir until blended.
    3. Stir in 60 milliliters of milk and mix until smooth. The consistency should be spreadable. If it is still too thick, mix in a little more milk.
    4. Fold in the chopped Oreo cookies.
    5. Arrange 4 ice cream sandwiches on a piece of foil measuring approximately 30 x 60 centimeters.
    6. Spread half of the pudding mixture on top of the four ice cream sandwiches. Then, top with 4 more ice cream sandwiches.
    7. Repeat the process by adding the rest of the pudding mixture and top it with the remaining 4 ice cream sandwiches.
    8. Frost the top and sides with the remaining whipped topping. Bring up the sides of the foil to make a loose pouch. It’s okay if the foil touches the whipped topping. Freeze for at least 4-6 hours before serving.
    9. Optional for Serving: Take the cake out of the freezer and spread a thin layer of Cool Whip on the outside. Add crushed cookies on top. Place back in the freezer for 30 minutes before slicing.

    How to Serve Oreo and Fudge Ice Cream Cake

    To serve Oreo and Fudge Ice Cream Cake, carefully slice it into pieces. You can drizzle chocolate syrup on individual servings for extra indulgence. This cake is best enjoyed straight from the freezer for a cool and creamy treat. Decorate with additional crushed Oreo cookies and a dollop of Cool Whip if desired. Enjoy every bite of this delicious ice cream cake!

  • Layered Chicken and Black Bean Casserole

    Layered Chicken and Black Bean Casserole

    Layered Chicken and Black Bean Casserole is a delicious and hearty meal that everyone will love. This recipe combines cooked chicken, black beans, and a variety of tasty ingredients for a flavorful experience. It is perfect for family dinners or gatherings with friends. Simple to prepare and easy to serve, this casserole will quickly become a favorite in your home.

    Ingredients:

    • 500 grams cooked chicken, diced
    • 30 grams fresh cilantro, chopped
    • 1 can (420 grams) black beans, rinsed and drained
    • 1 can (130 grams) diced green chilies, drained
    • 1/2 teaspoon cumin
    • 1/2 teaspoon coriander
    • 1 can (280 grams) enchilada sauce
    • 8 tortillas (15 cm)
    • 200 grams shredded Mexican cheese blend
    • 225 grams sour cream

    Directions:

    1. Preheat the oven to 180 degrees Celsius. In a bowl, combine the chicken, cilantro, black beans, chilies, cumin, and coriander. Blend well.
    2. In a lightly greased 28×10 cm pan, spread half of the enchilada sauce on the bottom.
    3. Top with a layer of tortillas, covering the bottom of the pan. It’s fine if the tortillas overlap.
    4. Spread half of the chicken mixture over the tortillas.
    5. Top with 100 grams of cheese and half of the sour cream.
    6. Add another layer of tortillas.
    7. Then, add the remaining chicken mixture.
    8. Pour the rest of the enchilada sauce over the chicken.
    9. Cover the casserole with aluminum foil. Bake in the preheated oven for 30 minutes.
    10. Remove the foil and top with the remaining cheese. Dot the top with the remaining sour cream. Place back in the oven for 5 to 10 minutes until the cheese has melted.
    11. Remove from the oven and let it sit for 10 minutes before serving.

    How to serve Layered Chicken and Black Bean Casserole

    Serve Layered Chicken and Black Bean Casserole warm. You can garnish it with extra cilantro for a fresh touch. This dish pairs well with a side salad or some fresh avocado slices. Enjoy your flavorful casserole with family and friends!