Category: Desserts

  • Real Turkish Ice Cream Recipe

    Real Turkish Ice Cream Recipe

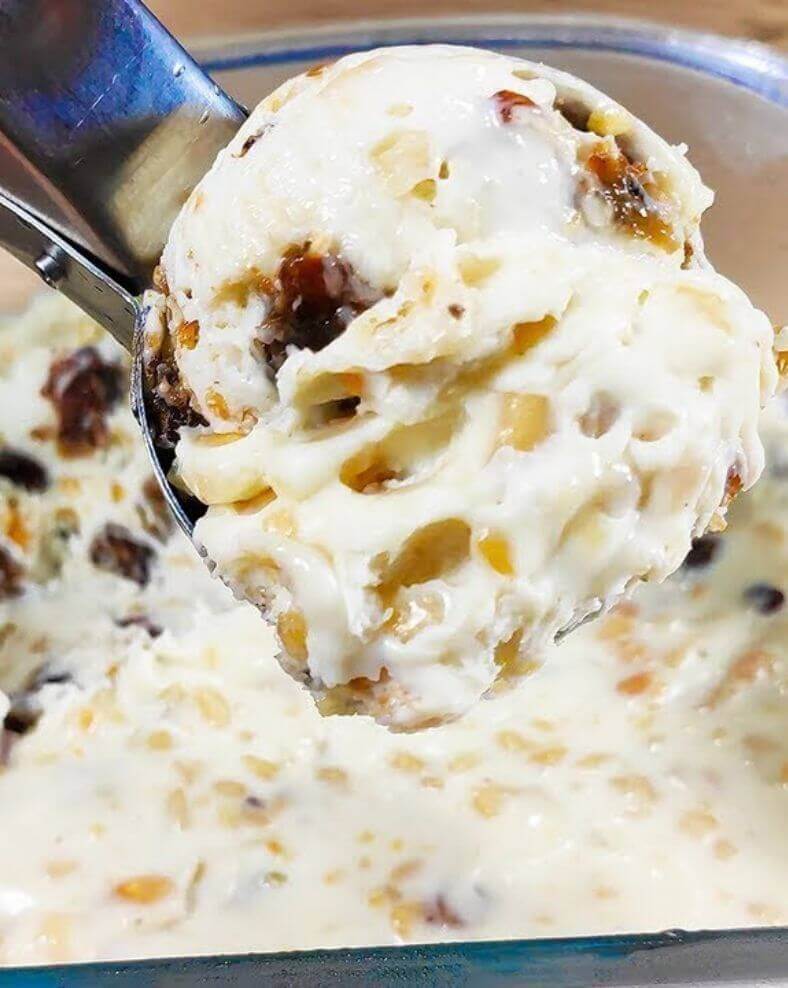
    Introduction

    Discover the delight of Real Turkish Ice Cream with this quick and easy recipe using just three main ingredients. Turkish ice cream, known for its unique texture and elasticity, is a treat that will amaze your taste buds. With a few additional flavors and mix-ins, you can create a variety of delicious versions. Let’s dive into this delightful recipe!

    Ingredients

    Base Ingredients

    • 1 liter full-fat fresh cow’s milk (4 1/4 cups)
    • 140g corn starch (1 1/8 cups)
    • 400g boiled condensed milk (14 oz)
    • 1 vanilla bean or 1 tsp vanilla extract

    Flavor Mix-ins

    • 100g peanuts (3.5 oz)
    • 100g raisins (3.5 oz)
    • 30g cocoa powder (1/4 cup)
    • 50g chocolate (1.75 oz)
    • 200g frozen cherries (7 oz)
    • 30g sugar (2 tbsp)
    • 1 banana

    Nutrition Information

    • Serving Size: 1 scoop (1/16 of the recipe)
    • Number of Servings: 16 scoops
    • Calories: 180
    • Total Fat: 8g
    • Saturated Fat: 4g
    • Cholesterol: 20mg
    • Sodium: 70mg
    • Total Carbohydrates: 24g
    • Dietary Fiber: 2g
    • Sugars: 18g
    • Protein: 4g

    Method of Preparation

    Step 1: Prepare the Base

    1. Pour 800 milliliters of milk into a suitable container, place on the stove, and heat to 90 degrees Celsius (194 degrees Fahrenheit), stirring all the time to prevent burning.
    2. In a small bowl, whisk the corn starch with the remaining milk until smooth.
    3. Slowly pour the starch mixture into the warm milk mixture, continuing to stir until thickened.
    4. Add the boiled condensed milk and stir until the mixture is smooth and thickened further.

    Step 2: Divide and Flavor

    1. Remove from the heat and divide the mixture into 3 equal parts.

    Flavor 1: Vanilla Peanut Raisin

    1. Grind the peanuts in a blender.
    2. Soak the raisins in a little warm water for 10 minutes, then drain well.
    3. Add the vanilla and peanuts to one part of the mixture and mix well.
    4. Pour into a suitable container and place in the freezer for about 1 hour or until completely set.

    Flavor 2: Cherry Banana

    1. Pour the cherries into a saucepan, add the sugar, and place on the stove.
    2. Cook until the sugar is completely dissolved.
    3. Remove from the heat, pour into the blender bowl, add the banana, and grind until smooth.
    4. Pour into the second part of the milk mixture and mix well.
    5. Pour into a storage container and refrigerate for 1 hour or until completely set.

    Flavor 3: Chocolate Cocoa

    1. Grate the chocolate on a coarse grater.
    2. Add the cocoa powder to the last part of the milk mixture and mix until smooth.
    3. Pour into a storage container, level the surface, and sprinkle with the grated chocolate.
    4. Place in the freezer for 1 hour or until completely set.

    Step 3: Serve

    1. Remove the ice cream from the freezer, allow to soften slightly, and serve.

    Conclusion

    Enjoy the rich and creamy taste of Real Turkish Ice Cream in these three delightful flavors. Whether you prefer the classic combination of vanilla, peanuts, and raisins, the fruity blend of cherry and banana, or the indulgent chocolate cocoa version, this recipe offers something for everyone. Perfect for a refreshing treat or a special dessert, this Turkish ice cream is sure to become a favorite in your household. Happy freezing!

  • Yogurt Cake: The Cake Everyone Will Ask You For!

    Yogurt Cake: The Cake Everyone Will Ask You For!

    Introduction

    Prepare to be amazed by the deliciousness of this Yogurt Cake. Light, fluffy, and incredibly moist, this cake is a crowd-pleaser that will have everyone asking for the recipe. Made with Greek yogurt, this cake has a delightful tang and richness, balanced with a hint of sweetness. It’s perfect for any occasion, from casual get-togethers to special celebrations.

    Ingredients

    • 400g Greek yogurt (14 oz)
    • 4 eggs
    • 3 tbsp corn starch (24g)
    • 3 tbsp stevia sweetener (or normal sugar) (about 30g)
    • 1 tsp baking powder (4g)
    • 1 pinch of salt
    • Powdered sugar (as needed)

    Nutrition Information

    • Serving Size: 1 slice (1/12 of the cake)
    • Number of Servings: 12 slices
    • Calories: 120
    • Total Fat: 4g
    • Saturated Fat: 2g
    • Cholesterol: 60mg
    • Sodium: 100mg
    • Total Carbohydrates: 12g
    • Dietary Fiber: 0g
    • Sugars: 5g
    • Protein: 6g

    Preparation

    Step 1: Prepare the Egg Mixture

    1. Separate the egg whites from the yolks.
    2. Add the stevia sweetener (or sugar) to the egg yolks and beat adequately with an electric whisk until you obtain a light, frothy mixture that has doubled in volume.

    Step 2: Add Dry Ingredients and Yogurt

    1. Add the baking powder and corn starch to the yolk mixture, then mix with a hand whisk to incorporate the powders.
    2. Add the Greek yogurt and mix until the batter is smooth.

    Step 3: Whip the Egg Whites

    1. Add a pinch of salt to the egg whites and beat them until stiff with an electric whisk.
    2. Incorporate the whipped egg whites into the yolk mixture in two steps, stirring delicately with a spatula starting from the bottom up. This helps to keep the batter airy.

    Step 4: Prepare the Baking Mold

    1. Line a round baking mold with high edges (18 centimeters in diameter) with parchment paper.
    2. Pour the mixture into the prepared mold.
    3. Mix the batter gently with a toothpick and tap the mold lightly on the table to remove any air bubbles.

    Step 5: Bake the Cake

    1. Preheat the oven to 160°C (320°F).
    2. Bake the cake for 30 minutes at 160°C.
    3. Lower the temperature to 140°C (284°F) and bake for an additional 10 minutes.
    4. When the cake is ready, let it cool in the oven turned off to prevent it from deflating.

    Step 6: Final Touches

    1. Remove the cake from the mold once it is completely cool.
    2. Sprinkle with powdered sugar before serving.

    Tips

    • Ensure all ingredients are at room temperature for best results.
    • Do not overmix the batter when incorporating the egg whites to maintain the light texture.
    • Add a splash of vanilla extract to enhance the flavor of the cake.
    • Serve with fresh berries or a dollop of whipped cream for an extra touch of indulgence.

    Conclusion

    This Yogurt Cake is a must-try recipe that will impress your family and friends with its light, fluffy texture and delightful flavor. Perfect for any occasion, it’s easy to make and incredibly delicious. Enjoy this melt-in-your-mouth treat and be prepared for everyone to ask you for the recipe. Happy baking!

  • The Lightest Cake in the World! It Melts in Your Mouth!

    The Lightest Cake in the World! It Melts in Your Mouth!

    Introduction

    Experience the sheer delight of the Lightest Cake in the World, a cake so airy and delicate that it practically melts in your mouth. With a simple yet delectable combination of a light, fluffy dough and a creamy cheese filling dotted with fresh raspberries, this cake is perfect for any occasion. Easy to make and incredibly delicious, it’s a dessert that will impress everyone who tries it.

    Ingredients

    Dough

    • 2 eggs
    • 80g sugar (1/3 cup + 1 tbsp)
    • A pinch of salt
    • Vanilla flavoring (to taste)
    • 100ml oil (1/2 cup)
    • 100ml milk (1/2 cup)
    • 200g flour (1 2/3 cups)
    • 12g baking powder (1 tbsp)

    Filling

    • 150g cheese (5.3 oz) (cottage cheese or cream cheese)
    • 20g sugar (1 1/2 tbsp)
    • 1 egg
    • Vanilla flavoring (to taste)
    • Raspberries (to taste)

    For Decoration

    • Powdered sugar

    Nutrition Information

    • Serving Size: 1 slice (1/12 of the cake)
    • Number of Servings: 12 slices
    • Calories: 180
    • Total Fat: 9g
    • Saturated Fat: 2g
    • Cholesterol: 45mg
    • Sodium: 120mg
    • Total Carbohydrates: 21g
    • Dietary Fiber: 1g
    • Sugars: 10g
    • Protein: 4g

    Preparation

    Dough

    1. Preheat your oven to 180°C (350°F).
    2. In a large mixing bowl, combine the eggs, sugar, a pinch of salt, and vanilla flavoring.
      • Mix with a mixer until well blended and fluffy.
    3. Gradually pour in the oil and milk, continuing to mix until fully incorporated.
    4. Add the flour and baking powder to the mixture.
      • Mix until the batter is smooth and free of lumps.
    5. Line a 26 cm diameter baking form with parchment paper.
    6. Pour the batter into the prepared baking form, spreading it evenly.

    Filling

    1. In a separate bowl, mix the cottage cheese (or cream cheese) with sugar, egg, and vanilla flavoring until smooth and creamy.
    2. Using a tablespoon, spread the cheese filling on top of the dough in the baking form.
      • Distribute the filling evenly for a uniform layer.
    3. Gently lay out the raspberries on top of the cheese filling.

    Baking

    1. Place the cake in the preheated oven and bake for about 40 minutes.
      • Check for doneness by inserting a toothpick into the center; it should come out clean.

    Decoration

    1. Allow the cake to cool slightly after removing it from the oven.
    2. Decorate with a light dusting of powdered sugar before serving.

    Tips

    • Ensure all ingredients are at room temperature for best results.
    • Use fresh raspberries for the most vibrant flavor, but frozen raspberries can be used if fresh ones are not available.
    • Adjust the sweetness by adding more or less sugar to both the dough and filling according to your taste preference.

    Conclusion

    This Lightest Cake in the World is an epitome of simplicity and elegance. The combination of a light, fluffy dough with a creamy cheese filling and fresh raspberries makes it a delightful treat for any time of day. Serve it as a dessert, with tea, or as a special treat for gatherings, and enjoy the compliments that follow. Happy baking!

  • Effortless Blackberry Cake: Mix the Ingredients and Bake for a Deliciously Soft Treat

    Effortless Blackberry Cake: Mix the Ingredients and Bake for a Deliciously Soft Treat

    Introduction

    Indulge in the simplicity and deliciousness of our Effortless Blackberry Cake. This recipe is designed for those who love baking but don’t want to spend hours in the kitchen. With just a few ingredients and easy steps, you can create a soft, moist cake that is bursting with the sweet-tart flavor of blackberries. Perfect for any occasion, this cake will impress your family and friends with its delightful taste and beautiful presentation.

    Ingredients

    • 1 teaspoon cornstarch (5g)
    • 150g blackberries (5.3 oz)
    • 2g vanilla sugar (1/2 teaspoon)
    • 1 teaspoon baking powder (5g)
    • 200g flour (1 3/4 cups)
    • 10 cl milk (100ml or 3.4 fl oz)
    • 3 large eggs
    • 150g sugar (3/4 cup)
    • 1 pinch of salt
    • 100g softened butter (7 tablespoons or 3.5 oz)

    Nutrition Information

    • Serving Size: 1 slice (1/12 of the cake)
    • Number of Servings: 12 slices
    • Calories: 200
    • Total Fat: 9g
    • Saturated Fat: 5g
    • Cholesterol: 60mg
    • Sodium: 90mg
    • Total Carbohydrates: 27g
    • Dietary Fiber: 1g
    • Sugars: 15g
    • Protein: 4g

    Preparation

    Preheat the Oven

    1. Preheat your oven to 180°C (350°F). This ensures the oven is at the right temperature when you’re ready to bake.

    Prepare the Batter

    1. In a large mixing bowl, place the softened butter.
    2. Add the sugar, vanilla sugar, and a pinch of salt.
    3. Crack the eggs into the bowl.
    4. Using an electric mixer, beat the ingredients together until the mixture is smooth and creamy.

    Incorporate Dry Ingredients

    1. In a separate bowl, sift together the flour, cornstarch, and baking powder.
    2. Gradually add the dry ingredients to the wet mixture, mixing well after each addition.
    3. Pour in the milk, and continue beating until the batter is smooth and well combined.

    Prepare the Baking Mold

    1. Line a 22 cm (approximately 9-inch) round baking mold with baking paper. This prevents the cake from sticking and makes it easy to remove after baking.

    Combine and Bake

    1. Pour the batter into the prepared mold.
    2. Smooth out the top with a spatula to ensure an even surface.
    3. Gently press the blackberries into the batter, distributing them evenly across the top.
    4. Place the mold in the preheated oven and bake for about 40 minutes.

    Check for Doneness

    1. Perform the toothpick test by inserting a toothpick into the center of the cake. It should come out dry and clean, indicating the cake is fully baked.

    Cool and Serve

    1. Allow the cake to cool completely in the mold before attempting to remove it.
    2. Once cooled, carefully unmold the cake and transfer it to a serving platter.
    3. Sprinkle the top with icing sugar for a decorative touch.

    Enjoy Your Blackberry Cake

    1. Slice and serve the cake to your delighted guests. Enjoy the deliciously soft and fruity treat with a cup of tea or coffee.

    Tips for the Perfect Blackberry Cake

    • Use fresh, ripe blackberries for the best flavor. Frozen blackberries can be used, but make sure to thaw and drain them first.
    • Ensure your butter is properly softened to achieve a smooth batter. This helps in incorporating air and making the cake light and fluffy.
    • Don’t overmix the batter once the flour is added. Overmixing can lead to a dense cake.
    • Check the cake halfway through baking and rotate the pan if necessary to ensure even baking.

    Storage and Serving Suggestions

    • Store any leftover cake in an airtight container at room temperature for up to 3 days.
    • For longer storage, refrigerate the cake, but bring it to room temperature before serving to enjoy its full flavor and texture.
    • Serve with a dollop of whipped cream or a scoop of vanilla ice cream for an extra indulgent treat.

    Enjoy the delightful simplicity and exquisite taste of this Effortless Blackberry Cake. Whether you’re baking for a special occasion or just to satisfy your sweet tooth, this cake is sure to become a favorite in your recipe collection. Happy baking!

  • Healthy No-Bake Chocolate Peanut Butter Bars

    Healthy No-Bake Chocolate Peanut Butter Bars

    Ingredients

    The Base

    • 2 cups quick rolled oats (180g)
    • 1 cup walnuts (100g)
    • 2 tsp cinnamon powder
    • 1/2 tsp salt
    • 1 1/2 cups coconut flakes (110g)
    • 1/4 cup chia seeds (45g)
    • 2/3 cup honey (220g)
    • 1 cup peanut butter (260g)

    The Chocolate

    • 1 cup cocoa powder (120g)
    • 1/2 cup coconut oil (125ml)
    • 1/2 cup honey (165g)
    • 1 tsp vanilla extract
    • Coarse coconut flakes, to sprinkle on top

    Servings

    This recipe makes approximately 25 pieces.

    Nutritional Information (per piece)

    • Calories: 190
    • Protein: 4g
    • Carbohydrates: 18g
    • Dietary Fiber: 3g
    • Sugars: 12g
    • Fat: 12g
    • Saturated Fat: 6g
    • Cholesterol: 0mg
    • Sodium: 45mg

    Instructions

    The Base

    1. Blend Ingredients: Using a food processor, blend the oats, walnuts, cinnamon powder, and salt into a smooth mixture. Transfer the mixture to a bowl.
    2. Mix: Add the coconut flakes, chia seeds, honey, and peanut butter to the bowl. Mix everything well until fully combined.
    3. Prepare the Pan: Pour the mixture into a 9 inch (23 cm) square pan that has been greased and lined with baking paper that overhangs on the sides. This will make it easier to lift and remove the bars from the pan.
    4. Press the Mixture: Using a spoon, press the mixture evenly into the base of the pan. Set aside.

    The Chocolate

    1. Combine Ingredients: Add the cocoa powder, coconut oil, honey, and vanilla extract into a bowl. Whisk until smooth.
    2. Pour: Pour the chocolate mixture over the base and spread it evenly.
    3. Sprinkle: Sprinkle some coarse coconut flakes on top.

    Chilling and Serving

    1. Chill: Place the pan in the refrigerator and chill for 2 hours to set.
    2. Remove and Cut: Once set, remove the bar from the pan by grabbing the sides of the baking paper and lifting it up. Cut into 25 pieces.
    3. Serve: Serve and enjoy these healthy no-bake chocolate peanut butter bars.

    Conclusion

    These Healthy No-Bake Chocolate Peanut Butter Bars are a delicious and nutritious treat that are easy to make and perfect for satisfying your sweet tooth. Packed with wholesome ingredients like oats, walnuts, coconut flakes, and chia seeds, these bars are a great snack or dessert option. With the added bonus of being no-bake, they come together quickly and require minimal effort. Enjoy these bars as a healthy treat any time of the day!

  • No Bake Peanut Butter Chocolate Cheesecake

    No Bake Peanut Butter Chocolate Cheesecake

    Indulge in the rich flavors of peanut butter and chocolate with this creamy, no-bake cheesecake. It’s a delightful dessert that’s easy to prepare and perfect for any occasion.

    Ingredients

    The Base

    • 150g digestive biscuits (or graham crackers) (5.3 oz)
    • 60ml unsalted butter, melted (1/4 cup)

    The Chocolate Layer

    • 113g semi-sweet chocolate (4 oz)
    • 200g full-fat cream cheese (7 oz)
    • 30g icing sugar (1/4 cup)
    • 1/2 tsp vanilla extract
    • A pinch of salt
    • 60ml whipping cream (1/4 cup)

    The Peanut Butter Layer

    • 200g full-fat cream cheese (7 oz)
    • 60g icing sugar (1/2 cup)
    • 1/2 tsp vanilla extract
    • 85g peanut butter (3 oz)
    • 60ml whipping cream (1/4 cup)

    The Ganache

    • 85g semi-sweet chocolate (3 oz)
    • 80ml whipping cream (1/3 cup)
    • 30ml whipping cream (2 tbsp)

    Servings

    This recipe makes approximately 8-10 servings.

    Nutritional Information (per serving)

    • Calories: 450
    • Protein: 8g
    • Carbohydrates: 35g
    • Dietary Fiber: 2g
    • Sugars: 25g
    • Fat: 30g
    • Saturated Fat: 15g
    • Cholesterol: 60mg
    • Sodium: 220mg

    Preparation

    Step 1: Preparing the Base

    1. Chop the Biscuits: Finely chop the digestive biscuits in a blender until they are crumbs.
    2. Mix with Butter: Add the melted butter and mix until well combined.
    3. Form the Base: Press the mixture into a 22 cm (8.5 inch) diameter springform pan lined with baking paper. Use your fingers to evenly spread and press the crumbs.
    4. Chill: Place the base in the refrigerator to cool and set.

    Step 2: Preparing the Chocolate Layer

    1. Melt the Chocolate: Melt the semi-sweet chocolate in a water bath until smooth. Remove from heat.
    2. Cream Cheese Mixture: In a bowl, beat the cream cheese, icing sugar, vanilla extract, and a pinch of salt until smooth.
    3. Combine: Gradually add the melted chocolate to the cream cheese mixture, mixing until well combined.
    4. Add Whipping Cream: Gently fold in the whipping cream.
    5. Spread: Pour the chocolate layer over the chilled base and spread evenly. Return to the refrigerator to set.

    Step 3: Preparing the Peanut Butter Layer

    1. Cream Cheese Mixture: In a bowl, beat the cream cheese, icing sugar, vanilla extract, and peanut butter until smooth.
    2. Add Whipping Cream: Gently fold in the whipping cream.
    3. Spread: Pour the peanut butter layer over the set chocolate layer and spread evenly. Return to the refrigerator to set.

    Step 4: Preparing the Ganache

    1. Heat the Cream: In a small pot, heat the cream (do not boil).
    2. Melt the Chocolate: Remove from heat and add the semi-sweet chocolate. Stir until the chocolate is fully melted and smooth.
    3. Spread: Pour the ganache over the set peanut butter layer and spread evenly.
    4. Chill: Place the cheesecake in the refrigerator to set for at least 2 hours, or until firm.

    Step 5: Serving

    1. Slice and Serve: Once the cheesecake is fully set, remove it from the springform pan. Slice and serve.
    2. Enjoy: Enjoy this rich, creamy, and indulgent no-bake peanut butter chocolate cheesecake with friends and family!

    Conclusion

    This no-bake peanut butter chocolate cheesecake is a delightful dessert that’s sure to impress. The combination of creamy peanut butter, rich chocolate, and a buttery biscuit base makes it a perfect treat for any occasion. With its easy preparation and decadent flavors, it’s a recipe you’ll want to make again and again. Enjoy!

  • Easy and Delicious Potato Bake Recipe: A Budget-Friendly Delight

    Easy and Delicious Potato Bake Recipe: A Budget-Friendly Delight

    This easy and delicious potato bake is a budget-friendly delight that’s perfect for any meal. It’s a hearty dish made with simple ingredients, bringing comfort and flavor to your table. The combination of potatoes, onions, red pepper, and a hint of spices makes this a satisfying and tasty dish.

    Ingredients

    • 3 large potatoes
    • 2 eggs
    • 1 onion
    • 1 red pepper
    • 1 tsp salt (5g)
    • 1 pinch of marjoram
    • 1 pinch of nutmeg
    • 1 pinch of ground red pepper
    • 2 tbsp oil (30ml)

    Servings

    This recipe serves 4 people.

    Nutritional Information (per serving)

    • Calories: 250
    • Protein: 6g
    • Carbohydrates: 32g
    • Dietary Fiber: 4g
    • Sugars: 3g
    • Fat: 10g
    • Saturated Fat: 2g
    • Cholesterol: 70mg
    • Sodium: 500mg
    • Calcium: 40mg
    • Iron: 2mg

    Method of Preparation

    Step 1: Prepare the Potatoes

    1. Peel the potatoes and grate them using a coarse grater.
    2. Place the grated potatoes in a large bowl and cover them with water. Mix well by hand and set aside.

    Step 2: Prepare the Onion and Pepper Mixture

    1. Peel and dice the onion.
    2. Wash and clean the red pepper, removing the stalks and seeds, and cut it into pieces.
    3. Heat the oil in a pan over medium heat. Once hot, add the diced onion and cook for 3-4 minutes.
    4. Add the chopped red pepper to the pan and mix well. Simmer for 5-7 minutes, then remove from heat.

    Step 3: Prepare the Potato Mixture

    1. Drain the water from the grated potatoes and squeeze out any remaining water with your hands. Place the potatoes in a bowl.
    2. Add the eggs, salt, marjoram, black pepper, and nutmeg to the bowl with the potatoes. Stir well to combine.

    Step 4: Assemble and Bake

    1. Preheat your oven to 180 degrees Celsius (350 degrees Fahrenheit).
    2. Brush a baking dish with 1 tablespoon of oil.
    3. Pour the potato mixture into the baking dish, spreading it out evenly.
    4. Top the potatoes with the onion and pepper mixture, spreading it evenly over the top.
    5. Grate cheese over the dish, if desired.
    6. Place the baking dish in the preheated oven and bake for 50 minutes, or until the potatoes are cooked through and the top is golden brown.

    Conclusion

    This easy and delicious potato bake is a versatile and budget-friendly dish that can be enjoyed any time of the day. Whether you’re serving it as a main course or a side dish, it’s sure to please everyone at the table. The combination of tender potatoes, savory onions, and sweet red peppers, all baked to perfection, makes this a comforting and flavorful recipe you’ll want to make again and again.

  • Quick and Easy Sweet Apple Pancakes Recipe: Ready in Just 5 Minutes!

    Quick and Easy Sweet Apple Pancakes Recipe: Ready in Just 5 Minutes!

    Description

    These sweet apple pancakes are a delightful breakfast or snack that can be whipped up in just 5 minutes. Made with simple ingredients like yogurt, flour, and a fresh apple, they are light, fluffy, and bursting with flavor. Perfect for those mornings when you want a quick and tasty treat!

    Ingredients

    • 150g white yogurt (5.3 oz)
    • 140g flour (1 1/8 cups)
    • 15g stevia sweetener (or 30g normal sugar) (1 tbsp stevia or 2 tbsp normal sugar)
    • 1 apple
    • 1 egg
    • 1 grated lemon zest
    • 1/2 tsp baking powder (2g)
    • Cinnamon (to taste)
    • Oil (for frying)
    • Icing sugar (optional, to taste)

    Servings

    This recipe serves 4 people.

    Nutritional Information (per serving)

    • Calories: 120
    • Protein: 4g
    • Carbohydrates: 22g
    • Dietary Fiber: 2g
    • Sugars: 6g
    • Fat: 3g
    • Saturated Fat: 1g
    • Cholesterol: 40mg
    • Sodium: 150mg
    • Calcium: 60mg

    Preparation

    Step 1: Prepare the Apple

    1. Peel the apple and remove the core.
    2. Grate the apple using a grater and set it aside temporarily.

    Step 2: Mix the Wet Ingredients

    1. In a bowl, crack the egg and add the stevia sweetener (or sugar). Mix with a hand whisk until well combined.
    2. Add the yogurt to the mixture and mix well.
    3. Add the grated apple and lemon zest to the bowl, and mix with a spatula until you achieve a homogeneous consistency.

    Step 3: Combine Dry Ingredients

    1. Sift the flour and baking powder into the apple mixture.
    2. Gently incorporate the dry ingredients into the wet mixture until well combined.

    Step 4: Cook the Pancakes

    1. Heat a non-stick pan over medium heat and drizzle it with a small amount of oil.
    2. Pour two tablespoons of the pancake mixture into the pan for each pancake.
    3. Cook the pancakes on both sides until they are nicely browned and cooked through, about 2-3 minutes per side.

    Step 5: Serve

    1. Once the pancakes are ready, garnish them with a pinch of icing sugar mixed with cinnamon for extra sweetness and flavor.
    2. Serve the pancakes warm and enjoy!

    Conclusion

    These quick and easy sweet apple pancakes are the perfect way to start your day or enjoy a tasty snack. With their delightful apple flavor and fluffy texture, they are sure to become a family favorite. Try them out and see how easy and delicious homemade pancakes can be!

  • Just Chocolate and Milk! An Incredible Dessert

    Just Chocolate and Milk! An Incredible Dessert

    Indulge in a creamy, decadent dessert made with just chocolate and milk! This easy-to-make treat combines the richness of chocolate with the smoothness of milk, resulting in a dessert that melts in your mouth. Perfect for any occasion, this recipe is sure to impress with its simplicity and deliciousness.

    Ingredients

    • 900ml milk (3 3/4 cups)
    • 1 tbsp gelatin agar (15g)
    • 500g chocolate (17.6 oz total; 200g dark chocolate, 300g chocolate with finely chopped hazelnuts)
    • 3 tbsp oil (45ml)

    Servings

    This recipe serves 8 people.

    Nutritional Information (per serving)

    • Calories: 390
    • Protein: 8g
    • Carbohydrates: 45g
    • Dietary Fiber: 4g
    • Sugars: 35g
    • Fat: 22g
    • Saturated Fat: 11g
    • Cholesterol: 5mg
    • Sodium: 45mg
    • Calcium: 150mg

    Instructions

    Step 1: Heating the Milk with Gelatin Agar

    1. Combine Ingredients: Pour 900ml of milk into a saucepan and add 1 tablespoon of gelatin agar.
    2. Heat Mixture: Gently heat the mixture over low heat, stirring occasionally until the gelatin agar is completely dissolved.

    Step 2: Adding Chocolate and Stirring Until Melted

    1. Add Chocolate: Once the milk is warm, add 200g of dark chocolate and 300g of chocolate with finely chopped hazelnuts to the mixture.
    2. Melt Chocolate: Stir continuously until the chocolate is completely melted and well incorporated into the milk.

    Step 3: Boiling the Mixture

    1. Boil and Simmer: Allow the mixture to come to a gentle boil, then reduce the heat and let it simmer for an additional 3 minutes, stirring constantly.

    Step 4: Pouring Into a Dish and Refrigerating

    1. Prepare Dish: Pour the chocolate mixture into a fireproof dish with dimensions around 26x12x10 cm or similar.
    2. Refrigerate: Let it cool slightly, then transfer the dish to the refrigerator for 2 hours or to the freezer for one hour to set.

    Step 5: Melting Chocolate with Hazelnuts and Oil

    1. Melt Topping Ingredients: In a separate bowl, melt the remaining chocolate with finely chopped hazelnuts and 3 tablespoons of oil. Stir until smooth and well combined.

    Step 6: Pouring Over the Chilled Dessert and Refrigerating Again

    1. Add Topping: Once the chocolate mixture has cooled and thickened slightly, pour it over the chilled dessert in the dish. Spread evenly with a spatula.
    2. Final Chill: Return the dish to the refrigerator for an additional 15 minutes to allow the chocolate topping to harden.

    Serving Suggestions

    1. Serve: Slice the chilled dessert into squares or rectangles and serve on a platter. This rich and indulgent treat pairs perfectly with a hot cup of coffee or a glass of cold milk.

    Conclusion

    This no-bake chocolate and milk dessert is a perfect combination of simplicity and luxury. With its rich, creamy texture and irresistible chocolate flavor, it’s sure to become a favorite in your dessert repertoire. Enjoy this delightful treat and share the recipe with friends and family to spread the joy!

  • New Dessert in Minutes! A Quick and Delicious Recipe

    New Dessert in Minutes! A Quick and Delicious Recipe

    Introduction

    This delightful no-bake dessert combines the crunch of biscuits with the rich flavor of cocoa and peanuts, creating a treat that is quick and easy to prepare. Perfect for a last-minute dessert or a sweet snack, this recipe requires minimal ingredients and can be made in just a few simple steps. Follow this guide to create a delicious and satisfying dessert that everyone will love.

    Ingredients

    • 500g biscuits (17.6 oz)
    • 120g sugar (1/2 cup)
    • 60g cocoa powder (1/2 cup)
    • 10g vanilla sugar (1 packet)
    • 250ml milk (1 cup)
    • 150g butter (5.3 oz)
    • 220g peanuts, divided (120g + 100g) (7.8 oz total)
    • A little extra butter or oil for spreading

    Number of Servings

    This recipe serves approximately 10-12 people.

    Nutritional Information

    The nutritional information per serving (assuming 12 servings) is as follows:

    • Calories: 320
    • Total Fat: 20g
    • Saturated Fat: 7g
    • Cholesterol: 15mg
    • Sodium: 100mg
    • Total Carbohydrate: 30g
    • Dietary Fiber: 3g
    • Sugars: 18g
    • Protein: 5g

    Instructions

    Step 1: Breaking the Biscuits and Grinding Peanuts

    1. Break the Biscuits
      • Start by breaking the biscuits into medium-sized pieces in a large mixing bowl. Thin biscuits work best for this recipe.
    2. Grind the Peanuts
      • Grind 220g of peanuts in a blender until they are finely chopped with no large pieces remaining.

    Step 2: Mixing Biscuits and Peanuts

    1. Combine Ingredients
      • In the mixing bowl, combine 120g of ground peanuts with the crumbled biscuits. Save the remaining peanuts for decoration.

    Step 3: Preparing the Cocoa Mixture

    1. Mix Dry Ingredients
      • In a small pot, mix together the sugar, cocoa powder, and vanilla sugar.
    2. Add Milk
      • Slowly pour in the room temperature milk while stirring constantly to avoid lumps.
    3. Cook the Mixture
      • Cook the mixture over low heat until it boils, stirring continuously to prevent burning.

    Step 4: Combining All Ingredients

    1. Add Butter
      • Once the mixture thickens, remove it from heat and add the butter, stirring until melted.
    2. Cool and Mix
      • Let the mixture cool for 10 minutes before pouring it into the bowl with biscuits and peanuts. Mix until the liquid is absorbed, and the mixture thickens to a batter-like consistency.

    Step 5: Rolling and Refrigerating the Mixture

    1. Form the Roll
      • Pour the prepared mixture onto baking paper and roll it up tightly, shaping it into a log.
    2. Refrigerate
      • Refrigerate for a few hours or overnight until set.

    Step 6: Decorating the Dessert

    1. Brush with Butter
      • After the roll has set, brush it with melted butter.
    2. Sprinkle Toppings
      • Sprinkle with the remaining crushed peanuts or other desired toppings like coconut flakes.
    3. Serve
      • Slice the roll into even pieces and serve chilled.

    Conclusion

    This no-bake Biscuit and Peanut Roll is a perfect quick dessert that combines rich flavors and satisfying textures. The combination of cocoa, peanuts, and biscuits creates a delightful treat that is easy to prepare and sure to please. Enjoy this delicious dessert with family and friends, and savor the sweet and nutty flavors in every bite.

    Enjoy your quick and delicious dessert!