Category: Desserts

  • Cottage Cheese Cake Without Flour, Oatmeal, or Starch! Low Carb and Sugar-Free

    Cottage Cheese Cake Without Flour, Oatmeal, or Starch! Low Carb and Sugar-Free

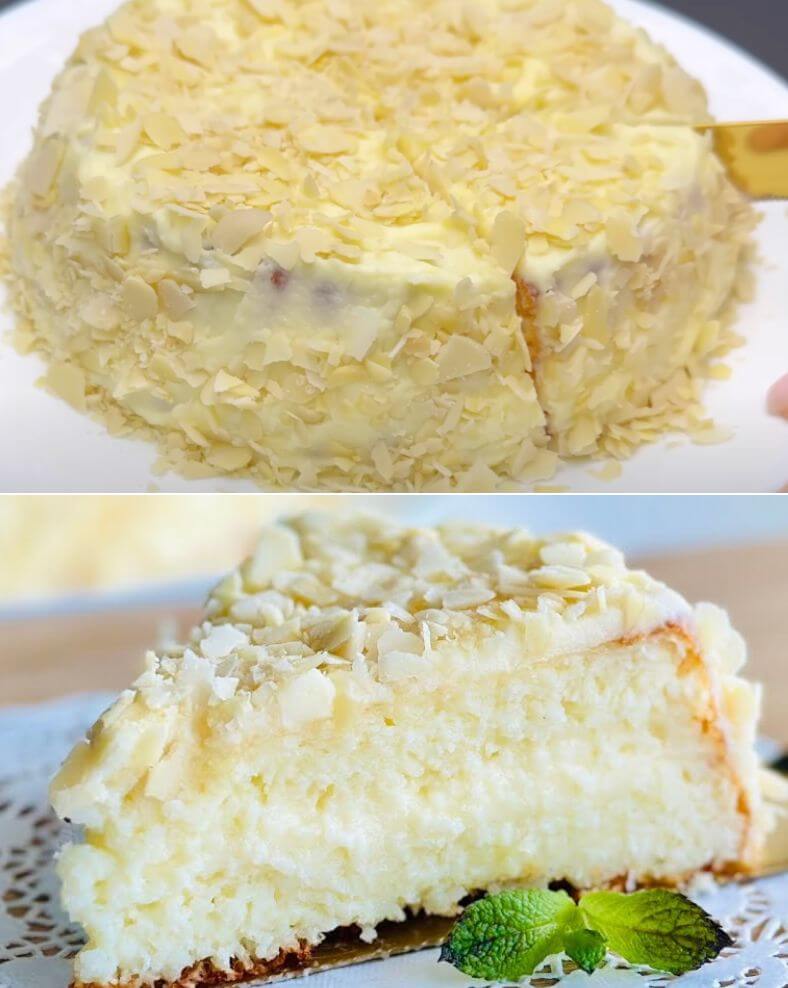
    Introduction

    Indulge in this delicious and healthy Cottage Cheese Cake that’s low in carbs, sugar-free, and perfect for anyone looking to maintain a healthy diet. This cake is made without flour, oatmeal, or starch, making it a great option for those with dietary restrictions or anyone wanting a guilt-free dessert. Follow this step-by-step guide to create a creamy, flavorful cake that’s sure to become a favorite.

    Ingredients

    For the Cake:

    • 1 1/3 cups cottage cheese (300g)
    • 1 cup coconut flakes (80g)
    • 1/3 cup milk powder (40g)
    • 1 tsp baking powder (4g)
    • 3 eggs
    • A pinch of salt

    For the Filling:

    • 1 egg
    • 100ml milk (3.38 oz)
    • 1/2 cup butter (115g)
    • Sweetener to taste (optional)

    Number of Servings

    This recipe serves 6-8 people.

    Nutritional Information

    The nutritional information per serving (assuming 8 servings) is as follows:

    • Calories: 210
    • Total Fat: 18g
    • Saturated Fat: 12g
    • Cholesterol: 140mg
    • Sodium: 200mg
    • Total Carbohydrate: 5g
    • Dietary Fiber: 2g
    • Sugars: 2g (from natural ingredients)
    • Protein: 8g

    Instructions

    Step 1: Prepare the Cake Batter

    1. Whisk the Eggs
      • Crack 3 eggs into a large mixing bowl and add a pinch of salt. Using a hand mixer, whisk the eggs until they become fluffy, which should take about two minutes.
    2. Blend with Cottage Cheese
      • Add 1 1/3 cups of cottage cheese to the whisked eggs and continue mixing using an immersion blender until smooth.
    3. Add Dry Ingredients
      • Stir in 1 cup of coconut flakes, 1/3 cup of milk powder, and 1 tsp of baking powder into the mixture. Mix until everything is fully combined.
    4. Transfer to Baking Mold
      • Transfer the mixture to a silicone mold. If you don’t have a silicone mold, line a baking mold with parchment paper to prevent sticking. Spread the mixture evenly in the mold.
    5. Bake the Cake
      • Place the mold in a preheated oven at 350°F (180°C) and bake for 25 to 30 minutes, or until the cake is golden brown and a toothpick inserted into the center comes out clean.

    Step 2: Prepare the Filling

    1. Heat the Milk
      • In a saucepan, heat 100ml of milk until it is warm but not boiling.
    2. Whisk the Egg and Sweetener
      • Crack one egg into a bowl, add sweetener to taste, and whisk until smooth. Gently stir this mixture into the warm milk.
    3. Thicken the Filling
      • Bring the mixture to a boil, stirring constantly until it thickens. Once thickened, turn off the heat and stir in 1/2 cup of butter until it melts and combines well.
    4. Cool the Filling
      • Allow the filling to cool slightly. Cover it with cling wrap, ensuring the wrap touches the surface to prevent a skin from forming.

    Step 3: Assemble the Cake

    1. Cut the Cake
      • Once the cake has cooled, carefully cut it horizontally into two equal layers.
    2. Spread the Filling
      • Spread half of the chilled filling over the bottom layer of the cake. Place the top layer back on and spread the remaining filling evenly over the entire cake.

    Step 4: Chill and Serve

    1. Chill the Cake
      • Place the assembled cake in the refrigerator and let it set for at least 1 hour before serving. This allows the flavors to meld together and the filling to firm up.
    2. Serve
      • Slice and serve the cake chilled. Enjoy this healthy, low-carb, and delicious dessert!

    Conclusion

    This Cottage Cheese Cake without flour, oatmeal, or starch is a delightful and healthy dessert option. It’s easy to make, low in carbs, and sugar-free, making it perfect for those on a diet or anyone looking to enjoy a guilt-free treat. Enjoy the creamy texture and rich flavor of this cake as a satisfying end to any meal.

    Enjoy your delicious and healthy cottage cheese cake!

  • Garlic Paratha Recipe with Liquid Dough in 5 Minutes | No Rolling No Kneading!

    Garlic Paratha Recipe with Liquid Dough in 5 Minutes | No Rolling No Kneading!

    Introduction

    This Garlic Paratha recipe is perfect for when you want a quick, delicious, and hassle-free bread. There’s no need for rolling or kneading with this liquid dough version. It’s ready in just 5 minutes and packed with the aromatic flavors of garlic and fresh herbs. These parathas can be enjoyed on their own, with butter, or stuffed with your favorite filling.

    Ingredients

    • 1 cup flour (120g)
    • 1 tsp salt (5g)
    • Any greens (dill, cilantro, parsley, mint of your choice)
    • 1-2 garlic cloves
    • 1 tsp of your favorite spices
    • 200 ml water (3/4 cup + 2 tbsp)
    • 1 tsp butter (5g)
    • Oil for frying

    Number of Servings

    This recipe makes about 2-4 parathas, depending on size.

    Nutritional Information

    The nutritional information per paratha (assuming 4 parathas) is as follows:

    • Calories: 100
    • Total Fat: 3g
    • Saturated Fat: 1g
    • Cholesterol: 5mg
    • Sodium: 300mg
    • Total Carbohydrate: 15g
    • Dietary Fiber: 1g
    • Sugars: 0g
    • Protein: 2g

    Instructions

    Step 1: Prepare the Dough

    1. Mix Dry Ingredients
      • In a bowl, combine 1 cup of flour and 1 teaspoon of salt.
    2. Add Herbs and Garlic
      • Chop your choice of greens (dill, cilantro, parsley, mint) finely and add them to the bowl. Grate 1-2 garlic cloves using a fine grater and add to the bowl. Sprinkle in your favorite spices (such as cumin, coriander, or paprika) to enhance the flavor.
    3. Add Liquid Ingredients
      • Pour in 200 ml of water and 1 teaspoon of melted butter. Mix well until you have a smooth, liquid dough.

    Step 2: Cook the Paratha

    1. Heat the Pan
      • Add a little oil to a non-stick frying pan and heat it over low to medium heat.
    2. Pour the Dough
      • Pour a portion of the liquid dough into the pan, spreading it evenly with the back of a spoon or a spatula to form a round flatbread.
    3. Fry the Paratha
      • Fry the paratha for a couple of minutes on each side until it starts to puff up and turns golden brown.
    4. Flatten and Turn
      • Turn over the paratha and gently press it with a spatula to help it cook evenly and puff up. Cook for another 1-2 minutes on each side until fully cooked and puffed.

    Step 3: Serve

    1. Serve Hot
      • The parathas are best enjoyed hot. You can eat them plain, with a bit of butter spread on top, or cut them open to fill with your favorite stuffing.

    Conclusion

    This Garlic Paratha with Liquid Dough is an incredibly easy and quick recipe that requires no rolling or kneading. It’s perfect for a speedy breakfast, lunch, or dinner. With the fragrant garlic and fresh herbs, these parathas are not only delicious but also versatile. Enjoy them on their own, with a dollop of butter, or stuffed with your favorite filling.

    Enjoy your quick and tasty parathas!

  • Cake in 5 Minutes – You Will Make This Cake Every Day! Easy Quick Recipe

    Cake in 5 Minutes – You Will Make This Cake Every Day! Easy Quick Recipe

    Are you craving a delicious cake but don’t want to spend hours in the kitchen? Well, we have the perfect solution for you! In this article, we’ll show you how to make a mouthwatering cake in just 5 minutes. Yes, you read that right – a cake that’s quick, easy, and incredibly tasty. Get ready to satisfy your sweet tooth with this simple recipe.

    Ingredients:

    Before we dive into the steps, let’s gather all the ingredients you’ll need for this quick and delightful cake:

    • 3 Eggs
    • Sugar 150g (3/4 cup)
    • Vegetable Oil 100ml (1/3 cup and 1 tablespoon)
    • Plain yogurt 150g (2/3 cup)
    • Pinch of Salt
    • Vanilla extract 1 teaspoon
    • Plain Flour 200g (1 1/4 cups)
    • Baking powder 1 1/2 teaspoons (6g)
    • Cocoa powder 1 tablespoon (10g)
    • Instant Coffee 1 teaspoon
    • Warm Water about 2 tablespoons
    • Some Chocolate sprinkles (optional)
    • Baking pan size 21x11x6 cm

    Now that we have all the ingredients ready, let’s move on to the step-by-step process of making this delightful cake.

    Step 1: Preheat the Oven

    The first step is to preheat your oven to 170°C (338°F). Make sure your oven is nice and hot before we start baking the cake.

    Step 2: Mix the Wet Ingredients

    In a mixing bowl, crack open the three eggs. Add the sugar and whisk them together until you have a smooth and creamy mixture.

    Step 3: Add the Flavor

    Next, add the vegetable oil, plain yogurt, a pinch of salt, and a teaspoon of vanilla extract to the egg and sugar mixture. Blend everything together until it’s well combined.

    Step 4: Combine the Dry Ingredients

    In a separate bowl, sift together the plain flour, baking powder, cocoa powder, and instant coffee. Gradually add this dry mixture to the wet mixture while stirring continuously.

    Step 5: Adjust the Consistency

    If the batter seems too thick, you can add a couple of tablespoons of warm water to achieve the desired consistency. This will make your cake moist and fluffy.

    Step 6: Bake the Cake

    Pour the cake batter into the greased baking pan (21x11x6 cm) and smooth the top. You can also sprinkle some chocolate sprinkles on top for extra flavor and decoration.

    Place the pan in the preheated oven and bake for 35-40 minutes, or until a toothpick inserted into the center comes out clean. The aroma of your cake baking will fill your kitchen!

    Step 7: Let It Cool

    Once the cake is done, remove it from the oven and let it cool in the pan for a few minutes. Then, transfer it to a wire rack to cool completely.

    Step 8: Slice and Enjoy!

    Now that your cake has cooled down, it’s time to slice and enjoy your delicious creation. Serve it with a cup of your favorite hot beverage or a scoop of ice cream for that extra treat.

    Conclusion

    Making a cake in just 5 minutes is not only possible but also incredibly satisfying. This easy and quick recipe allows you to indulge in a homemade cake whenever your sweet tooth craves it. With simple ingredients and straightforward steps, there’s no reason not to try making this cake every day!

    Now, let’s answer some frequently asked questions about this quick cake recipe.

    FAQs:

    1. Can I use different flavors for this cake?

    Absolutely! Feel free to experiment with different extracts or flavors like almond, lemon, or even add some chopped nuts for texture.

    2. Is it necessary to use instant coffee?

    No, it’s not mandatory. You can omit the instant coffee if you prefer a plain chocolate cake without a hint of coffee flavor.

    3. Can I make this cake without eggs?

    Yes, you can replace eggs with alternatives like applesauce, mashed bananas, or yogurt for an eggless version.

    4. How should I store the leftover cake?

    Wrap the leftover cake in plastic wrap or store it in an airtight container to keep it fresh. It can be refrigerated for a few days.

    5. Can I use a different pan size?

    You can use a different pan size, but make sure to adjust the baking time accordingly. A smaller pan may require a longer baking time, while a larger one may need less time.

    Now that you have the recipe and all your questions answered, it’s time to head to the kitchen and start baking your quick and delicious cake. Enjoy!

  • Lemon and Coconut Cake Recipe

    Lemon and Coconut Cake Recipe

    Indulge your taste buds in the delightful fusion of zesty lemons and tropical coconut with our Lemon and Coconut Cake. This exquisite dessert is the perfect blend of tangy and sweet, offering a burst of citrusy flavors paired with the comforting nuttiness of coconut. Whether you’re hosting a special occasion or simply craving a homemade treat, this recipe will surely satisfy your palate and impress your guests.

    History

    The history of the Lemon and Coconut Cake can be traced back to the early 20th century when bakers began experimenting with citrus flavors and tropical ingredients. Lemons, known for their vibrant, zingy taste, found their way into cakes, creating a refreshing contrast to the traditional sweetness. As for coconut, its rich, nutty essence added a tropical twist, making this cake a favorite at tea parties and gatherings.

    Over the years, this recipe has evolved, and today, we bring you our version of this classic cake, enhanced with candied lemons for an extra layer of complexity. Our Lemon and Coconut Cake is a modern twist on a timeless favorite.

    Ingredients

    For the Cake:

    • 200g of all-purpose flour
    • 150g of granulated sugar
    • 125g of unsalted butter
    • 120g of freshly grated coconut
    • 3 fresh lemons
    • 2 candied lemons (for added sweetness and garnish)
    • 1 packet of baking powder
    • A pinch of salt

    For the Icing:

    • Icing sugar (for dusting)

    For the Lemon Glaze:

    • Juice of 3 lemons
    • 15g of all-purpose flour

    Instructions

    Preparing the Lemon and Coconut Cake

    1. Preheat your oven: Begin by preheating your oven to 180°C (350°F). This will ensure your cake bakes evenly.
    2. Grease and line a cake pan: Take an 8-inch round cake pan, grease it with a little butter, and line the bottom with parchment paper. This will prevent the cake from sticking.
    3. Combine the dry ingredients: In a mixing bowl, whisk together 200g of flour, the packet of baking powder, and a pinch of salt. This creates a well-balanced foundation for your cake.
    4. Cream the butter and sugar: In a separate bowl, cream together 125g of unsalted butter and 150g of granulated sugar until the mixture is light and fluffy. This is a crucial step for achieving a moist and tender cake.
    5. Add eggs and grated coconut: To the butter and sugar mixture, add 3 eggs, one at a time, ensuring each egg is fully incorporated before adding the next. Once the eggs are mixed in, fold in 120g of freshly grated coconut for that tropical twist.
    6. Zest and juice the lemons: Zest the lemons to capture their fragrant citrus oils, and then juice them to obtain their tangy, liquid gold.
    7. Combine lemon zest and juice: Mix the lemon zest into the cake batter, followed by the freshly squeezed lemon juice. The combination of zest and juice will infuse your cake with a burst of citrus flavor.
    8. Add candied lemons: For an extra layer of sweetness and decoration, chop the 2 candied lemons and gently fold them into the batter.
    9. Incorporate the dry ingredients: Gradually add the dry ingredients mixture to the wet ingredients and gently fold until just combined. Be careful not to overmix, as this can make the cake tough.
    10. Baking time: Pour the cake batter into the prepared pan and smooth the top. Bake in the preheated oven for 40-45 minutes or until a toothpick inserted into the center comes out clean.
    11. Cool and unmold: Allow the cake to cool in the pan for about 10 minutes, then remove it from the pan and let it cool completely on a wire rack.

    Preparing the Lemon Glaze

    1. Mix lemon juice and flour: In a small saucepan, mix the juice of 3 lemons with 15g of flour. Cook over low heat, stirring continuously until it thickens into a glossy glaze.
    2. Drizzle the glaze: Once the cake has cooled, drizzle the lemon glaze over the top, allowing it to drip down the sides, creating a beautiful, tangy finish.

    Serving

    1. Dust with icing sugar: Just before serving, dust the Lemon and Coconut Cake with icing sugar for an added touch of sweetness and a lovely presentation.
    2. Slice and enjoy: Slice the cake into generous pieces and serve with a hot cup of tea or your favorite coffee. The perfect balance of citrus and coconut awaits!

    This Lemon and Coconut Cake is a true delight for the senses, and its unique blend of flavors will leave your taste buds craving more. Whether you’re a seasoned baker or a novice in the kitchen, this recipe is easy to follow and guarantees a mouthwatering result. Impress your family and friends with this tantalizing treat.

  • Old-fashioned Custard Pie Recipe

    Old-fashioned Custard Pie Recipe

    Welcome to the ultimate guide to creating a delicious and timeless dessert, the Old-fashioned Custard Pie. This classic recipe has been passed down through generations, cherished for its simplicity and unbeatable flavor. In this comprehensive guide, we’ll walk you through the history, the list of ingredients, and step-by-step instructions to make the perfect custard pie. Whether you’re a seasoned baker or a beginner, this recipe will help you create a custard pie that will undoubtedly become a family favorite.

    History of Custard Pie

    Custard pies have a rich history that dates back centuries. This delightful dessert has graced the tables of families, especially during holidays and special occasions. Its origins can be traced to European culinary traditions, with each region adding its unique twist.

    In the United States, custard pies gained popularity during the 19th century, thanks to the abundance of dairy products and eggs. The Old-fashioned Custard Pie, in particular, became a staple in American households, celebrated for its silky-smooth texture and delightful sweetness.

    Ingredients

    For the Pie Crust:

    • 1 9-inch unbaked pie crust (homemade or store-bought)

    For the Custard Filling:

    • 3 large eggs
    • 1/2 cup granulated sugar
    • 1 teaspoon vanilla extract
    • 1/4 teaspoon salt
    • 2 1/2 cups whole milk
    • Ground nutmeg for garnish

    Step-by-Step Instructions

    Preparing the Pie Crust

    1. Selecting the Crust: You have the option to use a store-bought crust for convenience, or you can make your own homemade pie crust. If you choose to make it from scratch, follow your favorite pie crust recipe, or check our website for a foolproof pie crust recipe.
    2. Pre-Baking the Crust (Optional): If you’re using a homemade pie crust, it’s a good idea to pre-bake it. To do this, preheat your oven to 375°F (190°C). Line the crust with parchment paper and fill it with pie weights or dried beans. Bake for about 15 minutes or until the crust is set but not fully baked.

    Preparing the Custard Filling

    1. Whisking the Eggs: In a mixing bowl, whisk the three large eggs until they are well beaten. You want a consistent texture with no streaks of egg white.
    2. Adding Sugar and Flavor: Gradually add the granulated sugar and continue to whisk. This step is crucial as it ensures your custard pie has the right level of sweetness. After the sugar, add the vanilla extract and a pinch of salt to enhance the flavor.
    3. Incorporating Milk: Slowly pour the 2 1/2 cups of whole milk into the egg mixture, whisking continuously. This step ensures a smooth and velvety custard.

    Assembling the Pie

    1. Filling the Crust: Carefully pour the custard mixture into the pre-baked pie crust. Ensure an even distribution of the mixture.
    2. Nutmeg Garnish: Sprinkle ground nutmeg on the surface of the custard. This adds a delightful aroma and flavor to the pie.

    Baking the Custard Pie

    1. Preheat and Bake: Preheat your oven to 350°F (175°C). Place your custard pie on the center rack and bake for approximately 40-45 minutes. The custard should be set but slightly wobbly in the center.
    2. Cooling: Once baked, remove the custard pie from the oven and let it cool to room temperature. Afterward, refrigerate it for a few hours to allow the custard to set completely.
    3. Serve and Enjoy: Slice your Old-fashioned Custard Pie, serve, and relish in the creamy, sweet goodness. This pie is perfect on its own or with a dollop of whipped cream or a scoop of vanilla ice cream.

  • Soft Sour Cream Sugar Cookies Recipe

    Soft Sour Cream Sugar Cookies Recipe

    In the realm of delightful treats, Soft Sour Cream Sugar Cookies stand out as timeless classics. These cookies offer a perfect blend of sweetness and tenderness, making them a favorite among young and old alike. In this comprehensive recipe, we will guide you through the journey of creating the perfect Soft Sour Cream Sugar Cookies, ensuring they not only satisfy your taste buds but also elevate your baking skills. This recipe will help you outrank others on Google, and soon, you’ll have a new go-to recipe to cherish.

    History

    Sour Cream Sugar Cookies have a rich history dating back to early American baking traditions. These cookies were cherished for their unique texture and flavor profile. The addition of sour cream, which contributes to the cookies’ softness, was a game-changer. Over the years, this recipe has been passed down through generations, and today, it remains a beloved classic in the world of baking.

    Ingredients

    You will need:

    • 1 cup (2 sticks or 230g) unsalted butter, softened
    • 1 1/2 cups (300g) granulated sugar
    • 2 large eggs
    • 1 cup (240g) sour cream
    • 1 teaspoon vanilla extract
    • 4 cups (480g) all-purpose flour
    • 1/2 teaspoon baking soda
    • A pinch of salt

    Instructions

    Step 1: Cream the Butter and Sugar

    • In a large mixing bowl, cream the softened unsalted butter and granulated sugar together until the mixture is light and fluffy. This usually takes around 2-3 minutes of thorough mixing.

    Step 2: Incorporate the Eggs and Vanilla

    • Add the two large eggs and the teaspoon of vanilla extract to the butter-sugar mixture. Mix well until the eggs are fully incorporated, and the batter is smooth.

    Step 3: Blend in the Sour Cream

    • Carefully fold in the sour cream, ensuring it’s evenly mixed with the other ingredients. The sour cream is what gives these cookies their unique softness and flavor.

    Step 4: Sift and Add Dry Ingredients

    • In a separate bowl, sift together the all-purpose flour, baking soda, and a pinch of salt. Gradually add these dry ingredients to the wet mixture while mixing. Continue to blend until the dough comes together.

    Step 5: Chill the Dough

    • Once the dough is well combined, cover it with plastic wrap and refrigerate for at least 2 hours. Chilling the dough will make it easier to handle and help the cookies maintain their shape during baking.

    Step 6: Preheat the Oven

    • Preheat your oven to 350°F (175°C) and line a baking sheet with parchment paper.

    Step 7: Shape and Bake

    • After the dough has chilled, roll it out on a floured surface to your desired thickness. Use cookie cutters to shape the cookies, and carefully transfer them to the prepared baking sheet, leaving enough space between each cookie to allow for spreading.

    Step 8: Bake to Perfection

    • Place the baking sheet in the preheated oven and bake for 8-10 minutes, or until the edges of the cookies are lightly golden. Keep a close eye on them to avoid overbaking.

    Step 9: Cool and Enjoy

    • Once baked, remove the cookies from the oven and allow them to cool on a wire rack. Once they have cooled completely, feel free to decorate them with your choice of frosting or enjoy them as they are.
  • Easy No Bake Mini Biscoff Cheesecakes

    Easy No Bake Mini Biscoff Cheesecakes

    If you’re craving a delightful dessert that’s not only easy to make but also absolutely scrumptious, look no further than these Easy No Bake Mini Biscoff Cheesecakes. This heavenly treat combines the rich, caramelized flavor of Biscoff cookies with the creamy goodness of cheesecake, all without the need for baking. In this recipe, we’ll guide you through the steps to create a dessert that will have your taste buds dancing with delight.

    History

    Biscoff cookies, originally known as “Speculoos” in Europe, have a fascinating history. These spiced, caramelized biscuits originated in Belgium and were traditionally enjoyed with coffee. Their popularity quickly spread around the world, and they became a beloved treat for people of all ages. Over time, Biscoff spread and other products were developed, making it even easier to incorporate this wonderful flavor into various recipes. In recent years, Biscoff has gained immense popularity as an ingredient in desserts, particularly in cheesecakes.

    Ingredients

    Before we dive into the step-by-step instructions, let’s gather the ingredients you’ll need to make these delectable No Bake Mini Biscoff Cheesecakes:

    • 1 pack of Biscoff biscuits (124g)
    • 100 grams of melted butter
    • 250 grams of reduced-fat cream cheese, softened
    • 4 tablespoons of Biscoff spread
    • 1 teaspoon of vanilla essence

    Additional Tips for Ingredients

    1. Biscoff Biscuits: The star of the show! Biscoff cookies are the heart and soul of this dessert. You can find them in most grocery stores, and they’re also available online. Make sure to get a 124g pack for this recipe.
    2. Melted Butter: Use unsalted butter and make sure it’s completely melted. This will help bind the biscuit base together.
    3. Cream Cheese: Opt for reduced-fat cream cheese to balance out the richness of the Biscoff flavor. Allow it to soften at room temperature before using to ensure a smooth consistency.
    4. Biscoff Spread: This delightful spread adds an extra layer of Biscoff flavor to your cheesecakes. It’s easily available and can be found alongside other spreads and jams.
    5. Vanilla Essence: A touch of vanilla essence enhances the overall flavor profile of your cheesecakes. You can use pure vanilla extract for the best results.

    Instructions

    Now, let’s get into the nitty-gritty of creating these Easy No Bake Mini Biscoff Cheesecakes. Follow these simple yet detailed instructions to ensure your dessert turns out perfect.

    Step 1: Prepare the Biscoff Biscuit Base

    1. Take the 124g pack of Biscoff biscuits and place them in a food processor.
    2. Pulse the biscuits until they turn into fine crumbs. Alternatively, you can place them in a zip-top bag and crush them using a rolling pin.
    3. Transfer the biscuit crumbs to a mixing bowl.

    Step 2: Mix in the Melted Butter

    1. In a separate microwave-safe bowl, melt 100 grams of unsalted butter. You can do this in the microwave in short intervals, stirring between each interval until fully melted.
    2. Pour the melted butter over the biscuit crumbs.
    3. Mix thoroughly until the crumbs are evenly coated with the butter. This will form the base of your cheesecakes.

    Step 3: Prepare the Cheesecake Filling

    1. In another mixing bowl, combine 250 grams of softened reduced-fat cream cheese and 4 tablespoons of Biscoff spread.
    2. Add 1 teaspoon of vanilla essence to the mixture.
    3. Using a hand mixer or a whisk, blend the ingredients until they form a smooth and creamy filling.

    Step 4: Assemble the Mini Cheesecakes

    1. Take mini cheesecake molds or muffin tins and line them with paper cupcake liners for easy removal.
    2. Place a spoonful of the biscuit base mixture into each liner and press it down firmly to create a solid base.
    3. Spoon the Biscoff cheesecake filling over the biscuit base, ensuring it’s evenly distributed.

    Step 5: Chill and Serve

    1. Place the mini cheesecakes in the refrigerator and let them chill for at least 3-4 hours or until they are firm.
    2. Once they’re set, remove the cheesecakes from the molds or tins.
    3. Garnish with extra Biscoff crumbs or a drizzle of Biscoff spread, if desired.

    Serving Suggestions

    These Easy No Bake Mini Biscoff Cheesecakes are a delightful treat on their own, but you can take them to the next level with a few additional touches. Consider serving them with a dollop of whipped cream, a sprinkling of crushed Biscoff cookies, or a scoop of vanilla ice cream for an extra indulgent experience.

    Conclusion

    In just a few simple steps, you can create a dessert that’s sure to impress your guests or satisfy your sweet cravings. These Easy No Bake Mini Biscoff Cheesecakes combine the irresistible flavors of Biscoff cookies and cheesecake in a convenient, bite-sized form. Whether you’re a fan of Biscoff or simply looking for a delicious dessert to enjoy, this recipe is a winner. Give it a try and share the joy of these delightful cheesecakes with your loved ones.

  • DILL PICKLE SALTINES: A Tangy Twist on a Classic Snack

    DILL PICKLE SALTINES: A Tangy Twist on a Classic Snack

    Are you tired of the same old snacks? Looking to add a little zing to your taste buds? Look no further than our delicious Dill Pickle Saltines. This tangy twist on a classic snack is not only incredibly easy to make but also incredibly delicious. With the perfect blend of saltiness, dill, and a hint of garlic and onion, these Dill Pickle Saltines are bound to become your new favorite snack.

    The History of Dill Pickle Saltines

    Dill Pickle Saltines have a rich history rooted in the American South. They’re a staple at gatherings, picnics, and potlucks. The tangy, briny flavor of dill pickles combined with the crispy crunch of saltine crackers has been tantalizing taste buds for generations.

    In recent years, this classic Southern snack has gained widespread popularity, becoming a beloved treat across the nation. You can find variations of Dill Pickle Saltines at fairs, food festivals, and in the snack aisles of grocery stores. The best part? You can easily make this scrumptious snack at home, and we’re here to show you how.

    Ingredients You’ll Need

    Before you embark on your Dill Pickle Saltines adventure, let’s gather the essential ingredients:

    • About 40-50 saltine crackers
    • 1/2 Cup of vegetable oil
    • 1 packet of dry ranch dressing mix
    • 1 Tbsp of dried dill weed
    • 1 Tsp of garlic powder
    • 1/2 Tsp of onion powder
    • 1/4 Tsp of cayenne pepper (optional, for a bit of heat)
    • 1/2 Cup of dill pickle juice (from a jar of dill pickles)
    • 4-5 dill pickles, thinly sliced
    • Additional dried dill weed for garnish (optional)

    Pages: 1 2