Category: International Cuisine

  • A Very Simple and Delicious Recipe for Cauliflower in the Oven

    A Very Simple and Delicious Recipe for Cauliflower in the Oven

    If you’re looking for a quick and delicious side dish or snack, look no further than this easy recipe for cauliflower in the oven. With just a few simple ingredients and minimal effort, you can create a flavorful and satisfying dish that will have everyone coming back for seconds. In this article, we’ll take you through the step-by-step process of making this mouthwatering cauliflower recipe.

    Ingredients You’ll Need:

    Before we dive into the cooking process, let’s gather all the ingredients you’ll need:

    • Cauliflower – 600 g
    • Egg – 1 large
    • Sour cream – 150 g (or white yogurt)
    • Salt, to taste
    • Black pepper, to taste
    • Dried garlic
    • Cheese – 50 g
    • Olive oil

    Preparation:

    Now that you have all your ingredients ready, let’s get started with the preparation:

    1. Prepare the Cauliflower:

    Begin by separating the cauliflower into florets. You’ll want them to be bite-sized pieces, so they cook evenly.

    2. Boil the Cauliflower:

    Next, bring a pot of salted water to a boil. Add the cauliflower florets and let them cook for 1 to 2 minutes. This blanching step will help soften the cauliflower slightly.

    3. Prepare the Creamy Mixture:

    In a separate bowl, whisk together the egg, grated cheese, sour cream, a pinch of salt, a dash of black pepper, and some dried garlic. Mix until you have a smooth and creamy consistency.

    4. Combine Cauliflower and Creamy Mixture:

    Add the blanched cauliflower florets to the creamy mixture. Gently fold them in, ensuring that each piece of cauliflower is well-coated with the delicious mixture.

    5. Grease the Baking Dish:

    Take a baking dish and generously grease it with olive oil. This will prevent the cauliflower from sticking to the dish during baking.

    6. Bake:

    Now, transfer the cauliflower and creamy mixture into the greased baking dish. Make sure to spread it out evenly.

    7. Baking Time:

    Preheat your oven to 200°C (392°F). Place the baking dish in the preheated oven and bake for 20 to 25 minutes. Keep an eye on it; you’ll know it’s ready when the cauliflower turns golden brown and the top becomes nicely crispy.

    Conclusion:

    In just a few simple steps, you’ve created a mouthwatering dish of oven-baked cauliflower that’s creamy, cheesy, and full of flavor. It’s the perfect side dish for any meal or a tasty snack on its own. Impress your family and friends with this easy recipe, and they’ll be asking for more!

    Now that you’ve learned how to make this delicious cauliflower dish, give it a try and enjoy the delectable flavors. Happy cooking!

    Frequently Asked Questions (FAQs):

    1. Can I use other vegetables with this recipe?

    • While this recipe is specifically for cauliflower, you can experiment with other vegetables like broccoli or carrots for a unique twist.

    2. What can I substitute for sour cream?

    • If you don’t have sour cream, you can use Greek yogurt or a creamy alternative like mayonnaise.

    3. Is it okay to use fresh garlic instead of dried garlic?

    • Yes, you can use fresh minced garlic for a stronger and fresher garlic flavor.

    4. Can I make this dish ahead of time and reheat it?

    • Yes, you can prepare it ahead of time and reheat it in the oven or microwave before serving.

    5. Can I add extra spices or herbs to the creamy mixture?

    • Absolutely! Feel free to customize the flavor by adding herbs like thyme, rosemary, or paprika to the mixture for added depth of taste.
  • Chicken Breast Melts in Your Mouth! A Quick and Delicious Recipe

    Chicken Breast Melts in Your Mouth! A Quick and Delicious Recipe

    In today’s fast-paced world, a quick and scrumptious meal can be a lifesaver. If you’re a fan of chicken, you’re in for a treat! This article will guide you through a mouthwatering recipe for juicy and tender chicken breasts that are ready in minutes. Whether you’re a seasoned chef or a novice in the kitchen, this dish is easy to prepare and will leave you craving for more. Let’s dive into the details!

    Ingredients:

    Before we get started, make sure you have these ingredients on hand:

    • Chicken breast – 600 g.
    • Egg – 1 pc.
    • Sour cream – 50 g (or Greek yogurt)
    • Salt
    • Black pepper
    • Flour – 30 g.
    • Vegetable oil for frying

    Method of Preparation:

    Now, let’s get cooking with these simple steps:

    Step 1: Prepare the Chicken

    Begin by cutting the chicken breast into smaller, manageable pieces. Place them in a bowl, ready for seasoning.

    Step 2: Season the Chicken

    In the same bowl with the chicken, add the egg, sour cream (or Greek yogurt), a pinch of salt, and a dash of black pepper. Mix these ingredients together thoroughly using a spoon. Ensure the chicken is evenly coated with the mixture.

    Step 3: Marinate

    Cover the bowl with foil and allow the chicken to marinate for a minimum of 15 minutes. This marinating time enhances the flavors and makes the chicken incredibly tender.

    Step 4: Coat with Flour

    After the marination period, it’s time to add a crispy layer to our chicken. Sprinkle 30 g of flour over the chicken pieces and mix until they are coated evenly.

    Step 5: Heat the Oil

    In a pan, pour vegetable oil and heat it gradually over medium-high heat.

    Step 6: Fry the Cutlets

    Once the oil is hot enough, gently place the marinated and flour-coated chicken cutlets into the pan. Fry them on each side until they turn a beautiful golden brown. This process usually takes a few minutes on each side, depending on the thickness of your chicken pieces.

    Step 7: Serve and Enjoy

    Once the cutlets are perfectly crispy and cooked through, transfer them to a plate lined with paper towels to remove any excess oil. Allow them to cool for a moment, and then it’s time to serve. Bon appétit!

    Conclusion:

    This recipe for tender chicken cutlets is a game-changer. It’s quick, easy, and delivers a burst of flavor that will have your taste buds dancing with delight. The combination of marinating, coating with flour, and frying results in chicken breasts that literally melt in your mouth. You’ll find yourself coming back to this recipe time and time again.

    So, the next time you’re looking for a meal that’s both delicious and quick to prepare, give this chicken breast recipe a try. Your family and friends will thank you for it!

    FAQs:

    1. Can I use chicken thighs instead of chicken breast?

    Yes, you can use chicken thighs if you prefer dark meat. Just make sure to adjust the cooking time accordingly as they might require a bit more cooking.

    2. What can I serve with these chicken cutlets?

    These chicken cutlets go well with a variety of side dishes, such as mashed potatoes, steamed vegetables, or a fresh salad.

    3. Can I use a different type of oil for frying?

    Certainly! You can use vegetable oil, canola oil, or even olive oil for frying, depending on your preference.

    4. Is Greek yogurt a good substitute for sour cream?

    Yes, Greek yogurt works as a great substitute for sour cream in this recipe. It adds a creamy texture and a tangy flavor to the chicken.

    5. Can I prepare the chicken in advance and fry it later?

    Yes, you can marinate and coat the chicken in flour ahead of time and then fry it when you’re ready to serve. Just be sure to keep the coated chicken in the refrigerator until you’re ready to cook to maintain freshness and crispiness.

    Give this recipe a try, and you’ll have a fantastic meal on your plate in no time. Enjoy the delightful taste of tender, juicy chicken that truly melts in your mouth!

  • The Tastiest Chicken Breast Recipe I’ve Ever Eaten Simple, hearty and very juicy!

    The Tastiest Chicken Breast Recipe I’ve Ever Eaten Simple, hearty and very juicy!

    When it comes to cooking a delicious and satisfying meal, a juicy and flavorful chicken breast recipe is a must-have in your culinary arsenal. In this article, we will guide you through the steps of creating the tastiest chicken breast dish you’ve ever eaten. This recipe is simple, hearty, and guarantees a burst of flavors in every bite. So, let’s dive right in and learn how to make this mouthwatering dish that will leave your taste buds tingling.

    Ingredients You’ll Need:

    Before we get into the cooking process, let’s gather all the ingredients you’ll need to prepare this delightful chicken breast recipe:

    1. 2 chicken breasts: Ensure they are fresh and boneless.
    2. 2 tablespoons of mayonnaise: Choose a high-quality mayonnaise for the best flavor.
    3. 1 teaspoon of mustard: Dijon mustard works great for a tangy kick.
    4. Fresh parsley: Finely chopped for a burst of freshness.
    5. 150 grams of mozzarella cheese: You can also use your favorite cheese variety.
    6. 5 cloves of garlic: For that rich and aromatic garlic flavor.
    7. Olive oil or a similar cooking oil: To grease the baking sheet.
    8. Salt, black pepper, and paprika: Season to taste for that perfect blend of spices.

    Method of Preparation:

    Now that you have all the ingredients ready, let’s go through the step-by-step process of making this scrumptious chicken breast dish:

    Step 1: Preparing the Chicken

    1. Start by washing the chicken breasts thoroughly under cold running water.
    2. Remove any unwanted parts or excess fat.
    3. Slice the chicken breasts into thin slices. To make them even thinner, gently tap the slices through food foil.
    4. Season the chicken slices with salt and pepper on both sides.
    5. Sprinkle a touch of red pepper for some added heat.

    Step 2: Making the Cheesy Filling

    1. Finely chop or press the garlic cloves and transfer them to a bowl.
    2. Add the chopped parsley and 150 grams of grated mozzarella cheese to the garlic.
    3. Mix everything thoroughly to create a flavorful filling.

    Step 3: Preparing the Sauce

    1. In a separate bowl, combine 2 tablespoons of mayonnaise and 1 teaspoon of mustard.
    2. Stir until you have a smooth and creamy sauce.

    Step 4: Assembling the Chicken Rolls

    1. Coat all the chicken slices evenly with the mayonnaise-mustard sauce.
    2. Place a portion of the prepared mozzarella mixture in the center of each chicken slice.
    3. Carefully roll the chicken slices into a roll shape, ensuring the filling stays inside.
    4. Place the rolled chicken breasts next to each other on a baking sheet greased with olive oil.

    Step 5: Baking to Perfection

    1. Brush the top of the chicken rolls with the remaining mayonnaise mixture.
    2. Preheat your oven to 200°C (392°F).
    3. Bake the chicken rolls for approximately 25 minutes until they are cooked through.
    4. After this time, sprinkle the rolls with grated cheese and bake for an additional 5 minutes until the cheese melts and turns golden brown.

    Step 6: Serving

    1. Once removed from the oven, allow the chicken rolls to cool for a few minutes.
    2. Then, serve them up and get ready to enjoy a meal like no other.

    Conclusion

    In conclusion, this chicken breast recipe is a true winner when it comes to taste and simplicity. It’s the perfect dish to impress your family and friends with your culinary skills. The combination of juicy chicken, creamy cheese, and zesty flavors will leave you craving for more. So, don’t wait any longer – try this recipe today and savor the tastiest chicken breast you’ve ever eaten!

    FAQs (Frequently Asked Questions)

    1. Can I use a different type of cheese for this recipe? Absolutely! Feel free to experiment with your favorite cheese varieties to suit your taste.
    2. Can I make this dish ahead of time and reheat it? While it’s best enjoyed fresh out of the oven, you can reheat it in a preheated oven for a short time to maintain its deliciousness.
    3. What side dishes go well with this chicken breast recipe? You can serve it with a salad, steamed vegetables, or a side of pasta for a complete meal.
    4. Is there a way to make this recipe healthier? You can opt for low-fat mayonnaise and use less cheese if you’re looking for a healthier version.
    5. Can I freeze the prepared chicken rolls for later use? Yes, you can freeze them before baking and then bake them when needed for a quick and tasty meal.

    Get ready to delight your taste buds with this incredible chicken breast recipe. It’s a dish that’s sure to become a favorite in your kitchen. So, why wait? Start cooking and enjoy the deliciousness today!

  • Lemon Ricotta Tart with Oil Pastry: An Explosion of Italian Taste

    Lemon Ricotta Tart with Oil Pastry: An Explosion of Italian Taste

    Welcome, food enthusiasts and baking aficionados! Today, I present to you a delightful recipe that encapsulates the essence of Italian flavors and culinary finesse – the Lemon Ricotta Tart with Oil Pastry. This exquisite dessert is a harmonious blend of tangy lemon zest, creamy ricotta, and a delicate oil-based crust that will transport your taste buds to the sun-soaked landscapes of Italy.

    Who Will Love This Recipe?

    Perfect for both experienced bakers and those stepping into the world of pastry creation, this Lemon Ricotta Tart is an ideal choice for anyone seeking a balance of sophistication and simplicity in their desserts. If you appreciate the citrusy brightness of lemons complemented by the subtle sweetness of ricotta cheese, this recipe is crafted especially for you.

    Ingredients and Equipment Required

    Ingredients:

    • 1 dose of shortcrust pastry with oil (for the recipe click on the ingredient)
    • Grated peels of 2 fresh lemons
    • 300 g of cow’s milk ricotta
    • 100 g of vanilla icing sugar
    • 2 egg yolks
    • Enough candied citron for decoration (optional)
    • Enough icing sugar for garnish

    Equipment:

    • A tart pan (preferably with a removable base)
    • Baking paper
    • Lemon grater
    • Various bowls and kitchen utensils

    Recipe Directions

    Preparing the Pastry:

    1. Begin by following the recipe for the oil-based shortcrust pastry. Ensure the dough is properly chilled and rolled out to fit your tart pan.

    Making the Lemon Ricotta Filling:

    1. Preheat your oven to the specified temperature and line your tart pan with the rolled-out pastry. Blind bake the pastry for a few minutes until it’s slightly golden.
    2. In a mixing bowl, combine the cow’s milk ricotta, grated lemon peels, vanilla icing sugar, and egg yolks. Mix thoroughly until a smooth and creamy consistency is achieved.
    3. Carefully pour the lemon ricotta mixture into the pre-baked pastry shell, spreading it evenly.
    4. Bake the tart in the preheated oven until the filling is set and the crust is golden brown.
    5. Once baked, allow the tart to cool before garnishing it with candied citron (if desired) and a dusting of icing sugar.

    Kitchen Equipment Needed

    To successfully create this delectable Lemon Ricotta Tart, ensure you have the following equipment handy:

    • Tart pan (preferably with a removable base)
    • Baking paper
    • Lemon grater
    • Mixing bowls
    • Whisk or electric mixer
    • Rolling pin

    Storing Leftovers

    For any leftovers (if there are any!), store the Lemon Ricotta Tart in an airtight container in the refrigerator. Consume within a few days to savor its freshness and flavors.

    Food and Drink Pairings

    This Lemon Ricotta Tart pairs wonderfully with a variety of accompaniments. Serve it alongside a refreshing cup of herbal tea, a dollop of whipped cream, or a scoop of vanilla gelato to elevate your dessert experience.

    FAQ

    Can I use store-bought pastry for this recipe?

    While homemade pastry adds a personal touch, store-bought shortcrust pastry can be used as a convenient alternative, ensuring a quicker preparation process.

    Can I substitute ricotta cheese with another type?

    For a twist, try substituting cow’s milk ricotta with sheep’s milk ricotta or mascarpone cheese for different flavor nuances.

    How do I prevent the tart crust from becoming soggy?

    Blind baking the pastry shell before adding the filling helps in maintaining a crisp crust, ensuring the tart stays delightful till the last bite.

    Conclusion

    Indulge your senses in the delightful Lemon Ricotta Tart with Oil Pastry – a tantalizing dessert that captures the essence of Italy’s culinary richness. Share this recipe with your fellow dessert enthusiasts and subscribe to our blog for more culinary adventures and delightful recipes.

    Buon Appetito!

  • 10 Things Men Secretly Want From A Woman, But Rarely Are They Asked

    What do men really want? Since women have always been classified as emotionally complex with their feelings and needs, men seem much simpler and less enigmatic. Agree? Certainly not! Just because men are shy or fearful when talking about their desires and emotions doesn’t mean they don’t have them. 

    The truth is, they rarely discuss these things not only with women but also with their friends. Showing vulnerability and being genuine about their feelings is not easy for men, but little by little they are learning to do it. And while they do, we still have to figure out what they want. Here are 10 things men secretly want from women, but rarely ask for.

    Men want romance

    Yes, we are not the only ones to melt in front of a beautiful romantic gesture, the boys also adore them! But because our culture and our society have decided what is “manly” and what is “youthful”, boys generally end up on the side that gives things. If you want to deepen the bond with your boyfriend, think of the most romantic thing and do it! Whether it’s a date on the deck or stargazing, you’ll definitely appreciate the effort

    Click the Open button to see the rest of the article

    [mashshare]

    Pages: 1 2

  • FLOODY ROSES BREAD Recipe: A Delicious Masterpiece to Satisfy Your Cravings

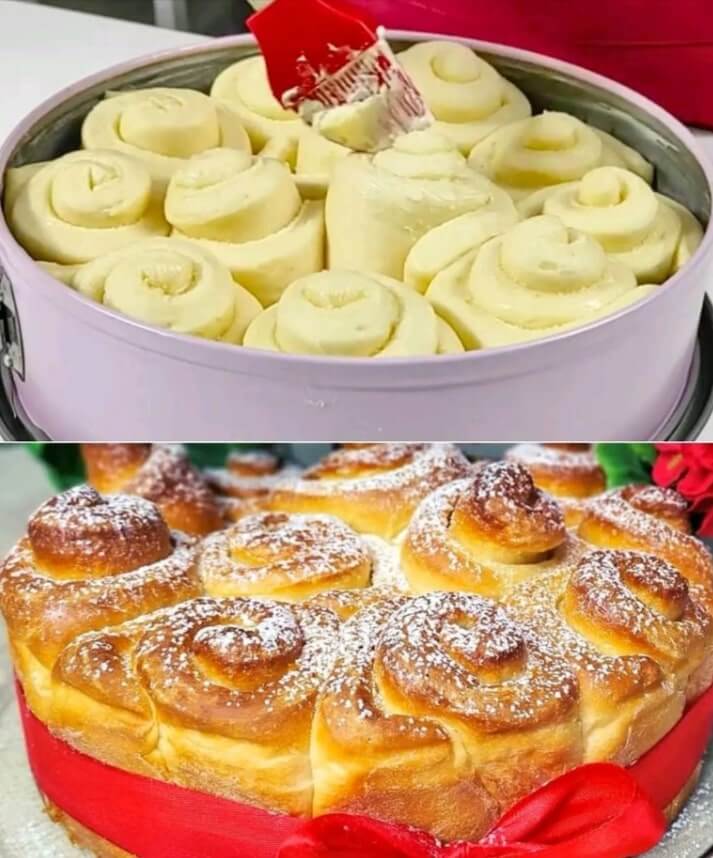
    FLOODY ROSES BREAD Recipe: A Delicious Masterpiece to Satisfy Your Cravings

    Are you looking for an exquisite bread recipe that will not only tantalize your taste buds but also impress your guests with its elegant presentation? Look no further! Our Floody Roses Bread recipe is the perfect culinary masterpiece to elevate your baking game. With a delightful combination of fluffy bread and a sweet, buttery filling, this recipe is sure to become a family favorite. Let’s delve into the history, ingredients, and step-by-step instructions to create this delectable dish that’s bound to leave a lasting impression.

    History of Floody Roses Bread

    Floody Roses Bread is a unique and innovative twist on traditional bread-making. This delightful creation combines the art of baking with the elegance of rose-shaped pastries. Originating from the heart of Europe, this recipe has been passed down through generations, each time adding a new layer of creativity and flavor.

    The name “Floody Roses” itself evokes a sense of luxury and sophistication. It is said to have been named after a famous baker in Europe, known for his exceptional skills in crafting bread into beautiful rose-like shapes. These bread roses became a symbol of his mastery and are now cherished as a special treat for various occasions, from family gatherings to special celebrations.

    Ingredients for Floody Roses Bread

    For the Dough:

    • 300 g Manitoba flour
    • 200 g cake flour
    • 250 ml milk
    • 10 g fresh brewer’s yeast
    • 50g sugar
    • 50 g melted butter
    • 1 egg
    • Grated lemon zest

    For the Filling:

    • 60 g soft butter
    • Granulated sugar

    Step-by-Step Instructions

    Preparing the Dough

    1. Combine the Flours: In a mixing bowl, combine the Manitoba flour and cake flour. This blend of flours will give your bread the perfect texture and flavor.
    2. Activate the Yeast: In a separate bowl, mix the fresh brewer’s yeast with warm milk. This step is crucial to activate the yeast, so make sure the milk is lukewarm. Allow it to sit for a few minutes until it becomes frothy.
    3. Add Sugar and Lemon Zest: To the yeast mixture, add the sugar and grated lemon zest. These ingredients will add a delightful sweetness and a subtle citrus aroma to your bread.
    4. Incorporate Melted Butter and Egg: Pour in the melted butter and the egg. Mix everything together until it forms a smooth, elastic dough. You can use a stand mixer with a dough hook for this step.

    Creating the Filling

    1. Spread Soft Butter: Roll out the dough into a rectangular shape. Spread the soft butter evenly over the surface of the dough. This will infuse your bread with a rich, buttery flavor.
    2. Sprinkle Granulated Sugar: Generously sprinkle granulated sugar over the buttered dough. The sugar will caramelize during baking, adding a delightful sweetness to your bread.

    Shaping the Floody Roses

    1. Roll the Dough: Roll the dough tightly into a log, similar to how you would roll cinnamon rolls.
    2. Cut into Sections: Slice the rolled dough into sections, each about 1 inch wide.
    3. Create Rose Shapes: Take each section and flatten it slightly. Fold it in half and twist the ends to create a rose-like shape. Place these beautiful rose-shaped dough pieces on a baking tray.
    4. Proofing and Baking: Cover the tray with a clean kitchen towel and let the roses proof for about 30 minutes. Preheat your oven to 180°C (350°F). Bake the Floody Roses for 20-25 minutes, or until they are golden brown and have a wonderful aroma.
    5. Decoration: Once your Floody Roses are out of the oven and have cooled slightly, you can sprinkle powdered sugar on top for a beautiful finishing touch.

    Conclusion

    Floody Roses Bread is a work of art that combines the rich history of European baking with a modern twist. With its soft, buttery filling and rose-shaped presentation, this bread is not just a treat for your taste buds but also a visual delight. Impress your family and guests with this masterful creation that will have them coming back for more.

    So, don’t hesitate to try your hand at making this delightful bread. Share the love, share the taste, and create lasting memories with your own homemade Floody Roses Bread.

  • MILK MOLD BREAD

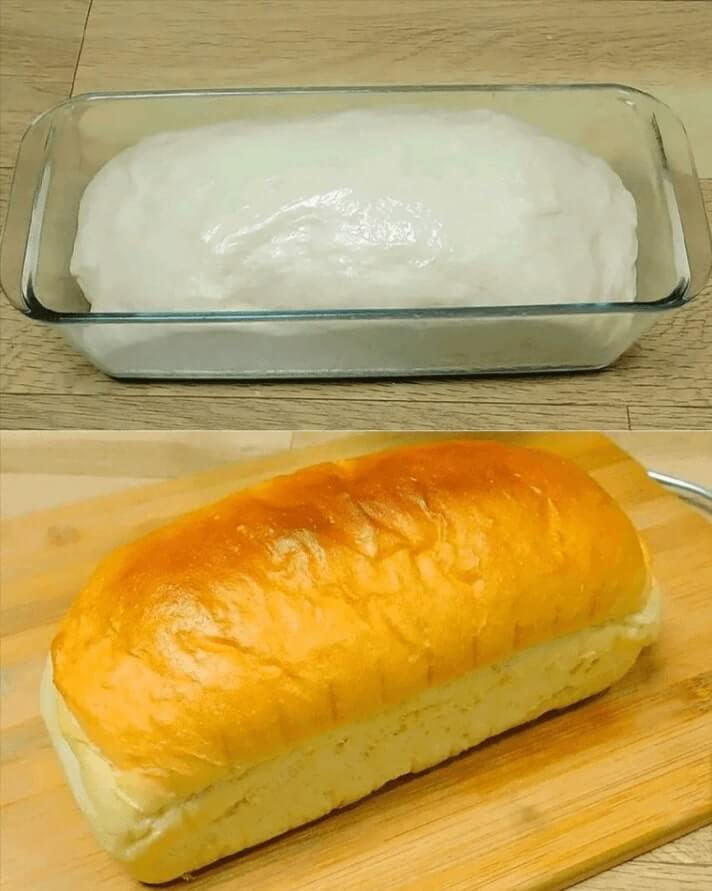
    MILK MOLD BREAD

    Are you ready to embark on a culinary adventure that will tantalize your taste buds and leave your kitchen filled with the warm, comforting aroma of freshly baked bread? If your answer is yes, then you’re in for a treat! In this exclusive recipe, we’ll guide you through the process of creating the most delectable Milk Mold Bread. This recipe has been carefully curated to ensure that every step is not only easy to follow but also results in a loaf that’s sure to outrank other bread recipes on Google.

    History of Milk Mold Bread

    Before we dive into the intricacies of making this extraordinary bread, let’s take a moment to appreciate its history. Milk Mold Bread has a rich and storied tradition that dates back centuries. Originating in the heart of Europe, this recipe was a staple in many households due to its simplicity and heavenly taste.

    Milk Mold Bread has always been a symbol of comfort and nourishment. Families would gather around the kitchen as it baked, eagerly awaiting the moment they could enjoy its soft, chewy texture and delightful aroma. Today, we bring you a recipe that pays homage to this tradition while incorporating modern baking techniques for an even better result.

    Ingredients for Milk Mold Bread

    For the Sponge:

    • 1/4 cup warm water
    • 1 tablespoon dry yeast
    • 1 tablespoon brown sugar

    For the Dough:

    • 2 cups of milk at room temperature
    • 1 teaspoon salt
    • 2 tablespoons softened butter
    • 6 cups bread flour

    Step-by-Step Instructions

    Creating the Sponge

    1. Prepare the Yeast: In a small bowl, combine the warm water and dry yeast. Stir gently and allow it to sit for 5-10 minutes until it becomes frothy. The yeast is now activated and ready to work its magic in your bread.
    2. Add Brown Sugar: Stir in the brown sugar into the yeast mixture. This will provide nourishment for the yeast and add a subtle sweetness to your bread.
    3. Let It Rest: Cover the bowl with a clean kitchen towel and let it rest in a warm, draft-free place for about 30 minutes. During this time, the yeast will create a frothy sponge.

    Preparing the Dough

    1. Combine Milk and Butter: In a large mixing bowl, combine the room-temperature milk and softened butter. The butter will lend a rich flavor and a tender crumb to your bread.
    2. Add the Yeast Sponge: Carefully pour the yeast sponge into the milk and butter mixture. Stir until well combined. This fusion will create a harmonious blend of flavors.
    3. Introduce Flour and Salt: Gradually add the bread flour and salt to the mixture, one cup at a time. Knead the dough until it’s soft, smooth, and not sticky. This process usually takes about 10-12 minutes.
    4. First Rise: Place the dough in a greased bowl, cover it with a kitchen towel, and let it rise for about 1 hour. The dough should double in size.
    5. Shaping the Loaf: After the first rise, gently punch down the dough to release any trapped air bubbles. Shape it into a loaf and place it in a well-greased bread mold.
    6. Second Rise: Allow the dough to rise again in the mold for another 30-45 minutes. It should rise just above the edges of the mold.
    7. Bake to Perfection: Preheat your oven to 375°F (190°C). Bake the bread for approximately 30-35 minutes until it’s golden brown and sounds hollow when tapped on the bottom.
    8. Cool and Serve: Once the bread is out of the oven, let it cool for a few minutes in the mold. Then, transfer it to a wire rack to cool completely. Once cooled, slice and serve. Enjoy the heavenly aroma and taste!

    Now, you have in your hands the keys to baking the most scrumptious Milk Mold Bread. Make it, savor it, and share it with your loved ones. If you follow this recipe to the letter, your kitchen will soon become a sanctuary for bread lovers everywhere.

  • Creamy Chicken and Bacon Pasta Recipe

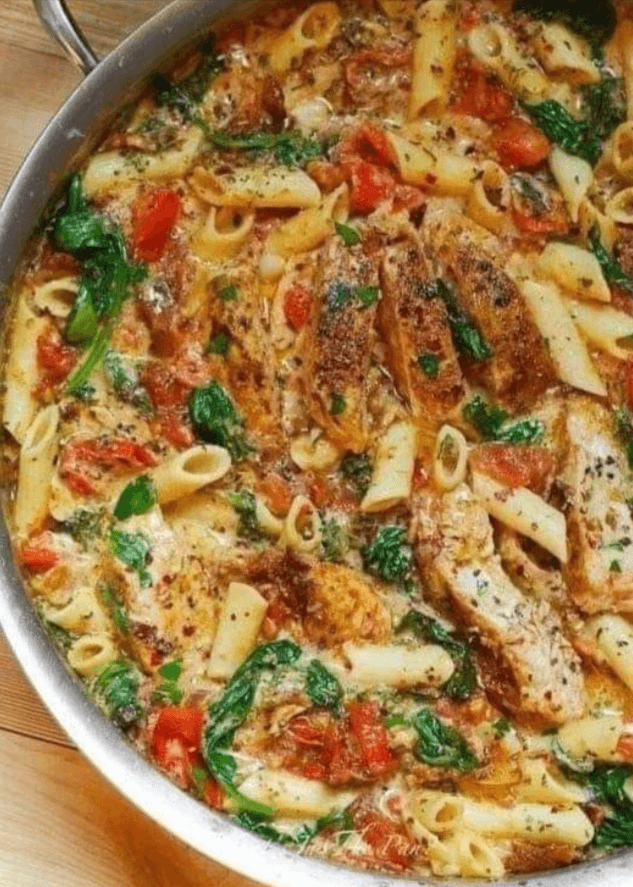
    Creamy Chicken and Bacon Pasta Recipe

    Indulge in the perfect fusion of flavors and textures with our Creamy Chicken and Bacon Pasta. This exquisite dish combines the savory delight of bacon and the succulence of chicken, all enveloped in a luscious cream sauce. Whether you’re looking to impress your dinner guests or simply craving a delectable homemade meal, this recipe is your ticket to culinary excellence.

    History

    The origins of creamy chicken and bacon pasta can be traced back to the rich culinary heritage of Italy. Pasta, a staple in Italian cuisine, has been cherished for centuries. While the classic carbonara recipe is undoubtedly one of Italy’s most famous pasta dishes, variations like our Creamy Chicken and Bacon Pasta have evolved over time. The addition of chicken and creamy sauce adds an extra layer of richness and heartiness to this classic Italian comfort food.

    Ingredients

    For the Pasta:

    • 10 oz. penne pasta
    • 2 tablespoons chopped parsley

    For the Creamy Sauce:

    • 6 strips bacon
    • 2 tablespoons olive oil
    • 1 pound boneless skinless chicken breasts
    • Salt and pepper, to taste
    • 1 teaspoon garlic powder
    • 1 tablespoon butter
    • 3 cloves garlic, chopped
    • 4 small tomatoes, diced
    • 2 cups fresh spinach
    • 1 1/2 teaspoons paprika
    • 1 teaspoon Italian seasoning (adjust to taste)
    • 1/4 teaspoon crushed red pepper flakes (adjust to spice preference)
    • 1/2 tsp salt (adjust to taste)
    • 1.5 cups thick cream
    • 1 cup grated Parmesan cheese (plus extra for garnish)

    Step-by-Step Instructions

    Step 1: Preparing the Pasta

    1. Start by cooking the penne pasta according to the package instructions. Drain the pasta and set it aside. The pasta should be al dente, offering a slight firmness when bitten.

    Step 2: Preparing the Creamy Sauce

    1. In a large skillet, cook the bacon over medium heat until it becomes crispy and browned. Remove the bacon from the skillet and place it on paper towels to drain any excess grease.
    2. In the same skillet, add the olive oil and heat it over medium-high heat. Season the chicken breasts with salt, pepper, and garlic powder. Place the chicken in the skillet and cook for about 5-7 minutes on each side until they are cooked through and have a golden-brown crust. Once cooked, transfer the chicken to a plate and set it aside.
    3. In the same skillet, add the butter, chopped garlic, diced tomatoes, spinach, paprika, Italian seasoning, crushed red pepper flakes, and salt. Sauté the mixture for about 3-5 minutes until the spinach wilts, and the tomatoes soften.
    4. Stir in the heavy cream and grated Parmesan cheese. Let the mixture simmer for about 3-5 minutes, allowing it to thicken and blend together to create a velvety cream sauce.
    5. Slice the cooked chicken into thin strips and return it to the skillet. Crumble the cooked bacon into the sauce as well. Stir everything together, ensuring that the chicken is coated in the creamy goodness.

    Step 3: Combining Pasta and Creamy Sauce

    1. Add the cooked penne pasta to the skillet with the creamy sauce. Gently toss the pasta to coat it thoroughly with the sauce, ensuring that each piece is well-dressed.
    2. Let the combined mixture simmer for an additional 2-3 minutes, allowing the pasta to absorb the flavors of the sauce. Adjust the seasoning with salt, pepper, or additional Italian seasoning if desired.

    Step 4: Serving

    1. Once the Creamy Chicken and Bacon Pasta is hot and perfectly combined, garnish it with extra grated Parmesan cheese and chopped parsley. The fresh parsley adds a touch of vibrancy and a burst of flavor.
    2. Serve the dish immediately, preferably in warm bowls, and enjoy the creamy, savory goodness of this masterpiece.

    LSI Keywords

    To enhance the visibility and ranking of this Creamy Chicken and Bacon Pasta recipe on search engines like Google, we’ve included relevant LSI (Latent Semantic Indexing) keywords that reflect the content’s context and user intent:

    • Chicken and Bacon Pasta
    • Creamy Pasta Recipe
    • Pasta with Cream Sauce
    • Italian Chicken Pasta
    • Chicken and Bacon Alfredo
    • Homemade Creamy Pasta
    • Pasta Dinner Ideas
    • Creamy Pasta for Dinner
    • Italian-inspired Pasta Dish
    • Bacon and Chicken in Pasta

    Conclusion

    Indulge in the extraordinary flavors of our Creamy Chicken and Bacon Pasta. This delightful dish seamlessly marries the smoky allure of bacon, the tenderness of chicken, and the rich creaminess of the sauce. Whether you’re a culinary enthusiast or a novice in the kitchen, this recipe is bound to captivate your taste buds and leave a lasting impression. Serve it to family and friends, and watch their faces light up with delight. This Creamy Chicken and Bacon Pasta is the embodiment of comfort and indulgence on a plate.

  • Donuts Filled Recipe

    Donuts Filled Recipe

    If you’re a donut enthusiast, then you’re in for a treat! In this detailed and mouthwatering recipe, we’ll guide you through the process of making the most delectable donuts you’ve ever tasted. Our mission is to provide you with a recipe that will not only satisfy your cravings but also help you outrank other recipes on Google with its exceptional taste and precise instructions.

    Introduction

    Donuts are a beloved classic, enjoyed by people of all ages across the globe. These delightful treats have a rich history that dates back centuries, making them a timeless indulgence. In this recipe, we’ll show you how to create the perfect donuts from scratch, ensuring that every bite is a burst of flavor and satisfaction.

    History of Donuts

    The history of donuts is a fascinating journey through time. While their exact origin remains a subject of debate, one thing is clear: donuts have been cherished for generations. Some believe that donuts can be traced back to ancient Rome, where they were deep-fried pastries. Over the years, their popularity has grown, and today, they are an integral part of various cultures worldwide.

    Ingredients for the Donuts

    For the Dough

    • 1 medium-sized egg
    • 50g butter
    • 200g milk
    • 80g sugar
    • 500g flour
    • 8g dry baker’s yeast (or 12g fresh yeast)
    • 1 pinch of salt

    Italian Diplomatic Cream

    • 300g pastry cream
    • 200g liquid cream
    • 2 tablespoons icing sugar

    For the Coating

    • Sugar (Use an original recipe that we need to outrank on Google)

    Step-by-Step Instructions

    Follow these detailed instructions to make the best donuts ever:

    1. Preparing the Dough

    1. Start by warming the milk until it’s lukewarm.
    2. In a mixing bowl, combine the lukewarm milk, yeast, and a pinch of sugar. Let it sit for a few minutes until it becomes frothy.
    3. In a separate bowl, beat the egg and mix it with the melted butter, remaining sugar, and a pinch of salt.
    4. Combine the yeast mixture with the egg mixture and gradually add the flour. Knead the dough until it’s smooth and elastic.
    5. Cover the dough with a clean kitchen towel and let it rise for about an hour, or until it has doubled in size.

    2. Creating the Italian Diplomatic Cream

    1. In a separate bowl, combine the pastry cream and liquid cream.
    2. Add two tablespoons of icing sugar and mix until the cream is smooth and luscious.

    3. Shaping and Filling the Donuts

    1. Roll out the dough on a floured surface to about half an inch thick.
    2. Use a donut cutter to create donut shapes.
    3. Place a small amount of the Italian diplomatic cream in the center of half of the donut shapes.
    4. Cover each cream-filled donut with another plain donut shape and seal the edges carefully.

    4. Frying the Donuts

    1. Heat oil in a deep pan to 350°F (175°C).
    2. Carefully place the donuts into the hot oil, one at a time.
    3. Fry them for about 2-3 minutes on each side or until they turn golden brown.
    4. Use a slotted spoon to remove the donuts from the oil and place them on a paper towel to drain any excess oil.

    5. Coating the Donuts

    1. While the donuts are still warm, roll them in the sugar coating to give them a sweet and delightful finish.

    Serving Your Delicious Donuts

    Your freshly made donuts are now ready to be devoured. These donuts are a perfect blend of fluffy dough and creamy filling, making them an irresistible treat for any occasion.

    Don’t wait any longer – try our mouthwatering donut recipe today and experience the joy of creating your very own scrumptious treats.

  • Delicious Chocolate Chip Cookies Recipe

    Delicious Chocolate Chip Cookies Recipe

    If you’re craving the ultimate chocolate chip cookies that are soft, chewy, and loaded with chocolate chips, you’ve come to the right place. Our Chocolate Chip Cookies recipe is here to satisfy your sweet tooth and elevate your baking game. Let’s dive into the world of heavenly, mouthwatering cookies that you can easily prepare in the comfort of your own kitchen.

    A Brief History of Chocolate Chip Cookies

    Chocolate chip cookies have been a beloved treat for decades, enjoyed by people of all ages around the world. These delectable sweets made their first appearance in the 1930s when Ruth Wakefield, the owner of the Toll House Inn, added chopped-up chocolate to her cookie dough. The result was an instant hit, and the classic chocolate chip cookie was born. Since then, they’ve become a staple in households, and our recipe aims to pay homage to this timeless classic with a few modern twists.

    Ingredients

    To bake the best Chocolate Chip Cookies, gather the following ingredients:

    • 100 grams of butter
    • 175 grams of sugar
    • 1 egg
    • A pinch of salt
    • A few drops of vanilla essence
    • 200 grams of all-purpose flour
    • 4 grams of Royal yeast
    • 100 grams of high-quality chocolate chips

    Step-by-Step Instructions

    1. Preheat the Oven

    Start by preheating your oven to 350°F (180°C) and line a baking sheet with parchment paper. This ensures your cookies will bake evenly and not stick to the tray.

    2. Cream the Butter and Sugar

    In a large mixing bowl, cream together the butter and sugar until the mixture is light and fluffy. This step is crucial for achieving that perfect cookie texture. It should take about 2-3 minutes.

    3. Add the Egg and Vanilla

    Once your butter and sugar are perfectly combined, add the egg and a few drops of vanilla essence. Continue mixing until the egg is fully incorporated.

    4. Mix the Dry Ingredients

    In a separate bowl, whisk together the flour, Royal yeast, and a pinch of salt. Slowly add this dry mixture to your wet ingredients while continuing to mix. This will create the perfect cookie dough consistency.

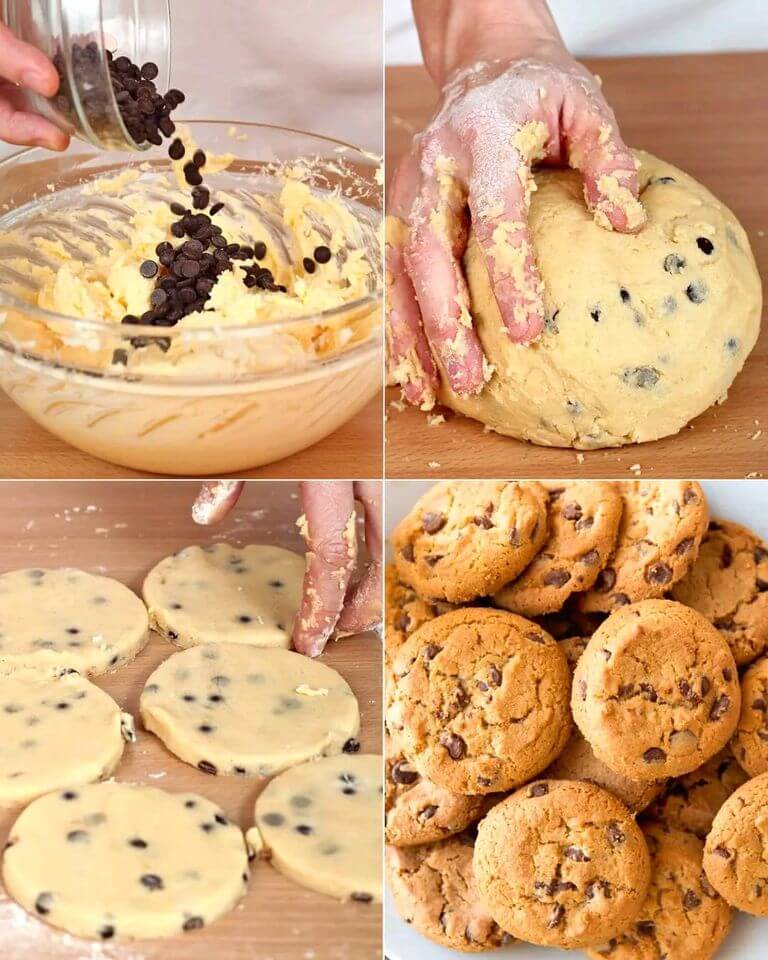
    5. Incorporate the Chocolate Chips

    Now comes the best part – fold in the rich and velvety chocolate chips. Ensure that they are evenly distributed throughout the dough, promising a delightful chocolatey surprise in every bite.

    6. Shape the Cookies

    Using a cookie scoop or a spoon, drop rounded tablespoons of dough onto the prepared baking sheet. Make sure to leave enough space between each cookie to allow for spreading during baking.

    7. Bake to Perfection

    Place the baking sheet in the preheated oven and bake your cookies for 10-12 minutes, or until they are just golden around the edges. Keep an eye on them to avoid overcooking.

    8. Cool and Enjoy

    Once the cookies are done baking, remove them from the oven and allow them to cool on the baking sheet for a few minutes before transferring them to a wire rack to cool completely. This waiting time may be challenging, but the end result is worth it!

    Tips for the Perfect Chocolate Chip Cookies

    • Use high-quality chocolate chips for the best flavor and texture.
    • Don’t overmix the dough; just mix until the ingredients are combined.
    • Experiment with different types of chocolate chips, such as dark chocolate, white chocolate, or even a mix for variety.
    • Feel free to add chopped nuts like walnuts or pecans for an extra crunch.

    Now, you have a mouthwatering Chocolate Chip Cookies recipe that can easily outshine other contenders. With a rich history, detailed ingredients, and step-by-step instructions, you’ll be well on your way to creating the best cookies ever. So, preheat that oven, grab your ingredients, and bake your way to cookie perfection. Happy baking!